🎄 No-Bake Christmas Sugar Cookie Bars 🍪✨
Introduction
There are some desserts that don’t just taste delicious—they bring back memories. These No-Bake Christmas Sugar Cookie Bars are the kind of treat that fills the kitchen with the feeling of Christmas before the first present is even opened.
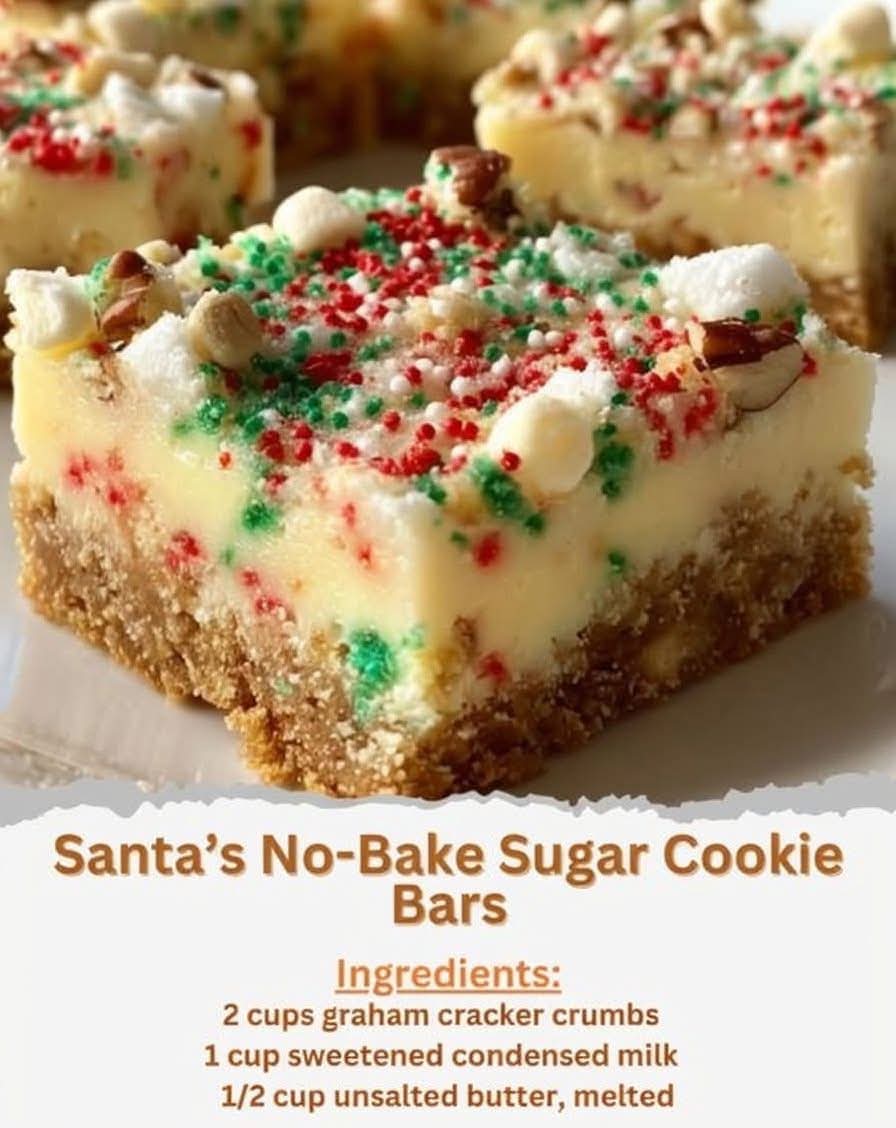
Imagine a buttery graham cracker crust topped with a creamy white-chocolate and sweetened-condensed-milk layer, finished with colorful holiday sprinkles, fluffy mini marshmallows, and crushed candy canes. Every bite is sweet, creamy, crunchy, and wonderfully festive.
Best of all, these bars require no oven, no rolling pin, and no complicated cookie dough. When your holiday kitchen is already busy with cakes, pies, cookies, and dinner, this easy refrigerator dessert can come to the rescue.
They are perfect for Christmas Eve gatherings, cookie exchanges, holiday parties, dessert tables, or simply enjoying with a cup of coffee or hot chocolate while wrapping presents.
🍪 Ingredients
For the Graham Cracker Base
- 2 cups graham cracker crumbs
- ½ cup unsalted butter, melted
For the Creamy Sugar Cookie Layer
- 1 cup sweetened condensed milk
- 1 teaspoon vanilla extract
- 1 cup white chocolate chips, melted
For the Festive Topping
- Holiday sprinkles, preferably red, green, and white
- ½–1 cup mini marshmallows
- ¼ cup crushed candy canes or peppermint pieces
- Extra white chocolate chips, optional
- Extra festive sprinkles, optional
🥣 Equipment
- 8×8-inch or 9×9-inch baking pan
- Parchment paper
- Mixing bowls
- Rubber spatula
- Measuring cups and spoons
- Microwave-safe bowl
- Sharp knife
👩🍳 Instructions
Step 1: Prepare the Pan
Line an 8×8-inch or 9×9-inch baking pan with parchment paper, leaving some parchment hanging over the sides.
This makes it much easier to remove the finished bars later.
For especially easy removal, lightly grease the pan before placing the parchment inside.
Step 2: Make the Buttery Graham Cracker Base
Place the graham cracker crumbs in a mixing bowl.
Pour in the melted unsalted butter and stir thoroughly until every crumb is coated.
The mixture should resemble wet sand and should hold together when pressed between your fingers.
Transfer the mixture to the prepared pan.
Using the back of a spoon, the bottom of a measuring cup, or your fingers, press the crumbs firmly and evenly across the entire bottom.
Take your time with this step. A firmly packed crust will give the bars a beautiful foundation and prevent them from falling apart when sliced.
Step 3: Prepare the Sugar Cookie Layer
In another bowl, add the sweetened condensed milk and vanilla extract.
Stir until smooth and well combined.
The vanilla adds that familiar warm flavor associated with classic sugar cookies.
Step 4: Melt the White Chocolate
Place the white chocolate chips in a microwave-safe bowl.
Microwave for approximately 20 seconds at a time, stirring well after each interval.
Continue until the chocolate is smooth and melted.
Do not overheat the chocolate. White chocolate can become thick or seize if overheated.
If necessary, let it sit for a few seconds and continue stirring until completely smooth.
Step 5: Combine the Creamy Layer
Slowly add the melted white chocolate to the sweetened condensed milk mixture.
Stir continuously until everything is completely incorporated.
The mixture should become thick, creamy, glossy, and smooth.
This is the layer that gives the bars their rich, sweet, almost sugar-cookie-dough-like flavor.
Step 6: Form the Bars
Pour the creamy white-chocolate mixture over the graham cracker crust.
Use a rubber spatula to spread it evenly from corner to corner.
Try to create a smooth surface so the toppings will sit beautifully on top.
🎄 Step 7: Decorate
While the creamy layer is still soft, immediately sprinkle the top with your Christmas decorations.
Add:
- Red and green holiday sprinkles
- White sprinkles
- Mini marshmallows
- Crushed candy canes
- Peppermint pieces
- Extra white chocolate chips, if desired
Gently press larger toppings into the surface so they stay attached after chilling.
This is the fun part, so don’t be afraid to make them colorful!
❄️ Step 8: Chill
Place the pan in the refrigerator.
Chill for at least 3 hours, or preferably until completely firm.
For the cleanest slices, you can refrigerate them overnight.
The chilling process allows the chocolate layer to firm up and the graham cracker crust to become sturdy enough to cut.
🔪 Step 9: Slice
Once completely set, remove the pan from the refrigerator.
Lift the bars out using the parchment-paper edges.
Place them on a cutting board.
Using a sharp knife, cut into squares or rectangles.
For cleaner cuts, wipe the knife between slices.
✨ Formation of the Dessert
These Christmas bars are made from three delicious layers:
1. Buttery Graham Cracker Layer
The bottom layer provides a slightly crisp, buttery foundation. The graham crackers add a subtle toasted flavor that balances the sweetness of the topping.
2. Creamy Sugar Cookie Layer
The combination of sweetened condensed milk, vanilla, and melted white chocolate creates a rich, smooth center.
This layer is sweet, creamy, and reminiscent of classic sugar cookie dough.
3. Christmas Topping
The final layer transforms a simple no-bake dessert into a festive holiday centerpiece.
Bright sprinkles, fluffy marshmallows, and crushed peppermint give the bars color, texture, and a wonderful Christmas aroma.
🎅 A Little Holiday History
No-bake desserts have long been loved by home bakers because they make entertaining easier, especially during busy celebrations.
Traditional refrigerator bars, chocolate refrigerator cakes, graham cracker treats, and condensed-milk desserts became popular because they could be prepared without relying on an oven.
Graham crackers also became a familiar ingredient in American home baking, particularly in easy crusts and refrigerator desserts.
Meanwhile, sugar cookies became strongly associated with Christmas through generations of holiday baking. Families decorated them with colorful sugar, icing, sprinkles, and festive shapes.
This recipe brings those traditions together in a simpler form: the comforting flavor of Christmas sugar cookies without the work of rolling, cutting, and baking individual cookies.
❤️ Why Everyone Loves These Bars
There are so many reasons to love this recipe:
- No oven required
- Very easy to prepare
- Perfect for beginners
- Great for Christmas parties
- Beautiful on a holiday dessert table
- Easy to make ahead
- Fun to decorate with children
- Rich and creamy texture
- Buttery graham cracker crust
- Festive peppermint flavor
- Easy to cut into bite-sized pieces
They’re especially wonderful when you’re already preparing several other holiday desserts.
🍬 Topping Variations
You can completely customize the decoration.
Classic Christmas
Use red, green, and white sprinkles with crushed candy cane.
Peppermint Lovers
Add extra crushed peppermint and a drizzle of melted white chocolate.
Chocolate Lovers
Add mini chocolate chips or drizzle the finished bars with melted milk or dark chocolate.
Snowy Christmas
Use white sprinkles, white chocolate curls, and mini marshmallows.
Candy Cane Crunch
Add a generous layer of crushed peppermint candies for an extra festive crunch.
Kids’ Christmas Bars
Let children decorate their own portions with different sprinkles and mini candies.
☕ Serving Suggestions
These bars are wonderful served chilled alongside:
- Hot chocolate
- Coffee
- Vanilla latte
- Hot tea
- Peppermint tea
- Eggnog
- Warm milk
Arrange them on a festive Christmas platter and sprinkle a few extra candy cane pieces around the plate.
They also make a lovely addition to a holiday cookie tray.
🎁 Make-Ahead Instructions
These bars are excellent for preparing ahead of time.
You can make them one or two days before serving and keep them refrigerated in an airtight container.
Place parchment paper between layers if stacking them.
For the best texture and appearance, keep them chilled until you’re ready to serve.
❄️ Storage
Store the finished bars in an airtight container in the refrigerator.
They are best enjoyed chilled because the white chocolate layer stays firm and creamy.
If you’re preparing them for a party, take them out shortly before serving so they can soften slightly while remaining firm enough to hold their shape.
👩🍳 Helpful Tips for Perfect Bars
Press the crust firmly
A loosely packed crust can crumble when you cut the bars.
Don’t overheat the white chocolate
Use short microwave intervals and stir frequently.
Decorate immediately
The toppings need to be added while the creamy layer is still soft.
Chill completely
Don’t rush the refrigeration step. The bars need enough time to become firm.
Use parchment paper
This makes removing and slicing the bars dramatically easier.
Chill before cutting
For beautiful squares, make sure the dessert is completely set before slicing.
🎄 The Perfect Christmas Memory
There is something special about making a dessert while Christmas music plays in the background, presents are waiting to be wrapped, and the whole house smells sweet and festive.
These bars are not meant to be complicated.
They’re meant to be easy, joyful, colorful, and delicious.
They’re the kind of dessert you can make with your family, decorate with your children, bring to a Christmas party, or quietly enjoy after everyone else has gone to bed.
And sometimes the simplest desserts become the recipes people remember the longest.
❤️ For the Christmas Dessert Lovers
If you’re a lover of sugar cookies, white chocolate, peppermint, graham crackers, and easy no-bake desserts, these bars are made for you.
If you love Christmas baking but don’t want to spend hours rolling dough and waiting for batches of cookies to bake, this recipe gives you all the festive sweetness with a fraction of the effort.
One pan can create a whole tray of beautiful Christmas treats—and they tend to disappear quickly!
🎅 Conclusion
These No-Bake Christmas Sugar Cookie Bars are more than just an easy dessert. They’re a little taste of holiday nostalgia.
The buttery graham cracker crust, creamy white-chocolate sugar-cookie layer, colorful sprinkles, fluffy marshmallows, and peppermint crunch come together to create a dessert that’s rich, festive, and incredibly satisfying.
Make them on Christmas Eve while wrapping presents. Make them for a holiday party. Make them for a cookie exchange. Or make them simply because you want something sweet and festive in the refrigerator.
And when someone asks where you bought them, you can smile and say:
“I made them myself.” 🎄🍪❤️
🎄 Final Question for Fellow Christmas Lovers:
Would you go all-in with extra crushed candy canes and peppermint pieces, or keep these beautiful Christmas bars simple with just red-and-green sprinkles?