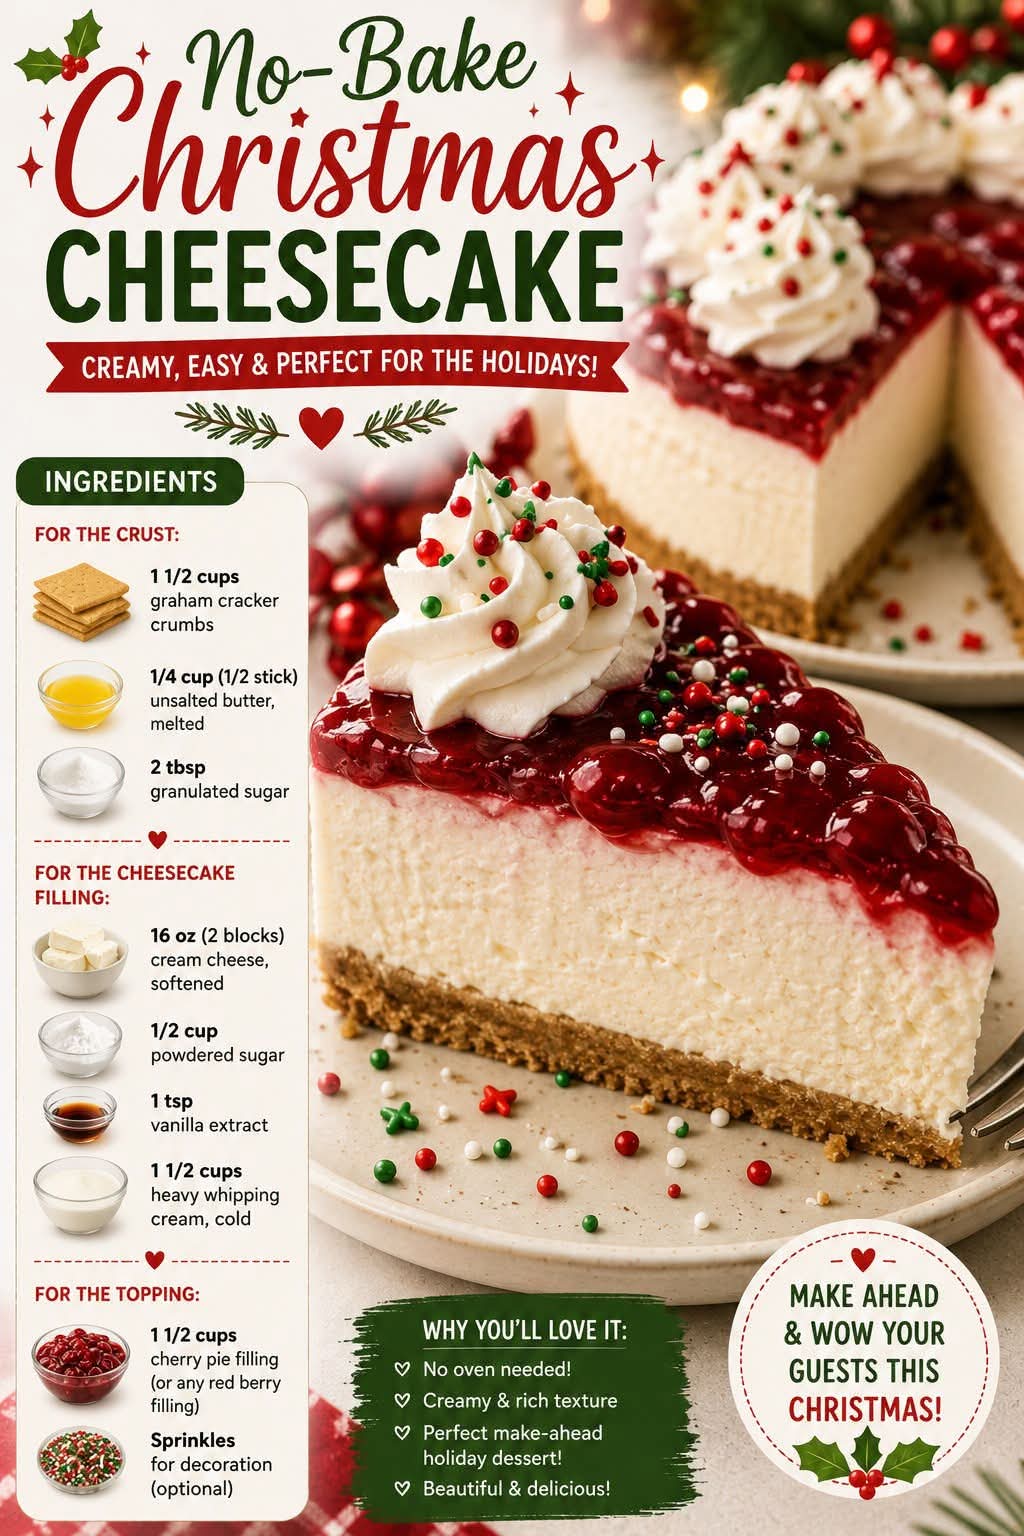
🎄❤️ Creamy No-Bake Christmas Cheesecake with Cherry Topping
Introduction
Christmas is the perfect time for desserts that look spectacular without requiring hours in the kitchen. This Creamy No-Bake Christmas Cheesecake is rich, smooth, festive, and wonderfully easy to prepare.
A buttery graham cracker crust is topped with a luscious cheesecake filling made with cream cheese, whipped cream, sugar, and vanilla. The cheesecake is finished with a beautiful ruby-red cherry topping, creating a classic Christmas combination of white, red, and golden-brown.
Best of all, there is no oven required. Simply prepare the crust and filling, assemble everything, refrigerate until firm, and decorate before serving. It is an excellent make-ahead dessert for Christmas Eve, holiday parties, family dinners, potlucks, and gatherings.
🎄 Recipe at a Glance
Prep Time: 30 minutes
Chilling Time: 6 hours, preferably overnight
Servings: 10–12 slices
Difficulty: Easy
Method: No-bake
Occasion: Christmas, holidays, parties, family gatherings
❤️ Ingredients
For the Graham Cracker Crust
- 2½ cups graham cracker crumbs
- ½ cup unsalted butter, melted
- ¼ cup granulated sugar
- 1 teaspoon vanilla extract
- Pinch of salt
For the Creamy Cheesecake Filling
- 24 oz (680 g) cream cheese, softened to room temperature
- 1 cup powdered sugar
- 2 teaspoons vanilla extract
- 1 tablespoon fresh lemon juice
- 1½ cups heavy whipping cream, very cold
- ¼ cup powdered sugar, for whipping the cream
For the Festive Cherry Topping
- 1 can (21 oz/595 g) cherry pie filling
- ½ teaspoon vanilla extract, optional
- 1 teaspoon lemon juice, optional
For Christmas Decoration — Optional
- Whipped cream
- Fresh cherries
- White chocolate shavings
- Red and green sprinkles
- Crushed candy canes
- Powdered sugar
- Small rosemary sprigs for decoration
- Red or green Christmas sugar pearls
🌟 Equipment
- 9-inch springform pan
- Mixing bowls
- Electric hand mixer or stand mixer
- Food processor, if making your own crumbs
- Rubber spatula
- Measuring cups and spoons
- Refrigerator
🍰 Method 1: Prepare the Graham Cracker Crust
Step 1: Crush the crackers
Place the graham crackers in a food processor and pulse until they become fine crumbs.
If you don’t have a food processor, place the crackers in a sealed bag and crush them with a rolling pin.
Step 2: Mix the crust
Place the crumbs in a bowl.
Add the melted butter, sugar, vanilla, and a small pinch of salt.
Mix thoroughly until every crumb is lightly coated with butter. The mixture should resemble wet sand and hold together when pressed.
Step 3: Form the crust
Line the bottom of a 9-inch springform pan with parchment paper.
Pour the crumb mixture into the pan.
Using the bottom of a measuring cup or glass, firmly press the crumbs into an even layer.
For an especially beautiful cheesecake, press some of the crumbs slightly up the sides of the pan.
Step 4: Chill
Place the crust in the refrigerator while preparing the cheesecake filling.
Chill for at least 20–30 minutes.
🥄 Method 2: Make the Creamy Cheesecake Filling
Step 1: Beat the cream cheese
Place the softened cream cheese in a large mixing bowl.
Beat on medium speed until completely smooth and creamy.
Make sure there are no lumps.
Step 2: Add the sweet ingredients
Add the powdered sugar gradually.
Beat until incorporated.
Add the vanilla extract and lemon juice.
Mix again until the filling is silky smooth.
The small amount of lemon juice helps balance the sweetness and gives the cheesecake a pleasant, fresh flavor.
Step 3: Whip the cream
In a separate cold bowl, add the chilled heavy whipping cream.
Beat until it begins to thicken.
Gradually add the remaining powdered sugar.
Continue beating until stiff peaks form.
Be careful not to overbeat the cream.
Step 4: Combine the mixtures
Add approximately one-third of the whipped cream to the cream cheese mixture.
Gently fold it in with a rubber spatula.
Continue adding the remaining whipped cream in two additions.
Fold gently until the mixture is completely combined and fluffy.
Do not aggressively stir—the goal is to keep as much air in the whipped cream as possible.
🎄 Method 3: Assemble the Cheesecake
Remove the chilled crust from the refrigerator.
Spoon the cheesecake filling over the crust.
Spread it evenly using a spatula.
Smooth the surface as much as possible.
For an extra festive presentation, create gentle decorative swirls across the top.
❄️ Method 4: Chill Until Firm
Cover the cheesecake loosely with plastic wrap or foil.
Refrigerate for at least 6 hours.
For the best texture, refrigerate overnight.
This chilling time allows the filling to firm up and makes the cheesecake much easier to slice.
🍒 Method 5: Add the Cherry Topping
When the cheesecake is completely chilled, carefully spoon the cherry pie filling over the top.
Spread the cherries toward the edges while leaving some of the creamy cheesecake visible.
The bright red cherries against the white cheesecake create a beautiful Christmas appearance.
If desired, add a little whipped cream around the edges.
✨ Method 6: Decorate for Christmas
Now comes the fun part!
Decorate the cheesecake with:
- Whipped cream rosettes
- Fresh cherries
- White chocolate curls
- Red and green sprinkles
- Crushed candy cane
- Powdered sugar
- Christmas sugar pearls
For an elegant look, keep the decoration simple: cherry topping in the center, whipped cream around the border, and a few white chocolate shavings.
🔪 Method 7: Slice and Serve
For clean slices, use a sharp knife.
Dip the knife into hot water, wipe it dry, and gently cut through the cheesecake.
Clean and warm the knife between slices.
Serve the cheesecake cold.
🎅 A Little Christmas History
Cheesecake itself has a long history, with early versions of cheese-based cakes appearing in ancient civilizations. Over the centuries, recipes evolved through Europe and eventually became especially popular in American baking.
The no-bake cheesecake became a favorite because it offers the creamy richness of traditional cheesecake without requiring an oven or a complicated baking process.
The combination of cheesecake and cherries is particularly appealing during the holidays. The creamy white filling and vibrant red cherries naturally create a festive Christmas color palette.
Today, no-bake cheesecakes are beloved because they can be prepared ahead of time, leaving the cook more time to enjoy Christmas celebrations with family and friends.
❤️ Formation of the Cheesecake
This dessert is built in three delicious layers:
1. Buttery Graham Cracker Base
The graham cracker crumbs provide a crunchy, buttery foundation.
2. Creamy Cheesecake Center
The cream cheese and whipped cream create a soft, airy, rich filling that melts in your mouth.
3. Festive Cherry Crown
The cherries add bright color, fruity sweetness, and a beautiful Christmas finishing touch.
Together, these layers create the perfect contrast of crunchy, creamy, and fruity.
🎄 Tips for the Perfect No-Bake Cheesecake
Use room-temperature cream cheese
Softened cream cheese blends much more easily and helps prevent lumps.
Keep your whipping cream cold
Cold heavy cream whips faster and holds its shape better.
Don’t overmix
Once the whipped cream is added, fold gently.
Give it enough chilling time
Six hours is the minimum I recommend, but overnight chilling gives the cheesecake an even better texture.
Don’t decorate too early
For the freshest appearance, add the cherry topping and decorative elements after the cheesecake has fully set.
Make it ahead
This is one of the best holiday desserts to prepare the day before your celebration.
🍓 Delicious Variations
Strawberry Christmas Cheesecake
Replace the cherry topping with strawberry pie filling or fresh strawberries.
Raspberry Cheesecake
Use raspberry sauce or raspberry pie filling for a beautiful sweet-tart flavor.
Chocolate Cherry Cheesecake
Add ¼ cup unsweetened cocoa powder to the cheesecake filling and decorate with chocolate shavings.
Peppermint Cheesecake
Add ½ teaspoon peppermint extract to the filling and decorate with crushed candy canes.
White Chocolate Cherry Cheesecake
Melt 4 oz of white chocolate, allow it to cool slightly, and carefully mix it into the cream cheese filling.
🎁 Make-Ahead Instructions
This cheesecake is ideal for holiday entertaining.
You can prepare the entire cheesecake one day before serving.
Keep it covered in the refrigerator until ready to serve.
For the best presentation, add whipped cream and decorative toppings shortly before serving.
The finished cheesecake can generally be refrigerated for several days, provided it is kept properly covered and chilled.
❤️ Why Everyone Loves This Cheesecake
There are so many reasons this dessert disappears quickly from the Christmas table:
✨ No oven required
✨ Easy to prepare
✨ Creamy and rich
✨ Beautiful Christmas colors
✨ Make-ahead friendly
✨ Perfect for parties
✨ Great for beginners
✨ Easy to customize
✨ Absolutely delicious with coffee or tea
It is the kind of dessert that looks like you spent all day making it—even though the preparation is wonderfully simple.
🎄 Serving Suggestions
Serve each slice with a spoonful of extra cherry topping.
For an extra-special Christmas dessert plate, add:
- A small dollop of whipped cream
- A few fresh cherries
- White chocolate curls
- A dusting of powdered sugar
Pair it with coffee, hot chocolate, tea, or a warm holiday drink.
❤️ Conclusion
This Creamy No-Bake Christmas Cheesecake with Cherry Topping is everything a holiday dessert should be: easy, beautiful, creamy, festive, and delicious.
The buttery graham cracker crust provides the perfect foundation for the smooth cheesecake filling, while the ruby-red cherries add a gorgeous Christmas touch and a burst of fruity flavor.
Whether you’re preparing Christmas Eve dinner, hosting a holiday party, bringing dessert to a family gathering, or simply craving something special for the season, this cheesecake is a wonderful choice.
Most importantly, it gives you more time to enjoy what Christmas is really about—family, laughter, love, and making sweet memories together. 🎄❤️
🎅 From My Kitchen to Yours
May your kitchen be filled with the smell of holiday treats, your table be surrounded by people you love, and your Christmas be filled with plenty of laughter, joy, and delicious desserts.
One slice is never enough! 🍒❤️🎄