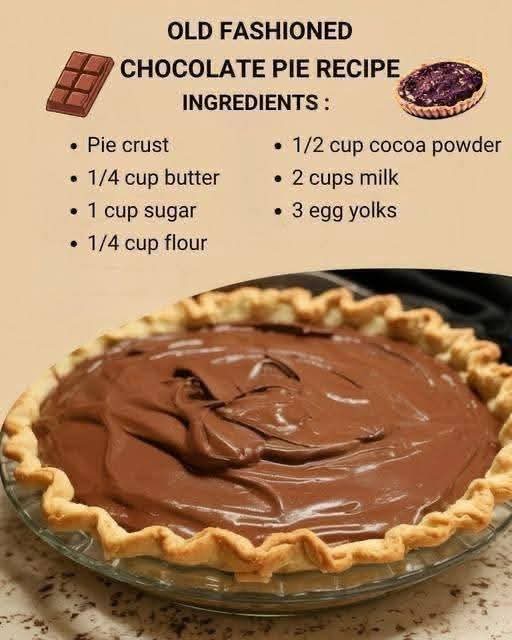
🍫 Old-Fashioned Chocolate Pie
A Silky, Creamy, Homemade Chocolate Dessert
There are some desserts that never go out of style, and Old-Fashioned Chocolate Pie is one of them. This classic pie combines a crisp, flaky crust with a rich, silky chocolate filling that tastes like something straight from Grandma’s kitchen.
Made with simple pantry ingredients—cocoa powder, sugar, milk, butter, flour, and egg yolks—this pie is wonderfully comforting without being complicated. The chocolate filling is cooked gently on the stovetop until thick and creamy, then poured into a baked pie crust and chilled until perfectly sliceable.
Serve it cold with a generous spoonful of whipped cream, or enjoy it plain for that nostalgic homemade flavor. 🍫🥧
📜 A Little History
Old-fashioned chocolate pies belong to a long tradition of American home baking, particularly Southern-style desserts. Before modern convenience foods became common, families often relied on basic ingredients already available in the kitchen to create custards, puddings, and pies.
Cocoa powder made it possible to create an intensely chocolatey dessert without needing expensive chocolate bars. Egg yolks helped create richness, while flour provided structure and thickening.
Recipes varied from family to family. Some versions were topped with meringue, some with whipped cream, and others were simply served chilled with the creamy chocolate filling exposed. That flexibility is part of the charm of this classic dessert.
🛒 Ingredients
For the Pie
- 1 prepared 9-inch pie crust, unbaked
- 1/4 cup (56 g) unsalted butter
- 1 cup (200 g) granulated sugar
- 1/4 cup (30 g) all-purpose flour
- 1/2 cup (43–45 g) unsweetened cocoa powder
- 2 cups (480 ml) whole milk
- 3 large egg yolks
- 1 teaspoon vanilla extract
- 1/4 teaspoon salt
Optional Toppings
- Whipped cream
- Chocolate shavings
- Cocoa powder
- Mini chocolate chips
- Powdered sugar
- Fresh berries
🥧 Step 1: Prepare the Pie Crust
Preheat your oven to 375°F (190°C).
Place the pie crust into a 9-inch pie plate and gently press it into the bottom and sides.
Prick the bottom of the crust several times with a fork. This helps prevent large bubbles from forming while it bakes.
For an especially neat crust, place parchment paper over the pastry and fill it with pie weights or dried beans.
Bake until the crust is lightly golden and completely cooked, usually about 15–20 minutes, depending on the crust.
Remove the weights and allow the crust to cool.
🍫 Step 2: Make the Chocolate Filling
In a medium saucepan, whisk together:
- Sugar
- Flour
- Cocoa powder
- Salt
Whisk thoroughly so the cocoa and flour are evenly distributed.
Slowly add the milk while whisking continuously. Keep whisking until the mixture becomes smooth and there are no large lumps.
Place the saucepan over medium heat.
Cook the mixture, stirring constantly, until it begins to thicken. This usually takes several minutes.
Do not walk away from the saucepan—the milk mixture can scorch on the bottom if left unattended.
🥚 Step 3: Temper the Egg Yolks
Place the three egg yolks in a separate bowl and whisk them lightly.
Once the chocolate mixture is hot and beginning to thicken, slowly pour a small amount of the hot mixture into the egg yolks while whisking constantly.
This process is called tempering.
Gradually add more hot chocolate mixture while continuing to whisk. Once the yolks have warmed up, pour the egg mixture back into the saucepan.
Return the saucepan to medium-low heat.
Continue cooking and stirring until the filling becomes thick, smooth, and glossy.
The filling should be thick enough to coat the back of a spoon.
🧈 Step 4: Add Butter and Vanilla
Remove the saucepan from the heat.
Add the butter and vanilla extract.
Stir until the butter melts completely and the filling becomes silky and shiny.
For the smoothest possible pie, you can strain the filling through a fine-mesh sieve before pouring it into the crust.
🥧 Step 5: Fill the Pie
Pour the warm chocolate filling into the cooled baked pie crust.
Use a spatula or the back of a spoon to gently smooth the surface.
Allow the pie to cool at room temperature for approximately 20–30 minutes.
Then transfer it to the refrigerator.
❄️ Step 6: Chill Until Set
Refrigerate the pie for at least 4 hours, preferably overnight.
Chilling allows the custard to fully set and makes the pie much easier to slice.
Do not rush this step. A properly chilled chocolate pie has a beautifully creamy texture while still holding its shape when cut.
🍦 Step 7: Decorate and Serve
Just before serving, top the pie with whipped cream.
For an extra-special presentation, add:
- Chocolate curls
- A light dusting of cocoa powder
- Chocolate shavings
- Fresh strawberries or raspberries
Slice with a sharp knife and serve chilled.
👩🍳 Important Cooking Methods
1. Whisking
Whisk the dry ingredients together before adding the milk. This helps prevent cocoa and flour from forming lumps.
2. Gentle Heating
Cook the chocolate filling over medium to medium-low heat. High heat can cause the milk to scorch or the eggs to scramble.
3. Constant Stirring
Keep stirring as the filling cooks. This produces a smooth custard and prevents sticking.
4. Tempering
Adding hot chocolate mixture gradually to the egg yolks prevents the yolks from cooking too quickly.
5. Proper Chilling
Allow enough refrigerator time for the filling to firm up. This is essential for beautiful slices.
💡 Secrets for the Best Chocolate Pie
Use good cocoa powder. Since cocoa is the main chocolate flavor, quality makes a noticeable difference.
Use whole milk. It creates a richer and creamier filling.
Don’t boil aggressively. Gentle cooking gives the custard a smoother texture.
Keep whisking. Continuous stirring prevents lumps and scorching.
Strain the filling if desired. This extra step creates an exceptionally smooth, restaurant-style texture.
Let it chill completely. The filling continues to set as it cools.
Use a sharp knife. For clean slices, wipe the knife between cuts.
❤️ Why Chocolate Pie Lovers Adore It
Chocolate pie lovers appreciate this dessert because it delivers everything a classic chocolate dessert should have: deep cocoa flavor, creamy custard, buttery pastry, and nostalgic homemade goodness.
It isn’t overly complicated, yet it feels special enough for holidays, Sunday dinners, birthdays, family gatherings, and celebrations.
The combination of the crisp crust and smooth chocolate filling makes every bite satisfying.
🍓 Delicious Serving Ideas
Classic
Serve chilled with whipped cream.
Extra Chocolatey
Add chocolate curls and a drizzle of chocolate sauce.
Southern-Inspired
Top generously with whipped cream or a fluffy meringue.
Berry Chocolate
Add fresh strawberries, raspberries, or cherries.
Coffeehouse Style
Serve with a cup of hot coffee or espresso.
Holiday Style
Decorate with chocolate shavings and a little powdered sugar.
🥧 Make-Ahead Instructions
This pie is excellent for making ahead.
Prepare the pie completely and refrigerate it, covered loosely, for up to 2–3 days.
For the best texture, add whipped cream shortly before serving.
Avoid freezing the finished custard pie if possible, because freezing and thawing can change the texture of the creamy filling.
📋 Quick Recipe Summary
Prep Time: 20 minutes
Bake Time: 15–20 minutes for the crust
Chilling Time: At least 4 hours
Total Time: About 5 hours
Yield: 8 slices
Difficulty: Easy to moderate
❤️ Grandma’s-Style Formation
The beauty of this pie comes from the way simple ingredients transform during cooking.
The flour and egg yolks help thicken the milk mixture. Cocoa provides the deep chocolate flavor, while sugar balances the cocoa’s natural bitterness. Butter adds richness and gives the finished filling a smooth, luxurious mouthfeel.
Once chilled inside the buttery crust, the result is a classic chocolate custard pie that is soft enough to feel creamy but firm enough to hold a beautiful slice.
🍫 Final Thoughts
Old-Fashioned Chocolate Pie is more than just a dessert—it is the kind of recipe that brings back memories of family kitchens, Sunday dinners, holidays, and homemade treats.
With its flaky crust, rich chocolate filling, and creamy texture, it proves that you don’t need complicated ingredients to make something unforgettable.
Make it for your family, bring it to a gathering, or simply keep a slice in the refrigerator for yourself. One bite of this silky chocolate pie and you’ll understand why these old-fashioned recipes continue to be loved generation after generation.
🍫🥧 If you love classic homemade desserts, this is one recipe worth saving!