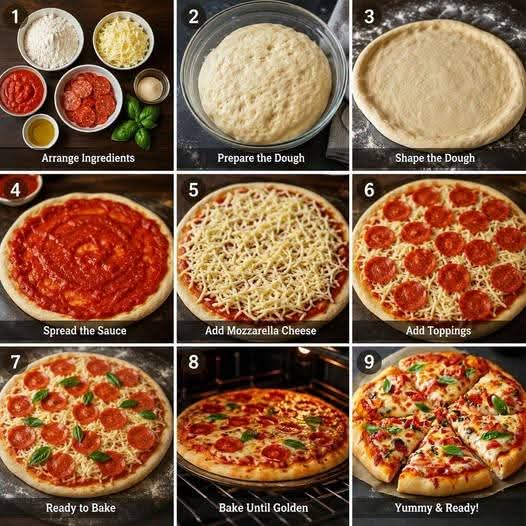
🍕 Homemade Pepperoni Pizza — Crispy, Cheesy & Irresistible
❤️ Introduction
There is something wonderfully comforting about a homemade pizza coming out of the oven: a golden, slightly crisp crust, rich tomato sauce, bubbling mozzarella, and perfectly seasoned pepperoni. This Homemade Pepperoni Pizza is simple enough for a beginner but delicious enough to become a family favorite.
The dough is soft and elastic on the inside with a beautifully golden edge. The sauce adds a rich tomato flavor, while melted mozzarella creates that irresistible stretchy cheese texture. Pepperoni brings a savory, slightly spicy taste, and bell pepper and onion add freshness, color, and crunch.
Whether you’re preparing a weekend family dinner, a casual gathering with friends, or simply craving a classic pizza night, this recipe is a wonderful choice.
🍕 Homemade Pepperoni Pizza
Makes
1 large pizza, approximately 12 inches (30 cm)
Preparation Time
20–25 minutes
Rising Time
About 1 hour
Baking Time
12–18 minutes
Total Time
Approximately 1 hour 45 minutes
🛒 Ingredients
For the Pizza Dough
- 2 cups all-purpose flour — 250 g
- ¾ cup warm water — 180 ml
- 1 tablespoon sugar — 12 g
- 1 teaspoon instant yeast — 3 g
- 1 teaspoon salt — 5 g
- 2 tablespoons vegetable oil or olive oil — 30 ml
For the Topping
- ½ cup pizza sauce — 120 g
- 1½ cups grated mozzarella cheese — 150 g
- ½ cup sliced pepperoni — 60 g
- ¼ cup chopped bell pepper — 35 g
- ¼ cup thinly sliced onion — 30 g
- 1 teaspoon dried oregano — 2 g
- Fresh basil leaves, optional
Optional Extras
For an even more flavorful pizza, you can add:
- Sliced mushrooms
- Black olives
- Jalapeños
- Cooked sausage
- Cooked chicken
- Extra mozzarella
- Parmesan cheese
- Red pepper flakes
- Garlic powder
- A drizzle of olive oil
👩🍳 Instructions
Step 1: Prepare the Yeast Mixture
Place the warm water in a large mixing bowl.
Add the sugar and instant yeast. Stir gently to combine.
Allow the mixture to stand for approximately 5 minutes.
The water should be warm rather than hot. Water that is too hot can damage the yeast.
If the mixture becomes slightly foamy, it is ready for the next step.
Step 2: Make the Pizza Dough
Add the flour and salt to the yeast mixture.
Pour in the olive oil or vegetable oil.
Mix everything together using a wooden spoon, spatula, or your hands until a soft dough begins to form.
The dough should be soft and slightly tacky but not excessively sticky.
If the dough feels very wet, add a small amount of flour, one tablespoon at a time.
If it feels too dry, add a teaspoon of water at a time.
Step 3: Knead the Dough
Transfer the dough to a lightly floured work surface.
Knead for approximately 8–10 minutes.
Push the dough away from you with the heel of your hand, fold it back toward you, turn it slightly, and repeat.
Continue kneading until the dough becomes:
- Smooth
- Soft
- Elastic
- Slightly springy
💡 Dough Test
Take a small piece of dough and gently stretch it between your fingers.
If it stretches thinly without immediately breaking, the gluten has developed nicely.
Step 4: First Rise
Lightly oil a clean bowl.
Place the dough inside and turn it once so that the surface is lightly coated with oil.
Cover the bowl with plastic wrap, a clean kitchen towel, or a reusable cover.
Place it somewhere warm and allow the dough to rise for approximately 1 hour, or until it has roughly doubled in size.
The exact rising time can vary depending on the temperature of your kitchen.
Step 5: Shape the Pizza Dough
Once the dough has doubled in size, gently press it down to release excess air.
Transfer it to a lightly floured work surface.
Shape it into a round.
Using your hands or a rolling pin, gradually stretch or roll the dough into a pizza base approximately 12 inches (30 cm) wide.
Leave the outer edge slightly thicker if you want a delicious, puffy crust.
🍕 Formation Tip
For a more rustic pizza, use your fingertips and hands instead of a rolling pin.
Start from the center and gently push the dough outward while leaving a thicker border around the edge.
Avoid pressing the dough completely flat around the outside.
Step 6: Prepare the Baking Tray
Place the shaped dough onto a lightly greased baking tray or a tray lined with parchment paper.
If you have a pizza stone or pizza steel, preheat it according to the manufacturer’s instructions for an even crispier crust.
Step 7: Add the Pizza Sauce
Spread approximately ½ cup of pizza sauce evenly over the dough.
Use the back of a spoon to spread the sauce.
Leave a small border around the edge of the dough.
Don’t add too much sauce because excessive moisture can make the center of the pizza soggy.
Step 8: Add the Cheese
Sprinkle the grated mozzarella evenly over the sauce.
Make sure the cheese reaches most areas of the pizza while leaving the crust border visible.
For extra cheesiness, you can add a small amount of Parmesan or another melting cheese.
Step 9: Add the Pepperoni
Arrange the sliced pepperoni evenly over the mozzarella.
Try not to pile all the pepperoni in the center.
Spacing the slices around the pizza helps distribute the flavor in every bite.
As the pizza bakes, the pepperoni will become wonderfully savory and slightly crisp around the edges.
Step 10: Add the Vegetables
Sprinkle the chopped bell pepper and sliced onion over the pizza.
These vegetables add color, freshness, texture, and a little sweetness as they roast in the oven.
Step 11: Season the Pizza
Sprinkle the dried oregano over the toppings.
If desired, add a few fresh basil leaves after baking rather than before, so they remain fresh and aromatic.
You can also add a pinch of red pepper flakes for a little heat.
🔥 Step 12: Bake the Pizza
Preheat your oven to:
220°C (425°F)
Place the pizza into the preheated oven.
Bake for approximately 12–18 minutes, depending on your oven and the thickness of the crust.
The pizza is ready when:
- The crust is golden brown.
- The cheese is completely melted.
- The cheese is bubbling.
- The pepperoni is lightly browned around the edges.
- The bottom of the crust is cooked and firm.
For a darker, crispier crust, you can bake it for a few additional minutes, watching carefully.
🔪 Step 13: Rest and Slice
Remove the pizza from the oven.
Allow it to rest for approximately 3–5 minutes before slicing.
This short resting period allows the melted cheese and toppings to settle slightly.
Cut the pizza into wedges and serve warm.
🍕 The Best Homemade Pizza Method
The secret to delicious homemade pizza is not complicated. It comes down to a few important details:
1. Don’t use extremely hot water
Warm water is ideal for working with yeast.
2. Knead the dough properly
Kneading develops gluten, which gives the crust structure and elasticity.
3. Give the dough enough time to rise
A proper rise creates a lighter and more flavorful crust.
4. Don’t overload the pizza
Too many toppings can make the center wet and prevent the crust from becoming crisp.
5. Preheat the oven properly
Pizza needs strong heat to develop a beautiful crust and bubbly cheese.
6. Let the pizza rest
A few minutes of cooling makes slicing easier and prevents the toppings from sliding everywhere.
📜 A Little History of Pizza
Pizza has a long history connected to flatbreads, breads, and simple toppings found throughout the Mediterranean.
The modern pizza tradition is especially associated with Naples, Italy, where flat rounds of dough were topped with ingredients such as tomatoes, cheese, and herbs.
As Italian immigrants traveled around the world, pizza became increasingly popular outside Italy. It eventually developed into countless regional and international styles.
Pepperoni pizza is particularly associated with Italian-American pizza culture. Pepperoni itself developed in the United States from traditions of Italian-style cured sausages, and it became one of the most recognizable pizza toppings in North America.
Today, pepperoni pizza is loved around the world and has become one of the classic comfort foods for pizza lovers.
❤️ Why Pizza Lovers Love This Recipe
There is a reason pepperoni pizza has such a loyal following.
Every bite brings together several delicious textures and flavors:
🍞 Soft, golden crust — chewy inside with a crisp exterior.
🍅 Rich tomato sauce — adds acidity and savory depth.
🧀 Melted mozzarella — creamy, stretchy, and comforting.
🌶️ Pepperoni — salty, savory, and slightly spicy.
🫑 Bell pepper — adds freshness and sweetness.
🧅 Onion — becomes tender and lightly caramelized during baking.
🌿 Oregano and basil — bring a fragrant Italian-inspired finish.
👨🍳 Chef’s Tips for a Better Pizza
For a crispier crust:
Bake the pizza on a preheated pizza stone or steel if available.
For a softer crust:
Avoid overbaking and don’t use excessive flour while kneading.
For a thicker crust:
Allow the dough to rise fully and don’t stretch it too thin.
For a thinner crust:
Stretch the dough more widely before adding the toppings.
For extra cheesy pizza:
Add another small handful of mozzarella during the final few minutes of baking.
For crispy pepperoni:
Arrange some pepperoni directly on top of the cheese so the edges can brown.
For fresh flavor:
Add fresh basil immediately after removing the pizza from the oven.
🥗 What to Serve With Homemade Pepperoni Pizza
This pizza is delicious on its own, but you can serve it with:
- Fresh green salad
- Caesar salad
- Garlic bread
- Roasted vegetables
- Coleslaw
- Potato wedges
- Tomato salad
- Fresh fruit
- Sparkling water or your favorite cold drink
❄️ Storage
If you have leftovers, allow the pizza to cool completely.
Store the slices in an airtight container in the refrigerator and enjoy them within a few days.
To reheat, use an oven, toaster oven, or skillet for the best crust texture.
A microwave is quick, but it tends to make the crust softer.
🧊 Can You Freeze Homemade Pizza?
Yes!
You can freeze baked pizza slices once they have completely cooled.
Wrap each slice well and place them in a freezer-safe container or bag.
When you’re ready to eat them, reheat them directly from frozen in a hot oven until the cheese is melted and the crust is hot and crisp.
You can also freeze the unbaked dough after the first rise. Wrap it tightly and freeze it. Thaw it in the refrigerator before shaping and baking.
💕 A Pizza Made for Lovers
This recipe is perfect for pizza lovers of all ages.
It is also a wonderful recipe to make together with family. Children can help spread the sauce, sprinkle the cheese, and arrange the toppings, while adults handle the hot oven.
For a cozy date-night dinner, make two smaller pizzas and let each person choose their own toppings.
For a family pizza night, prepare several toppings and allow everyone to create their own pizza.
That’s one of the best things about homemade pizza: everyone can make it their own.
🍕 Final Formation
The perfect homemade pepperoni pizza should have a beautifully browned crust, a flavorful tomato base, plenty of melted mozzarella, savory pepperoni, and just enough vegetables and herbs to keep every bite interesting.
The dough provides the foundation.
The sauce provides richness.
The mozzarella brings creaminess.
The pepperoni provides the signature savory flavor.
The vegetables add freshness and texture.
The herbs finish everything with a wonderful aroma.
❤️ Conclusion
Homemade Pepperoni Pizza is more than just a meal—it is a recipe that brings people together.
From mixing and kneading the dough to watching the cheese bubble in the oven, the entire process is part of the fun. The smell of freshly baked pizza filling the kitchen is almost as satisfying as the first bite.
With a simple homemade dough, flavorful sauce, stretchy mozzarella, classic pepperoni, colorful vegetables, and aromatic herbs, you can create a delicious pizza without needing a professional pizza oven.
So gather your ingredients, warm up the oven, stretch that dough, pile on the toppings, and enjoy a beautiful homemade pizza fresh from the oven.
🍕 Make it homemade. Make it cheesy. Make it unforgettable! ❤️
🍕 Pizza Lovers, Save This Recipe!
If you love homemade pizza, this is one recipe worth keeping in your collection. Try it with your favorite toppings, make it your own, and enjoy a delicious pizza night with the people you love!