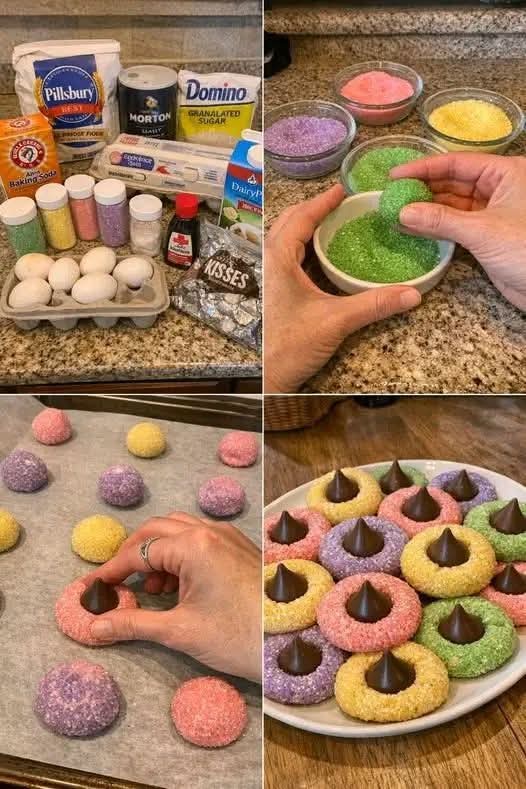
Easter Blossom Cookies
Introduction
Easter Blossom Cookies are cheerful, buttery sugar cookies made especially beautiful with pastel-colored sugar and a chocolate candy pressed into the center. They combine a tender, lightly crisp cookie exterior with a soft, rich middle and a sweet chocolate finish.
The idea is inspired by the classic blossom-cookie tradition, particularly the famous peanut butter blossom that became popular after Freda Smith entered her cookie in the 1957 Pillsbury Bake-Off. Modern Easter versions replace the peanut butter dough with a simple buttery sugar-cookie base and use pastel colors to create a springtime appearance.
This version begins with the ingredients you provided and develops them into a complete Easter cookie recipe. The result is ideal for Easter baskets, family gatherings, bake sales, cookie exchanges, afternoon tea, or a colorful holiday dessert table.
Ingredients
For the Cookie Dough
- 2 cups Pillsbury Best All-Purpose Flour
- 1/4 teaspoon Arm & Hammer Baking Soda
- 1/4 teaspoon Morton Salt
- 1 cup Domino Granulated Sugar
- 1/2 cup Land O Lakes Unsalted Butter, softened
- 1 large egg, preferably at room temperature
- 1 1/2 teaspoons pure vanilla extract
- 1 to 2 tablespoons milk, only if needed to soften the dough
For Rolling
- 1/2 cup additional granulated sugar, or pastel sanding sugar
- Pink, yellow, blue, green, lavender, or other Easter-colored sanding sugars
For the Chocolate Centers
- 24 to 30 chocolate kisses, unwrapped
You can use milk chocolate, dark chocolate, white chocolate, caramel-filled chocolate, or another chocolate candy that fits comfortably in the center of each cookie.
Equipment
- Large mixing bowl
- Medium mixing bowl
- Electric hand mixer or stand mixer
- Measuring cups and spoons
- Rubber spatula
- Cookie scoop or tablespoon
- Small bowls for the colored sugars
- Baking sheets
- Parchment paper
- Wire cooling rack
Preparation
Begin by taking the butter and egg out of the refrigerator ahead of time. Softened butter is important because it creams more easily with the sugar and helps create a tender cookie.
Preheat the oven to 350°F (175°C). Line two baking sheets with parchment paper.
Measure the flour carefully. Too much flour can make sugar cookies dry and dense, so spoon the flour into the measuring cup and level it rather than packing it down.
In a medium bowl, whisk together the flour, baking soda, and salt. Set this mixture aside.
Method: Making the Dough
Place the softened butter in a large mixing bowl.
Beat the butter for approximately 1 minute until smooth and creamy.
Gradually add the granulated sugar. Continue beating for about 2 to 3 minutes, scraping down the sides of the bowl as necessary. The mixture should become lighter and fluffy.
Add the egg and vanilla extract. Beat until completely incorporated.
Gradually add the flour mixture in several additions. Mix on low speed just until the flour disappears.
Do not overmix the dough. Once the flour has been incorporated, stop mixing. Overworking the dough can produce tougher cookies.
If the dough seems unusually dry or difficult to bring together, add 1 tablespoon of milk and mix briefly. Add another tablespoon only if necessary.
The finished dough should be soft enough to roll into balls but should not be sticky.
Forming the Easter Blossoms
Place the pastel sanding sugars into separate small bowls.
Using a cookie scoop or tablespoon, portion the dough into approximately 24 to 30 equal pieces.
Roll each portion gently between your palms to form a smooth ball.
Roll each dough ball through the colored sugar until completely coated.
For a traditional Easter appearance, use several different colors so that the finished cookies look like a collection of spring flowers.
Arrange the dough balls on the prepared baking sheets, leaving approximately 2 inches between them.
Do not flatten the dough balls before baking. They will naturally spread as they bake.
Baking Method
Place the baking sheet in the preheated oven.
Bake for approximately 9 to 12 minutes.
The cookies should look set around the edges while remaining relatively soft in the center. Avoid waiting for them to become deeply brown because overbaking can make sugar cookies dry.
Every oven is slightly different, so begin checking them around the 9-minute mark.
Remove the cookies from the oven as soon as they are ready.
Creating the Blossom Center
This is the most important finishing step.
While the cookies are still hot, immediately place one unwrapped chocolate kiss into the center of each cookie.
Press gently. You want the chocolate to settle into the soft cookie without breaking it apart.
The warmth of the cookie will soften the chocolate slightly and help it adhere to the center.
Allow the cookies to remain on the baking sheet for approximately 5 minutes before transferring them carefully to a wire rack.
The chocolate will be soft immediately after being added. Let the cookies cool completely before stacking or packaging them.
Formation of the Cookie
The beauty of an Easter Blossom Cookie comes from the contrast between its different textures.
The butter creates richness and tenderness.
The granulated sugar provides sweetness and helps the edges develop a delicate crispness.
The flour gives the cookie its structure.
The baking soda contributes to a gentle spread and lighter texture.
The egg binds the ingredients together and contributes moisture.
The vanilla adds warmth and depth.
The pastel sugar coating gives the exterior a colorful, slightly crunchy finish.
Finally, the chocolate center provides a rich contrast to the buttery sugar cookie.
Together, these elements create a cookie that is simple in structure but festive in appearance.
The History Behind Blossom Cookies
The Easter Blossom Cookie belongs to a broader family of blossom-style cookies. One of the best-known examples is the Peanut Butter Blossom.
The classic Peanut Butter Blossom traces its modern American history to Freda Strasel Smith of Gibsonburg, Ohio, who entered a peanut butter cookie topped with a chocolate kiss into the 1957 Pillsbury Bake-Off. The cookie was originally called “Black-eyed Susans” and later became known as the Peanut Butter Blossom.
The concept proved remarkably adaptable. Bakers began creating versions for different seasons and celebrations. Modern Easter blossom cookies commonly use a buttery sugar-cookie dough, colorful sanding sugar, and a chocolate kiss in the center.
This makes the Easter version less of an ancient traditional Easter cookie and more of a modern holiday adaptation of the blossom-cookie style.
Why These Cookies Are Loved
There are many reasons these cookies have become such a popular springtime treat.
First, they are visually attractive. The pastel sugar makes every cookie look different, creating a beautiful assortment for an Easter dessert table.
Second, the recipe is uncomplicated. The dough uses familiar baking ingredients and requires no complicated decorating techniques.
Third, they are excellent cookies for children to help prepare. Rolling the dough balls in colorful sugar and pressing the chocolate into the centers are particularly enjoyable steps.
Fourth, they are easy to customize. Different colors can transform the cookies for Easter, birthdays, baby showers, Valentine’s Day, Christmas, or other celebrations.
Tips for Perfect Easter Blossom Cookies
Use properly softened butter
The butter should be soft enough to press easily with a finger but should not be melted.
Melted butter can cause the cookies to spread excessively.
Do not overmix
Once the flour is incorporated, stop mixing. Overmixing can develop too much gluten and make the cookies less tender.
Keep the cookies similar in size
Using a cookie scoop helps ensure that all the cookies bake at approximately the same rate.
Do not overbake
The cookies should remain soft in the center. They may look slightly underdone when they first come out, but they will continue setting as they cool.
Add the chocolate immediately
Press the chocolate into the cookies while they are still warm. This gives the center its characteristic blossom appearance.
Allow the chocolate to set
Do not stack the cookies while the chocolate is still soft. Let them cool completely first.
Easter Variations
Chocolate Blossom Cookies
Add 2 tablespoons of unsweetened cocoa powder to the flour mixture. Reduce the flour by approximately 2 tablespoons to maintain a balanced dough.
Lemon Easter Blossoms
Add 1 teaspoon of finely grated lemon zest to the butter and sugar mixture. The bright citrus flavor works beautifully with pastel sugar.
Almond Blossom Cookies
Replace half of the vanilla extract with almond extract. Use a small amount because almond extract has a strong flavor.
White Chocolate Blossoms
Use white chocolate candies instead of milk chocolate centers.
Mixed Chocolate Blossoms
Use a combination of milk chocolate, dark chocolate, and white chocolate centers for a colorful variety.
Coconut Easter Blossoms
Add approximately 1/3 cup finely shredded unsweetened coconut to the dough. Roll the cookies in pastel sugar before baking.
Storage
Once completely cooled, place the cookies in an airtight container.
Separate layers with parchment paper if necessary, especially when the chocolate centers are still soft.
At room temperature, the cookies are best enjoyed within several days.
For longer storage, the baked cookies can be frozen in an airtight freezer-safe container. Thaw them at room temperature before serving.
You can also prepare the dough ahead of time, keep it refrigerated, and bake the cookies later. If the chilled dough becomes too firm to scoop, allow it to sit at room temperature briefly before shaping.
Serving Suggestions
Easter Blossom Cookies are especially attractive when arranged on a large serving platter with several different pastel colors.
They can be served alongside:
- Coffee
- Tea
- Hot chocolate
- Lemonade
- Milk
- Fresh berries
- Fruit salad
- Easter cakes
- Cupcakes
- Brownies
- Other holiday cookies
For an Easter basket, place the completely cooled cookies into food-safe bags and tie them with pastel ribbon.
They also make a thoughtful homemade gift because their colorful appearance makes them look special without requiring complicated decoration.
Make-Ahead Method
To make these cookies ahead of time, prepare the dough according to the recipe.
Shape the dough into balls and place them on a parchment-lined tray.
Refrigerate the shaped dough until firm, then transfer it to an airtight container.
When ready to bake, roll the chilled dough balls in the pastel sugar and place them on the baking sheets.
Bake according to the recipe, adding a small amount of baking time if the dough is very cold.
Add the chocolate centers immediately after baking.
A Simple Family Baking Tradition
One of the greatest pleasures of these cookies is that they can become part of a family tradition.
Children can choose their favorite colors. Adults can prepare the dough. Everyone can participate in rolling the cookies and decorating the finished batch.
The recipe is simple enough for a relaxed afternoon of baking but festive enough to become part of an annual Easter celebration.
Blossom cookies have long demonstrated how a simple cookie can become memorable through creativity and presentation. The famous peanut butter blossom itself became associated with family baking and holiday traditions after its 1957 appearance in the Pillsbury Bake-Off.
Troubleshooting
If the cookies spread too much
The butter may have been too warm, or the dough may have been too soft. Chill the dough briefly before baking the next tray.
If the cookies are too dry
They may have been overbaked or contained too much flour. Measure flour carefully and remove the cookies when the edges are set but the centers are still soft.
If the cookies do not spread enough
The dough may be too cold or contain too much flour. Allow it to soften slightly before baking.
If the chocolate melts too much
This is normal immediately after baking. Allow the cookies to cool completely. If you want a more defined chocolate center, let the cookies cool for a minute or two before pressing in the chocolate.
Conclusion
Easter Blossom Cookies are a beautiful example of how a simple sugar cookie can be transformed into a memorable holiday dessert.
The buttery dough provides a tender foundation, the colorful sugar creates the appearance of spring blossoms, and the chocolate center adds a rich finishing touch. Their preparation is straightforward enough for beginner bakers while still producing cookies that look impressive on an Easter dessert table.
Most importantly, these cookies are about more than flour, butter, and sugar. They are about gathering around the kitchen, sharing the work of baking, choosing beautiful colors, and creating something that family and friends can enjoy together.
Whether you prepare them for Easter morning, an afternoon gathering, a cookie exchange, a school celebration, or simply because you want something sweet and colorful, these Easter Blossom Cookies are a lovely addition to any spring baking tradition.
The best blossom cookies are the ones made with patience, shared generously, and enjoyed while fresh and tender.