Coconut Chocolate Dream Bars 🍫🥥
Sticky, gooey, chocolate-loaded bars with a nostalgic “old church cookbook” vibe
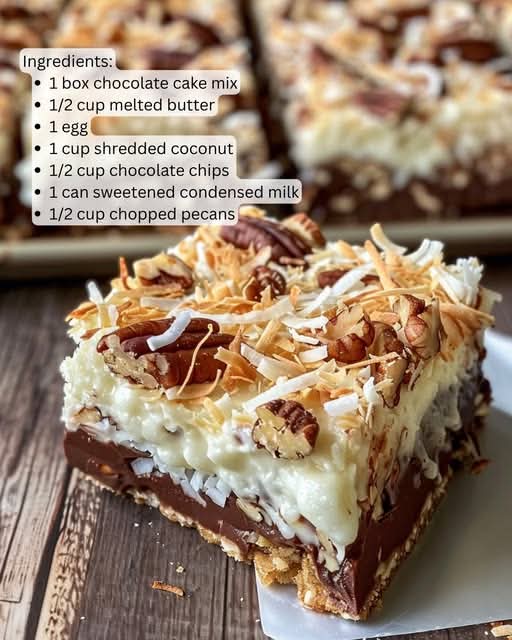
These Coconut Chocolate Dream Bars are the kind of dessert that feels homemade in the deepest sense—simple pantry ingredients layered into something rich, chewy, and slightly caramelized. The chocolate cake base turns into a soft brownie-like crust, while sweetened condensed milk melts everything together into a gooey topping that sets into a fudgy, candy-bar texture once cooled.
🌟 Introduction
This recipe belongs to the category of “dump-and-layer” desserts—no fancy techniques, just mixing, spreading, sprinkling, and baking. It’s popular in community cookbooks and potluck tables because it’s reliable, affordable, and always disappears fast.
The flavor profile is a perfect balance:
- Chocolatey base
- Sweet creamy topping
- Nutty crunch
- Coconut chewiness
Every bite feels like a mix between a brownie, a candy bar, and a coconut macaroon.
🧾 Ingredients
Base layer:
- 1 box chocolate cake mix
- 1/2 cup melted butter
- 1 large egg
Topping layer:
- 1 cup shredded coconut
- 1/2 cup chocolate chips
- 1/2 cup chopped pecans
- 1 can (14 oz) sweetened condensed milk
👩🍳 Instructions
- Preheat oven to 350°F (175°C).
Lightly grease a 9×13-inch baking pan. - Make the crust: In a bowl, mix chocolate cake mix, melted butter, and egg until a thick dough forms.
- Press the base: Press mixture evenly into the prepared pan. Use your hands or a spatula to smooth it out.
- Add toppings: Sprinkle coconut evenly over the crust, followed by chocolate chips and chopped pecans.
- Add the magic layer: Slowly pour sweetened condensed milk over the entire surface, making sure it spreads evenly.
- Bake: Bake for 30–35 minutes, until edges are golden and the center is set but still slightly soft.
- Cool completely: This step is important—let it cool fully so it firms up for clean slicing.
- Slice and serve: Cut into squares or bars once fully cooled.
🔥 Method Explained (Why it works)
- Cake mix + butter + egg → forms a shortcut brownie-like crust
- Condensed milk → caramelizes slightly in the oven, binding everything
- Coconut + pecans → add texture contrast (chewy + crunchy)
- Chocolate chips → melt into pockets of rich chocolate
As it bakes, the layers fuse together into one dense, chewy dessert bar.
📜 History & Origins
This style of dessert became popular in mid-20th-century American home baking, especially through:
- church cookbooks
- community fundraisers
- “seven-layer bar” variations
Sweetened condensed milk became a key ingredient in many desserts because it was shelf-stable, inexpensive, and created instant richness without needing candy-making skills. Recipes like this were designed for busy home bakers who wanted impressive results with minimal effort.
🧪 Formation (How the texture develops)
During baking:
- The bottom layer firms into a soft brownie crust
- The condensed milk thickens and caramelizes
- Coconut absorbs moisture and becomes chewy
- Nuts toast lightly in the oven
- Chocolate chips partially melt into the top layer
After cooling, everything sets into a dense, sliceable bar with layered textures.
💡 Variations & “Lovers” (Fun twists people enjoy)
Here are popular ways people adapt this recipe:
- Extra chocolate lovers: add dark chocolate chips + drizzle melted chocolate on top
- Coconut lovers: increase coconut to 1 1/2 cups for stronger flavor
- Nut-free version: skip pecans and add crushed graham crackers instead
- Salted caramel twist: sprinkle sea salt before baking
- Peanut butter version: swirl 2–3 tablespoons peanut butter into condensed milk
🍽️ Serving Ideas
- Serve chilled for a firmer candy-bar texture
- Serve slightly warm for gooey, melt-in-your-mouth squares
- Pair with coffee or cold milk
- Great for potlucks, holidays, or bake sales
🏁 Conclusion
Coconut Chocolate Dream Bars are proof that simple ingredients can create unforgettable desserts. They’re rich without being complicated, sweet without being overwhelming, and nostalgic in a way that feels like they’ve always existed in someone’s family recipe box.
If you’re looking for a dependable crowd-pleaser that tastes like it took far more effort than it did, this is one of those recipes you’ll keep coming back to.
If you want, I can also turn this into a , a , or a .