Here is a detailed, expanded version of the classic Buttermilk Biscuit recipe, structured as you’ve requested.
The Old Fashioned Buttermilk Biscuit: A Slice of Southern Comfort
There is perhaps no greater symbol of Southern hospitality and home cooking than the humble buttermilk biscuit. A perfect biscuit is a beautiful paradox: crusty and golden on the outside, while remaining impossibly tender, flaky, and soft on the inside. This recipe is for an old-fashioned version, the kind that grandmothers have been making by heart for generations. It relies on a few simple ingredients and a gentle touch to create something truly magical. It’s a recipe that connects us to the past, filling the kitchen with the warm, buttery aroma of comfort and love. Don’t lose this one—it’s a keeper.
—
The History of the Biscuit
The story of the biscuit begins long before it became a Southern staple. Its ancestors are hardtack and the English scone—firm, dry, unsweetened quick breads. Early American settlers brought these recipes with them. The transformation into the soft, flaky American biscuit we know today happened in the American South during the 19th century.
The key was the widespread availability of two things: soft winter wheat, which is lower in protein than its Northern counterpart, and the introduction of chemical leaveners like baking soda and baking powder. Unlike yeast breads that took hours to rise, these new “quick breads” could be mixed and baked in minutes. Buttermilk, a byproduct of churning butter, was a staple in almost every Southern kitchen. Its acidity was the perfect partner for the newfangled baking soda, creating bubbles that made the biscuits light and airy. Thus, the buttermilk biscuit was born—a symbol of resourcefulness and a daily luxury that graced tables from humble farmhouses to grand plantations.
—
The Benefits (The Joy of Baking)
While we don’t eat biscuits for their health benefits, there are undeniable benefits to making them:
· Therapy: The process of cutting cold butter into flour is a wonderfully tactile and grounding experience.
· Connection: Baking these biscuits connects you to a rich culinary heritage and generations of home cooks.
· Comfort: The aroma alone is a proven mood-lifter, creating a sense of warmth and welcome in any home.
· Versatility: They are the perfect vehicle for both sweet and savory toppings, from sausage gravy to strawberry jam.
—
The Formation: The Science of a Flaky Biscuit
A great biscuit is all about technique. Here’s the simple science behind it:
1. The Cold Fat: Cold solid butter is the most important element. As it bakes, the water in the butter turns to steam. This steam pushes apart the layers of dough, creating the flaky pockets we love. If the butter melts before baking, you’ll have dense, greasy biscuits.
2. The Acid-Base Reaction: Buttermilk is acidic. When it combines with the alkaline baking soda (and the baking powder), it creates carbon dioxide gas. This gas forms bubbles in the dough, making the biscuits light and airy.
3. The Gluten: Gluten is the protein structure that gives bread its chew. For tender biscuits, we want to develop as little gluten as possible. This is why we use a gentle hand and mix only until the dough comes together. Overmixing = tough biscuits.
—
The Recipe: Old Fashioned Buttermilk Biscuits
Introduction: Get ready to bake the fluffiest, most flavorful biscuits of your life. This recipe is simple, but the technique is everything. Follow these steps carefully, and you’ll be rewarded with golden perfection.
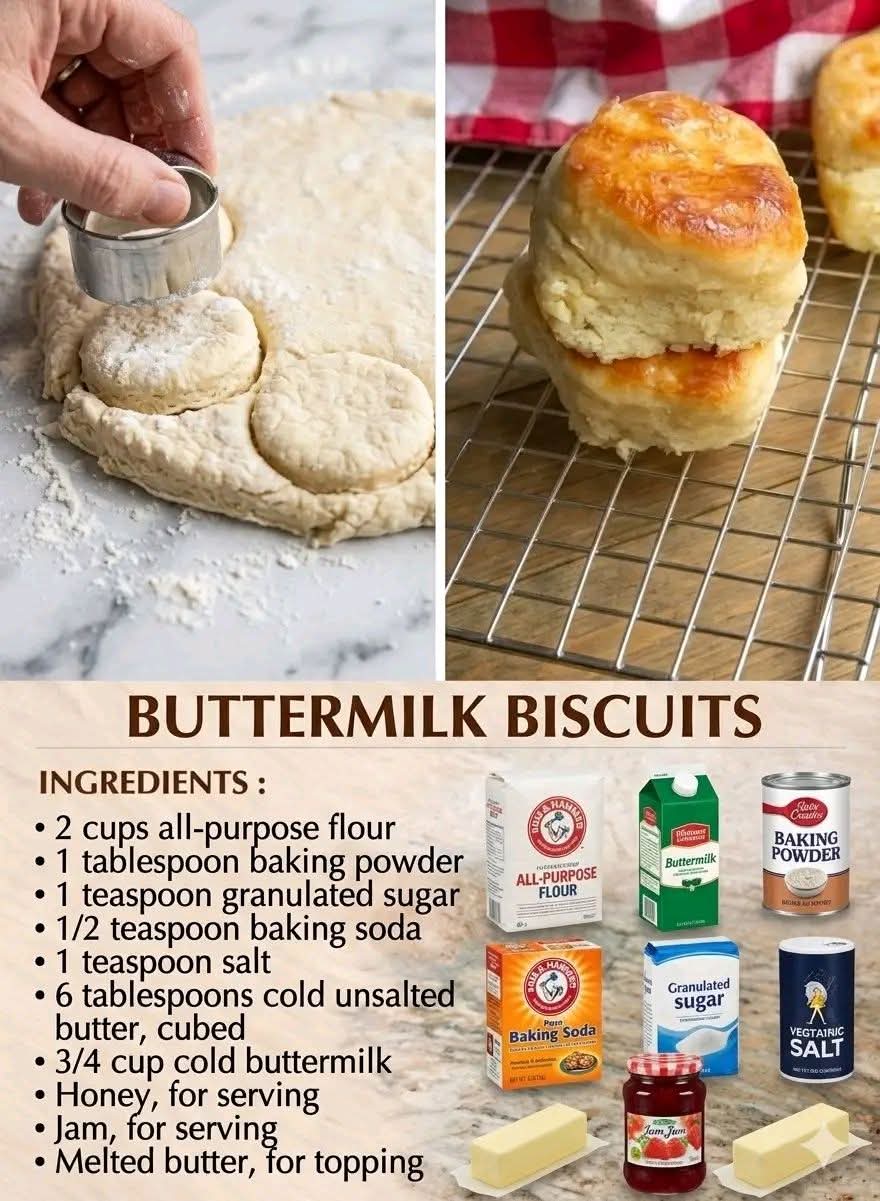
Ingredients
· 2 cups All-Purpose Flour: Provides the structure. Do not use self-rising flour, as we are controlling the leaveners ourselves.
· 2 teaspoons Baking Powder: The primary leavening agent, providing most of the rise.
· ¼ teaspoon Baking Soda: This reacts with the acidic buttermilk for extra lift and helps with browning.
· 1 teaspoon Salt: Essential for flavor; don’t skip it.
· 7 tablespoons Unsalted Butter: Crucially cold. Cut into small cubes. Using unsalted butter lets us control the salt level precisely.
· ¾ cup Cold Buttermilk: Provides moisture, tangy flavor, and the acid needed for the reaction. Shake the carton well before measuring.
Equipment
· Large Mixing Bowl
· Pastry Cutter, two forks, or your fingertips
· Box Grater (optional, but great for freezing butter)
· Measuring Cups and Spoons
· Baking Sheet (preferably light-colored)
· Parchment Paper
· 2-inch Round Biscuit Cutter (or a sharp knife)
· Pastry Brush (for butter topping)
Instructions: Step-by-Step Method
1. Prepare for Success: Preheat your oven to 450°F (230°C) . Line your baking sheet with parchment paper. Place your cubed butter (or grate it using a box grater) back in the freezer for 10-15 minutes while you prepare the dry ingredients. Keeping this butter as cold as possible is non-negotiable.
2. Whisk Dry Ingredients: In your large mixing bowl, whisk together the 2 cups of flour, 2 teaspoons of baking powder, ¼ teaspoon of baking soda, and 1 teaspoon of salt. Whisking ensures the leaveners and salt are evenly distributed.
3. Cut in the Butter: Retrieve your ice-cold butter from the freezer. Add it to the flour mixture. Using a pastry cutter, two knives, or your fingertips (work quickly!), cut the butter into the flour until the mixture resembles coarse, pebbly crumbs with some pea-sized pieces of butter remaining. You should see visible flat pieces of butter throughout—these are your future flaky layers.
4. Add the Buttermilk: Make a well in the center of the flour mixture. Pour in the ¾ cup of cold buttermilk all at once.
5. Gently Mix: Using a fork or a rubber spatula, stir gently, just until the dough comes together. It will look shaggy and a little sticky. Do not overmix. If there are dry bits at the bottom, you can add a tiny splash more buttermilk, but be very careful.
6. Bring the Dough Together: Turn the shaggy dough out onto a lightly floured surface. With floured hands, gently bring the dough together, patting it into a rough rectangle about ½-inch to ¾-inch thick. Fold the dough over on itself once or twice—this creates extra layers. Then, gently pat it out again to an even ½-inch to ¾-inch thickness.
7. Cut the Biscuits: Dip your biscuit cutter in flour to prevent sticking. Press the cutter straight down into the dough—do not twist! Twisting seals the edges and prevents the biscuits from rising to their full potential. Repeat, cutting biscuits as close together as possible to minimize scraps. Place the biscuits on the prepared baking sheet, about 1 inch apart for crusty sides, or touching for softer sides.
8. Bake to Perfection: Bake for 12-15 minutes, or until the biscuits are tall, golden brown on top, and even a little deeper golden on the bottom.
9. The Final Touch: As soon as you pull them from the oven, brush the tops with a little melted butter (optional, but highly recommended). This adds flavor and a beautiful sheen.
10. Cool and Serve: Let them cool on the baking sheet for just a couple of minutes before transferring to a wire basket or plate. Serve warm.
—
Lovers of the Biscuit
The beauty of this biscuit is its universal appeal. It is loved by:
· The Traditionalist: Who enjoys it split, with a pat of cold butter melting into the warm, craggy interior.
· The Adventurous Eater: Who uses it as the base for a sausage, egg, and cheese breakfast sandwich.
· The Sweet Tooth: Who slathers it with honey, jam, or preserves.
· The Gravy Enthusiast: For whom a biscuit is merely a vessel for delivering generous amounts of creamy sausage gravy.
· The Chef: Who values it as a simple, perfect, and versatile staple.
—
Conclusion
This Old Fashioned Buttermilk Biscuit recipe is more than just a list of instructions; it’s an invitation to create a moment of pure, simple joy. It’s a reminder that the most satisfying things in life are often made from scratch with a little patience and love. From the first bite of its flaky, buttery crust to its soft, tender heart, this biscuit is a timeless classic. Bake a batch, share them with the people you love, and create a warm memory that will last long after the last crumb is gone. Don’t lose this recipe—pass it on.