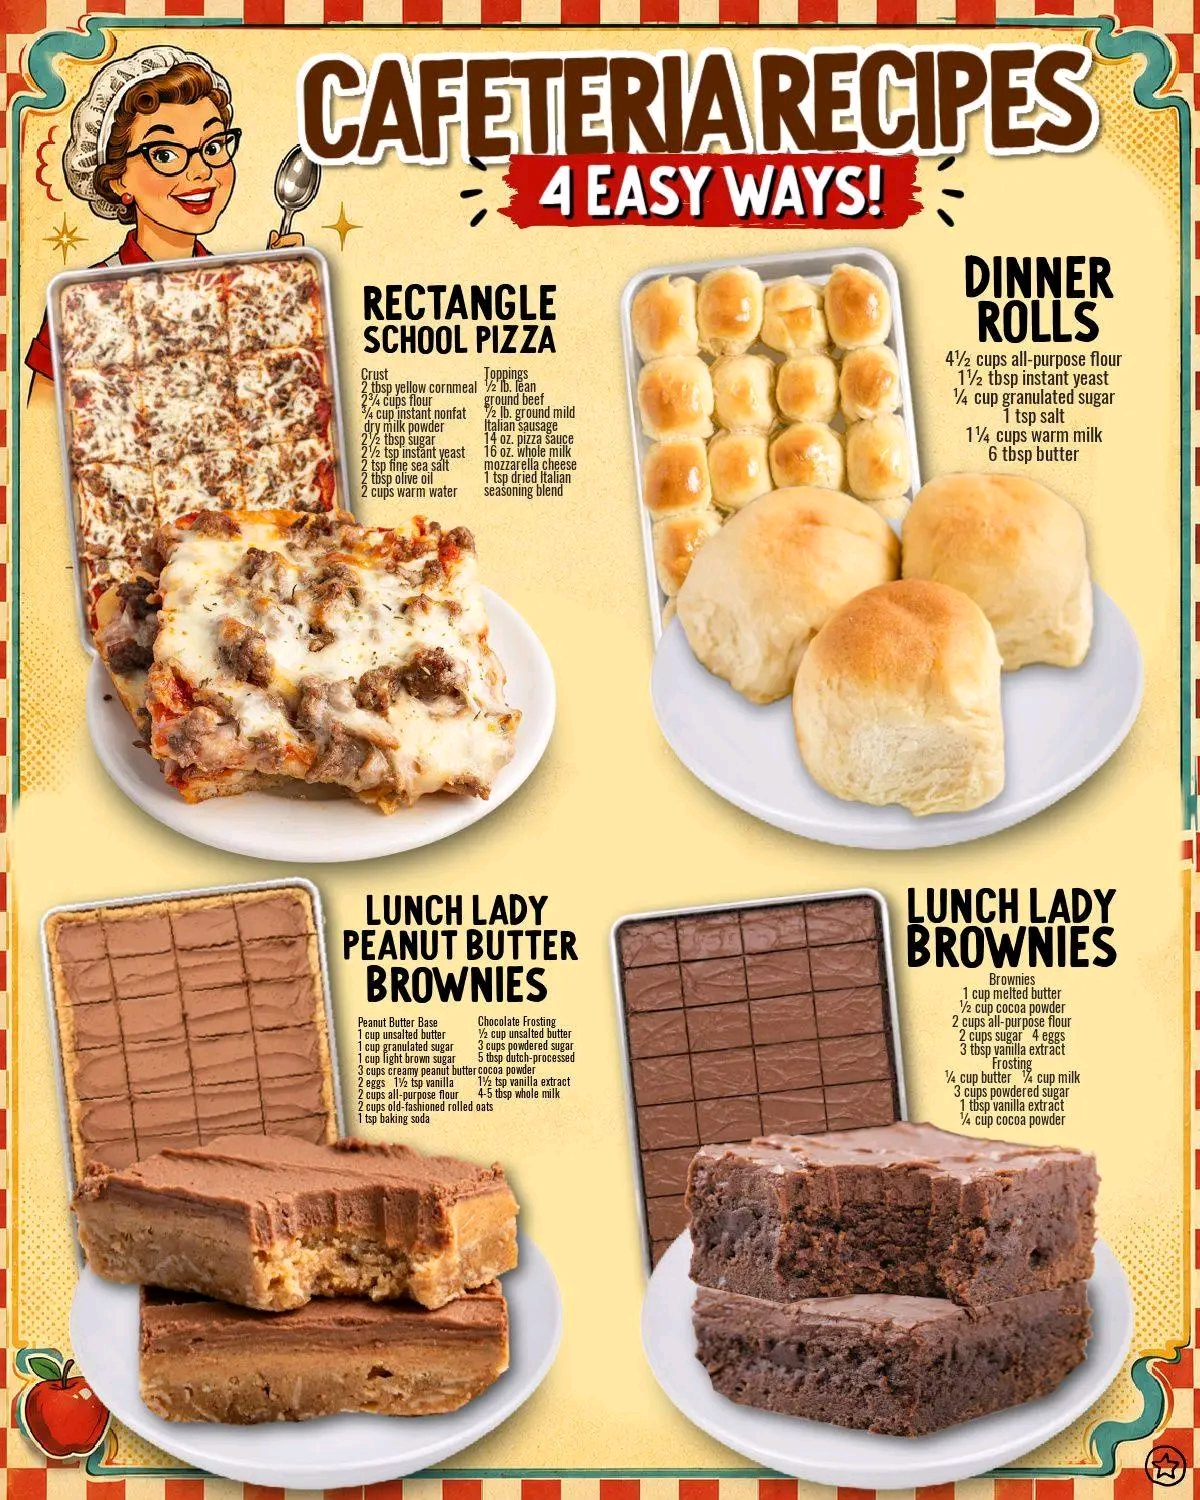
Lunch Lady Classics: School Pizza, Dinner Rolls, Peanut Butter Bars, and Brownies
Introduction
There is something wonderfully nostalgic about the food served in a school cafeteria. For many people, lunch lady classics bring back memories of long lunch lines, trays filled with comforting food, and desserts that seemed especially delicious because they were enjoyed with friends.
This collection recreates four beloved cafeteria-style favorites: rectangular school pizza, soft dinner rolls, chewy peanut butter bars with chocolate frosting, and rich lunch lady brownies.
These recipes are designed to be generous, comforting, and familiar. They are perfect for family dinners, bake sales, school-themed parties, potlucks, or simply recreating the flavors of childhood at home.
1. Rectangle School Pizza
Introduction
School cafeteria pizza is famous for its thick, soft crust, savory meat topping, plenty of melted mozzarella, and rectangular shape. Unlike a thin restaurant-style pizza, this version has a substantial, tender crust that makes every square satisfying.
The combination of ground beef and mild Italian sausage gives the topping a classic savory flavor, while the cornmeal helps create a slightly distinctive texture underneath the crust.
Ingredients
For the Crust
- 2 tablespoons yellow cornmeal
- 2¾ cups unbleached all-purpose flour
- ¾ cup instant nonfat dry milk powder
- 2½ tablespoons granulated sugar
- 2½ teaspoons instant yeast
- 2 teaspoons fine sea salt
- 2 tablespoons extra-virgin olive oil
- 2 cups warm water, approximately 105°F to 110°F
For the Topping
- ½ pound lean ground beef
- ½ pound mild Italian sausage
- 14 ounces pizza sauce, approximately 1½ cups
- 16 ounces whole-milk mozzarella cheese, shredded
- 1 teaspoon dried Italian seasoning
Instructions
Step 1: Prepare the Meat
Brown the ground beef and Italian sausage in a large skillet over medium heat. Break the meat into small pieces as it cooks.
Cook until completely browned and no longer pink. Drain excess grease and set the meat aside.
Step 2: Prepare the Pan
Generously grease a large rectangular baking sheet or rimmed sheet pan.
Sprinkle the bottom lightly with the yellow cornmeal. This helps prevent sticking and adds a subtle texture to the finished crust.
Step 3: Make the Dough
In a large mixing bowl, combine the flour, dry milk powder, sugar, yeast, and salt.
Add the olive oil and warm water. Stir until the ingredients come together into a thick, soft dough.
The dough will be considerably softer and stickier than traditional pizza dough. Do not add excessive flour.
Step 4: Form the Crust
Transfer the dough to the prepared pan.
Using lightly oiled or damp hands, gently spread the dough toward the edges of the pan. Work slowly so the dough does not tear.
Allow the dough to rest for approximately 15 to 20 minutes. This gives it time to relax and makes it easier to spread completely.
Step 5: Add the Toppings
Spread the pizza sauce evenly over the dough.
Scatter the cooked beef and sausage over the sauce.
Cover generously with shredded mozzarella and sprinkle the Italian seasoning over the cheese.
Step 6: Bake
Bake in a preheated 475°F oven until the crust is cooked through and the cheese is melted, bubbling, and lightly browned.
Depending on the pan and oven, this generally takes approximately 15 to 20 minutes.
Allow the pizza to rest for several minutes before cutting it into rectangular pieces.
Method Notes
For the most cafeteria-style texture, avoid making the crust too thin. The signature of this pizza is its thick, tender, bread-like base.
For cleaner slices, allow the pizza to cool for approximately 5 to 10 minutes before cutting.
2. Soft Lunch Lady Dinner Rolls
Introduction
Soft cafeteria dinner rolls are another classic comfort food. These rolls are lightly sweet, buttery, fluffy, and wonderful alongside soups, roasted meats, casseroles, or holiday meals.
The combination of warm milk, butter, egg, and rapid-rise yeast produces a tender dough that bakes into soft, golden rolls.
Ingredients
- 4½ cups all-purpose flour, divided into 3 cups and 1½ cups
- 1½ tablespoons rapid-rise instant yeast
- ¼ cup granulated sugar
- 1 teaspoon salt
- 1¼ cups warm milk, approximately 110°F
- 4 tablespoons softened butter
- 1 room-temperature egg
- 2 tablespoons melted butter, for brushing the finished rolls
Instructions
Step 1: Combine the Dry Ingredients
Place 3 cups of flour, yeast, sugar, and salt into a large mixing bowl.
Whisk the ingredients together until evenly distributed.
Step 2: Add the Wet Ingredients
Add the warm milk, softened butter, and egg.
Mix until a soft dough begins to form.
Step 3: Add the Remaining Flour
Gradually add the remaining 1½ cups of flour.
You may not need every last bit. Add enough flour to produce a soft dough that is slightly tacky but manageable.
Avoid making the dough excessively stiff.
Step 4: Knead
Turn the dough onto a lightly floured surface and knead for approximately 6 to 8 minutes.
The dough should become smooth, elastic, and soft.
Step 5: First Rise
Place the dough into a lightly greased bowl.
Cover and allow it to rise in a warm, draft-free place until approximately doubled in size, usually about 1 hour.
Step 6: Shape the Rolls
Gently press down the risen dough to remove excess air.
Divide the dough into approximately 15 to 18 equal portions.
Shape each portion into a smooth ball and arrange the rolls in a greased baking pan, leaving a little space between them.
Step 7: Second Rise
Cover the pan and let the rolls rise again until noticeably puffy, approximately 30 to 45 minutes.
Step 8: Bake
Bake in a preheated 350°F oven until the rolls are lightly golden and cooked through, approximately 18 to 22 minutes.
Immediately brush the hot rolls with melted butter.
Allow them to cool slightly before serving.
Method Notes
The most important secret to soft rolls is not adding too much flour. A slightly soft dough creates a much more tender finished roll.
The butter brushed over the rolls after baking adds flavor while keeping the exterior soft.
3. Lunch Lady Peanut Butter Bars
Introduction
Peanut butter bars are among the most recognizable school cafeteria desserts. They combine a chewy oatmeal-and-peanut-butter base with a generous layer of peanut butter and a smooth chocolate frosting.
They are rich, sweet, and satisfying, making them excellent for bake sales, lunchbox treats, parties, and family gatherings.
Ingredients
Peanut Butter Base
- 1 cup unsalted butter, room temperature
- 1 cup granulated sugar
- 1 cup packed light brown sugar
- 3 cups creamy peanut butter, divided
- 2 large eggs, room temperature
- 1½ teaspoons vanilla extract
- 2 cups all-purpose flour
- 2 cups old-fashioned rolled oats
- 1 teaspoon baking soda
- ½ teaspoon salt
Use 1½ cups of peanut butter in the dough and reserve the remaining 1½ cups for spreading over the baked bars.
Chocolate Frosting
- ½ cup unsalted butter, room temperature
- 3 cups sifted powdered sugar
- 5 tablespoons sifted Dutch-process cocoa powder
- ⅛ teaspoon salt
- 1½ teaspoons vanilla extract
- 4 to 5 tablespoons whole milk
Instructions
Step 1: Prepare the Pan
Grease a large rectangular baking pan and, if desired, line it with parchment paper, leaving some paper extending over the sides for easy removal.
Step 2: Cream the Butter and Sugars
Beat the softened butter, granulated sugar, and brown sugar until light and creamy.
This usually takes several minutes.
Step 3: Add Peanut Butter and Eggs
Beat in 1½ cups of the peanut butter.
Add the eggs one at a time, mixing well after each addition.
Add the vanilla extract.
Step 4: Add the Dry Ingredients
In another bowl, combine the flour, oats, baking soda, and salt.
Gradually add the dry ingredients to the peanut butter mixture.
Mix only until everything is incorporated.
Step 5: Press Into the Pan
Spread the dough evenly into the prepared pan.
Use lightly greased hands or the back of a spatula to create an even layer.
Step 6: Bake
Bake at 350°F until the center is set and the edges are lightly golden.
Avoid overbaking because the bars should remain chewy and tender.
Allow them to cool for several minutes.
Step 7: Add the Peanut Butter Layer
While the bars are still warm but no longer extremely hot, gently spread the remaining 1½ cups of peanut butter over the surface.
Allow the bars to cool completely so the peanut butter layer can set.
Step 8: Make the Chocolate Frosting
Beat the softened butter until smooth.
Add the powdered sugar, cocoa powder, and salt.
Mix in the vanilla.
Gradually add 4 tablespoons of milk and beat until smooth.
If the frosting is too thick, add the fifth tablespoon of milk a little at a time.
Step 9: Frost the Bars
Spread the chocolate frosting evenly over the peanut butter layer.
Allow the frosting to set before cutting.
Method Notes
For neat cafeteria-style squares, refrigerate the finished bars briefly before slicing.
Use a sharp knife and wipe it clean between cuts.
For the best texture, allow refrigerated bars to sit at room temperature for a short time before serving.
4. Lunch Lady Brownies
Introduction
Lunch lady brownies are known for being simple, rich, fudgy, and generously covered with chocolate frosting. Unlike elaborate bakery brownies, these rely on basic pantry ingredients and a thick layer of sweet cocoa frosting.
They are an excellent example of how simple ingredients can create a memorable dessert.
Ingredients
Brownies
- 1 cup melted butter
- ½ cup unsweetened cocoa powder
- 2 cups all-purpose flour
- 2 cups granulated sugar
- ½ teaspoon salt
- 4 eggs
- 3 tablespoons vanilla extract
Frosting
- ¼ cup melted butter
- ¼ cup milk
- 3 cups powdered sugar
- ¼ cup unsweetened cocoa powder
- 1 tablespoon vanilla extract
Instructions
Step 1: Prepare the Pan
Grease a rectangular baking pan and line it with parchment paper if desired.
Preheat the oven to 350°F.
Step 2: Combine the Butter and Cocoa
Place the melted butter and cocoa powder in a large bowl.
Whisk until smooth.
Step 3: Add Sugar and Eggs
Add the sugar and mix well.
Beat in the eggs one at a time.
Add the vanilla extract and stir until the mixture is smooth.
Step 4: Add the Flour
Gradually add the flour and salt.
Mix only until no dry streaks remain.
Do not overmix.
Step 5: Bake
Spread the batter evenly in the prepared pan.
Bake at 350°F until the brownies are set and a toothpick inserted into the center comes out with a few moist crumbs.
Do not overbake if you want a fudgy texture.
Step 6: Make the Frosting
While the brownies are cooling, combine the melted butter, milk, powdered sugar, cocoa powder, and vanilla.
Beat until smooth and spreadable.
Step 7: Frost
Spread the frosting over the brownies while they are completely or mostly cooled.
Allow the frosting to firm slightly before cutting.
Cut into squares or rectangles and serve.
The History and Nostalgia Behind School Cafeteria Recipes
School cafeteria food occupies a special place in American food memories. During the twentieth century, school lunch programs increasingly focused on providing affordable, filling meals to large numbers of students.
Because cafeterias needed recipes that could be prepared efficiently in large quantities, many dishes relied on straightforward ingredients and dependable techniques. Sheet-pan pizza, yeast rolls, peanut butter desserts, brownies, casseroles, and similar foods became familiar across generations.
The exact recipes varied from one school district to another. Some cafeterias made pizza with different sauces, cheeses, meats, or crusts, while others used their own institutional recipes.
That is part of the charm. There is not necessarily one single recipe that represents every school cafeteria. Instead, these dishes represent a broader tradition of practical, comforting food made for crowds.
Formation and Preparation Guide
When preparing this entire collection, organization makes everything easier.
The pizza dough and dinner-roll dough both benefit from proper handling and rising time. The peanut butter bars and brownies, meanwhile, can be prepared ahead of time and allowed to cool before frosting.
For a large gathering, prepare the desserts first. Once they have cooled and been frosted, they can be covered and stored while you work on the savory dishes.
The rolls are best served warm, while the pizza should rest briefly after baking before being sliced.
Serving Suggestions
School Pizza
Serve rectangular pizza squares with a simple green salad, steamed vegetables, fruit, or a classic cafeteria-style side dish.
Dinner Rolls
Serve warm with butter alongside soups, stews, roast chicken, turkey, meatloaf, casseroles, or holiday dinners.
Peanut Butter Bars
Cut into small squares because they are rich. They pair especially well with cold milk or a cup of coffee.
Brownies
Serve at room temperature with milk, coffee, vanilla ice cream, or simply on their own.
Storage
Pizza
Store leftover pizza covered in the refrigerator for up to several days. Reheat in an oven or air fryer for the best crust texture.
Dinner Rolls
Store cooled rolls in an airtight container at room temperature for a couple of days. They can also be frozen for longer storage.
Peanut Butter Bars
Keep covered at room temperature for short-term storage or refrigerate for a firmer texture and longer storage.
Brownies
Store the brownies in an airtight container. They generally become even more flavorful and fudgy after resting for several hours.
Tips for the Best Results
- Measure flour accurately. Too much flour can make both pizza crust and dinner rolls dense.
- Use properly warmed liquids. Yeast dough benefits from liquid that is warm rather than hot.
- Do not overwork brownie batter. Excessive mixing can produce a tougher texture.
- Allow baked desserts to cool before cutting. This produces cleaner edges.
- Use full-fat ingredients where specified. Whole milk mozzarella and whole milk in the recipes contribute richness and texture.
- Do not rush yeast dough. Proper rising time is essential for soft, fluffy rolls.
- Avoid overbaking. Brownies and peanut butter bars should remain tender in the center.
- For the most nostalgic presentation, cut the pizza and desserts into uniform rectangular pieces.
Conclusion
These lunch lady classics are more than recipes. They are recreations of the comforting flavors and simple presentation that made school cafeteria food memorable for so many people.
The rectangular pizza delivers a soft, hearty crust with savory meat and melted cheese. The dinner rolls are fluffy, buttery, and lightly sweet. The peanut butter bars combine chewy oats, creamy peanut butter, and rich chocolate frosting. The brownies provide a deeply chocolatey, fudgy base beneath a sweet cocoa topping.
Together, they make a wonderful nostalgic spread that can turn an ordinary meal into a trip down memory lane.
Whether you remember eating these foods at school, making something similar at home, or are simply discovering them for the first time, these classics demonstrate that some of the most memorable comfort foods are also the simplest.
Serve them generously, share them with family and friends, and enjoy the old-fashioned cafeteria spirit that inspired them.