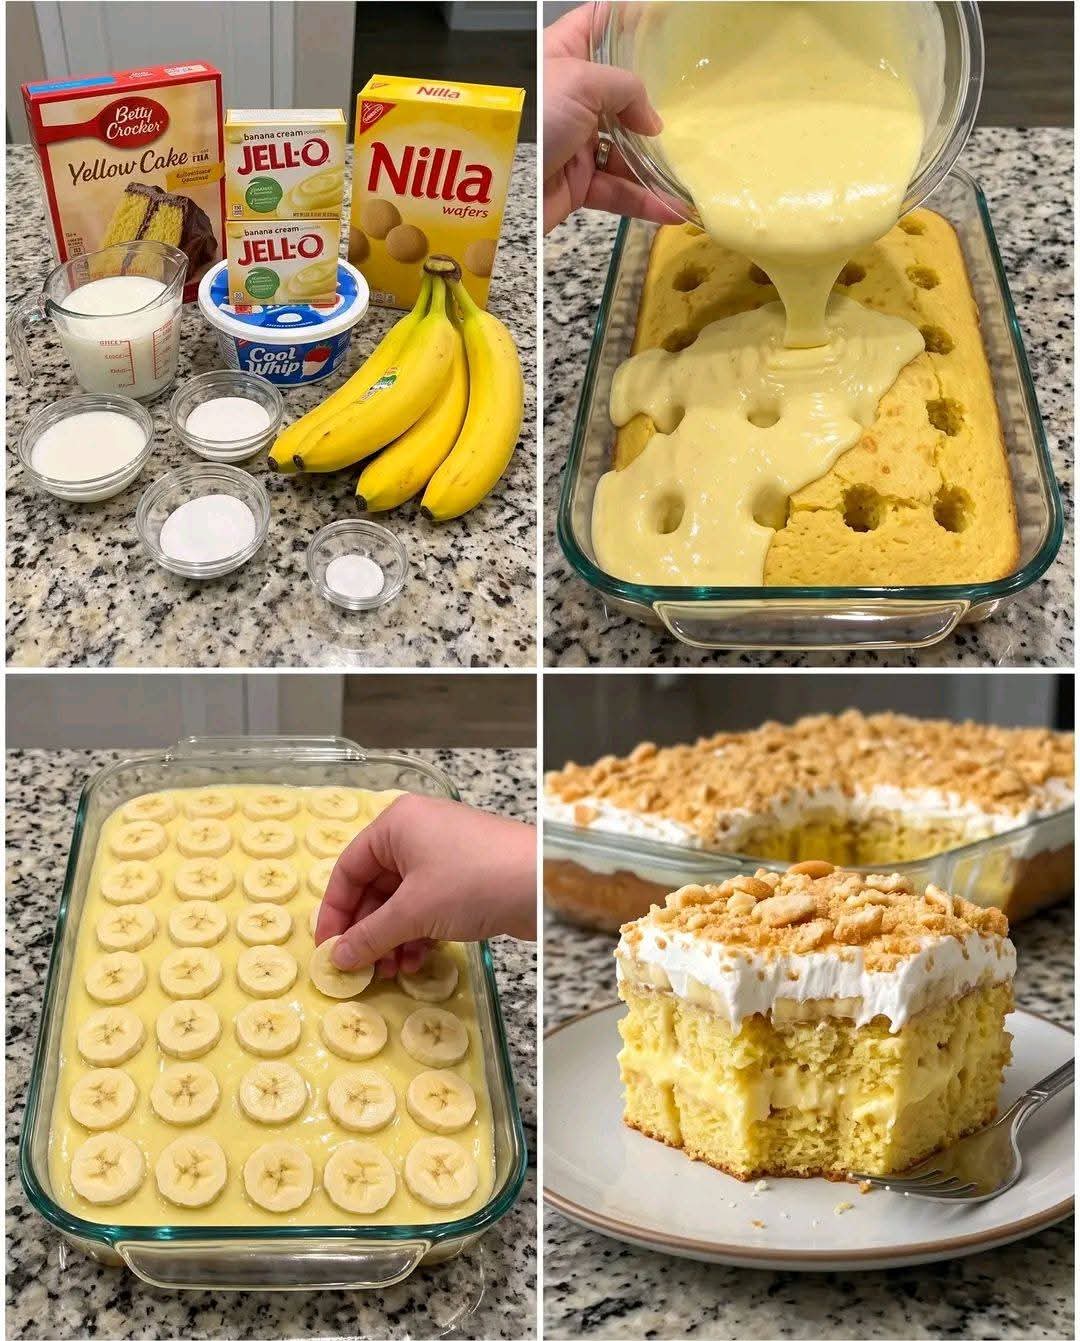
Banana Pudding Poke Cake
Introduction
Banana Pudding Poke Cake is a comforting Southern-inspired dessert that brings together three classic favorites: moist yellow cake, creamy banana pudding, and the familiar vanilla-wafer flavor of traditional banana pudding. The special feature of a poke cake is the series of holes made throughout the warm cake, allowing the pudding to soak deep into the crumb.
The result is a wonderfully soft and moist cake with layers of banana flavor, creamy pudding, fresh banana slices, fluffy whipped topping, and a crunchy Nilla Wafer finish. It is an easy dessert to prepare, but it looks impressive enough for birthdays, family dinners, potlucks, holidays, and celebrations.
Ingredients
For the Cake
- 1 box (15.25 oz) Betty Crocker Yellow Cake Mix
- Water, according to the cake mix directions
- Vegetable oil, according to the cake mix directions
- Eggs, according to the cake mix directions
For the Banana Pudding Layer
- 2 boxes (3.4 oz each) Jell-O Banana Cream Instant Pudding
- 3 cups cold milk
For the Topping
- 3 ripe bananas, sliced into thin coins
- 1 tub (8 oz) Cool Whip, completely thawed
- 1 cup Nilla Wafers, roughly crushed
Equipment
- 9 x 13-inch baking pan
- Large mixing bowl
- Whisk
- Wooden spoon with a rounded handle
- Spatula
- Measuring cups
- Refrigerator
Instructions
Step 1: Prepare the Cake
Preheat your oven according to the temperature specified on the yellow cake mix package.
Grease a 9 x 13-inch baking pan thoroughly, making sure the bottom and sides are coated.
Prepare the yellow cake batter according to the package directions, combining the cake mix with the required water, oil, and eggs.
Pour the batter into the prepared pan and spread it evenly.
Bake according to the package directions, or until the center of the cake is fully baked and a toothpick inserted into the center comes out clean or with only a few moist crumbs.
Do not allow the cake to cool completely.
Let it rest for approximately 10 minutes.
Step 2: Poke the Cake
While the cake is still warm, use the rounded handle of a wooden spoon to make large holes throughout the entire cake.
Space the holes fairly evenly so that the banana pudding will be distributed throughout the cake.
Push the spoon handle deep enough to create channels through much of the cake, but avoid breaking through the bottom of the pan.
This step is what transforms an ordinary yellow cake into a poke cake.
Step 3: Prepare the Banana Pudding
Pour the two packages of banana cream instant pudding into a large mixing bowl.
Add 3 cups of cold milk.
Whisk vigorously for approximately 1 minute.
The pudding should begin to thicken but should still be fairly pourable. Do not allow it to become completely firm before adding it to the cake.
Step 4: Fill the Cake
Immediately pour the prepared banana pudding over the warm cake.
Use a spatula to gently spread the pudding across the surface.
Pay special attention to the holes, encouraging the pudding to flow down into them.
The warm cake absorbs some of the pudding, creating creamy pockets throughout the cake.
Once the pudding has been distributed evenly, place the pan in the refrigerator.
Chill for approximately 1 hour, or until the pudding has completely set.
Step 5: Add the Fresh Bananas
Once the pudding layer is firm, peel the bananas.
Slice them into thin, relatively even coins.
Arrange the banana slices over the entire surface of the cake.
Try to create one even layer rather than piling the bananas too thickly in certain areas.
For the best flavor and appearance, use bananas that are ripe and naturally sweet but still firm enough to hold their shape.
Step 6: Add the Whipped Topping
Spread the thawed Cool Whip evenly over the banana layer.
Use a spatula to gently smooth the topping from edge to edge.
The whipped topping creates a light, creamy layer that balances the rich pudding and moist cake.
Make sure the topping completely covers the bananas. This also helps protect the banana slices from direct exposure to air.
Step 7: Add the Nilla Wafers
Roughly crush approximately 1 cup of Nilla Wafers.
You want a mixture of smaller crumbs and slightly larger pieces rather than turning all of the cookies into a fine powder.
Sprinkle the crushed wafers generously over the whipped topping.
For the best texture, add the crushed cookies shortly before serving. This keeps them crisp and prevents them from becoming overly soft in the refrigerator.
Methods
The Poke Cake Method
The defining technique in this recipe is the poke cake method.
The cake is baked first and then pierced while still warm. The holes provide pathways for the banana pudding to penetrate the cake.
Instead of having pudding only on top, every slice contains pockets of creamy banana pudding.
This method also helps keep the cake exceptionally moist.
The Instant Pudding Method
Instant pudding is mixed with cold milk and used while it is still pourable.
Working quickly is important because the pudding continues thickening after it is mixed.
Pouring it over the warm cake allows it to flow easily into the holes before becoming too firm.
The Layering Method
The dessert is assembled in distinct layers:
- Yellow cake
- Banana cream pudding
- Fresh banana slices
- Whipped topping
- Crushed vanilla wafers
This layering creates a combination of textures and flavors in every bite.
The Chilling Method
Refrigeration is essential.
The cake needs time for the pudding to set and for the flavors to come together. Chilling also makes the dessert easier to slice and serve.
History and Inspiration
Banana pudding has long been associated with American home cooking, particularly Southern-style desserts. Traditional banana pudding commonly combines creamy vanilla or banana pudding with sliced bananas and vanilla wafers.
Over time, home bakers began adapting familiar desserts into different formats, including cakes, trifles, cheesecakes, and poke cakes.
The poke cake itself became popular as an easy way to introduce fillings and flavored mixtures into a baked cake. By combining the poke-cake technique with the familiar components of banana pudding, bakers created a dessert that delivers the flavors of classic banana pudding in a convenient cake format.
This recipe follows that tradition while using a convenient boxed cake mix and instant pudding, making it accessible for both beginning and experienced bakers.
Formation of the Dessert
The formation of this cake is all about contrasting textures.
The yellow cake provides the soft foundation. The banana pudding travels through the holes and creates creamy pockets inside the cake. Fresh bananas provide natural sweetness and a tender, fruity texture.
The whipped topping adds lightness and richness, while the crushed Nilla Wafers provide a pleasant crunch.
When properly chilled, the different components become a unified dessert without losing their individual characteristics.
Important Tips for the Best Banana Pudding Poke Cake
Do Not Overmix the Pudding
Whisk the pudding and milk until smooth and beginning to thicken. If you let it become too firm before pouring it onto the cake, it will be more difficult to push into the holes.
Poke the Cake Generously
Small holes will not hold much pudding. Use the rounded handle of a wooden spoon to make substantial holes throughout the cake.
Work While the Cake Is Warm
The pudding penetrates the cake more easily while the cake is still warm.
Use Firm, Ripe Bananas
Very ripe bananas provide excellent flavor but can become too soft. Choose bananas that are yellow and sweet with enough firmness to slice neatly.
Add the Cookies at the End
Nilla Wafers naturally soften when exposed to moisture. Adding them immediately before serving gives you the best crunchy texture.
Chill Thoroughly
Allow enough time for the pudding to set completely. A well-chilled cake will slice much more cleanly.
Make-Ahead Instructions
The cake itself can be prepared several hours before serving.
For the best results, assemble the cake through the whipped-topping layer and keep it refrigerated.
Add the crushed Nilla Wafers shortly before serving.
If you prepare the entire dessert too far in advance, the cookies will gradually soften and the banana slices may lose some of their fresh appearance.
Serving Suggestions
Serve the Banana Pudding Poke Cake cold, directly from the refrigerator.
For a more decorative presentation, you can place a few whole or halved Nilla Wafers around individual servings.
A little extra sliced banana can also be added immediately before serving.
For gatherings, cut the cake into neat squares and serve chilled.
Storage
Cover the cake tightly and refrigerate.
Because the dessert contains fresh bananas, pudding, and whipped topping, it should remain refrigerated rather than being left at room temperature for extended periods.
For the best texture and appearance, enjoy it within a few days.
Why Dessert Lovers Enjoy It
Banana Pudding Poke Cake is especially appealing because it combines familiar flavors in a very soft and creamy dessert.
Banana lovers get fresh banana flavor and banana cream pudding. Cake lovers get a moist yellow cake base. Those who enjoy classic banana pudding get the familiar vanilla-wafer flavor, while anyone who loves creamy desserts gets a generous whipped topping.
The combination of soft cake, silky pudding, tender banana, fluffy topping, and crisp cookie crumbs makes every bite different.
Conclusion
Banana Pudding Poke Cake is a wonderful example of how a few simple ingredients can be transformed into an impressive dessert. The combination of yellow cake, banana cream pudding, fresh bananas, whipped topping, and Nilla Wafers captures the comforting character of classic banana pudding while giving it the soft, satisfying texture of a homemade cake.
The most important techniques are simple: bake the cake properly, poke deep holes while it is warm, pour in the pudding before it sets, chill the cake thoroughly, and add the crushed wafers close to serving time.
Whether prepared for a family gathering, Sunday dinner, potluck, birthday celebration, or simply as a special homemade treat, this Banana Pudding Poke Cake is a creamy, fruity, comforting dessert that is easy to make and hard to resist.