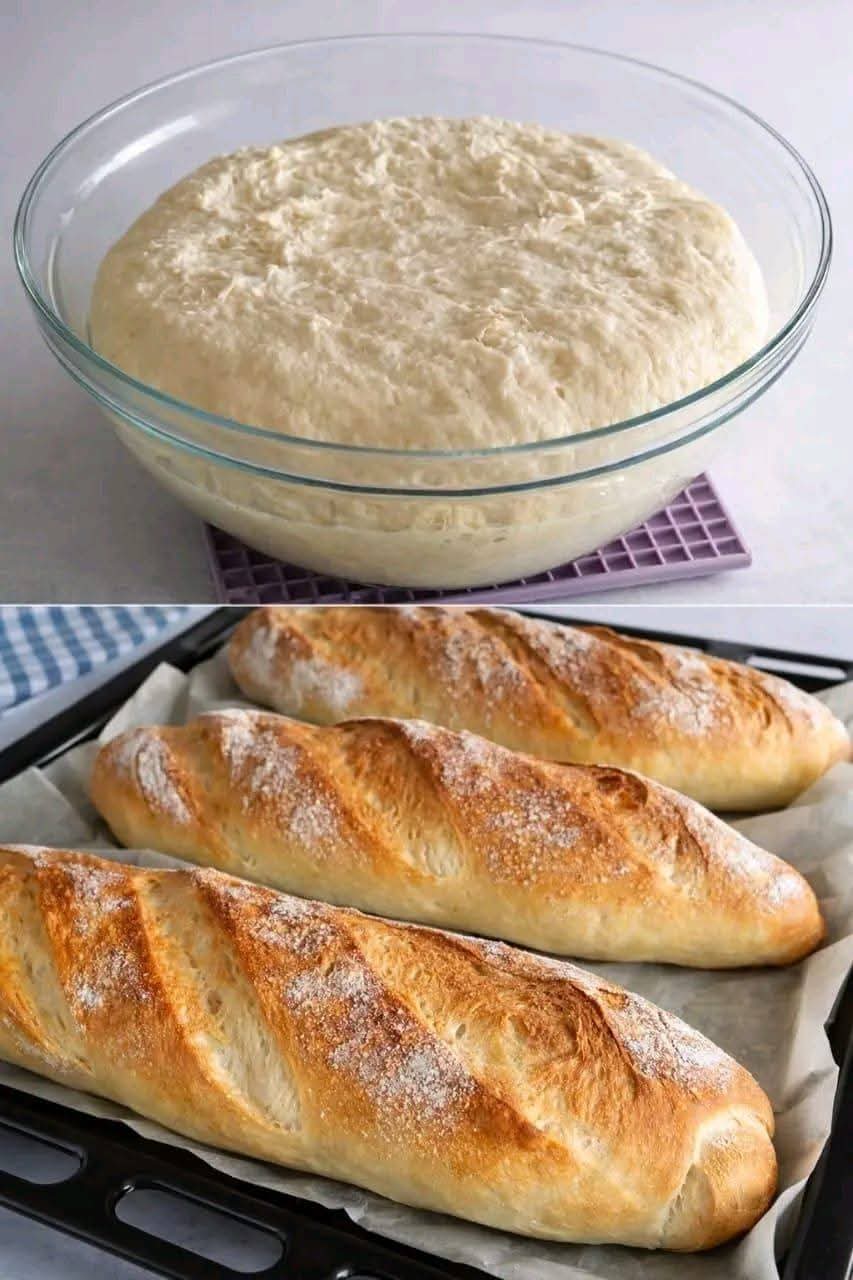
Homemade Everyday Bread
Introduction
After making this simple homemade bread once, you may find yourself wondering why you ever needed to buy a loaf from the store. This recipe uses basic pantry ingredients and produces a soft, fragrant loaf with a lightly crisp crust and a tender, satisfying crumb.
The dough is easy to prepare, requires no complicated equipment, and is suitable for beginners. Olive oil adds richness and helps keep the bread pleasantly soft, while yeast gives it the light, airy structure that makes freshly baked bread so enjoyable.
Ingredients
- 4 tablespoons (60 ml) olive oil
- 1 tablespoon (10 g) active dry yeast
- 1 teaspoon salt
- 1 1/3 cups (320 ml) warm water
- 4 3/4 cups (570 g) plain or all-purpose flour
- A little additional flour for kneading and shaping, if necessary
- Olive oil for lightly greasing the bowl and baking surface
Preparation Time
- Preparation: about 20 minutes
- First rise: 1 to 1 1/2 hours
- Shaping and second rise: 30 to 45 minutes
- Baking: approximately 30 to 40 minutes
- Total time: about 2 1/2 to 3 hours
Instructions
1. Prepare the yeast
Pour the warm water into a large mixing bowl. The water should feel comfortably warm rather than hot. Add the dry yeast and allow it to stand for about 5 to 10 minutes.
If the yeast becomes slightly foamy, it is ready to use. If it does not foam at all, the yeast may be inactive and should be replaced.
2. Make the dough
Add the olive oil and salt to the yeast mixture. Stir gently.
Gradually add the flour, mixing as you go. Do not add all the flour at once. Depending on the flour and humidity, you may need slightly more or slightly less than the stated amount.
When the mixture becomes too thick to stir, transfer it to a lightly floured work surface.
3. Knead the dough
Knead the dough for approximately 8 to 10 minutes.
The dough should become smooth, soft, and elastic. It may feel slightly tacky at first, but avoid adding excessive flour because this can make the finished bread heavy and dry.
A good dough should stretch gently without immediately tearing.
4. First rise
Lightly coat a clean bowl with olive oil. Place the dough inside and turn it once so the surface is lightly coated.
Cover the bowl with a clean kitchen towel or plastic wrap.
Leave the dough in a warm, draft-free place for approximately 1 to 1 1/2 hours, or until it has roughly doubled in size.
The exact rising time depends on the temperature of your kitchen.
5. Shape the bread
Once the dough has risen, gently press it down to release some of the excess air.
Place it on a lightly floured surface and shape it into a round or oval loaf. You can also divide the dough into two smaller loaves if preferred.
Place the shaped dough onto a lightly greased baking tray or into a suitable loaf pan.
6. Second rise
Cover the shaped dough and allow it to rest for another 30 to 45 minutes.
During this time, preheat the oven to 200°C (400°F).
The second rise gives the bread additional volume and helps create a lighter texture.
7. Prepare the loaf for baking
Before placing the bread in the oven, make two or three shallow cuts across the top with a sharp knife.
These cuts allow the bread to expand during baking and give the loaf a beautiful homemade appearance.
For an even more attractive crust, you can lightly brush the top with olive oil before baking.
8. Bake
Place the bread in the preheated oven.
Bake for approximately 30 to 40 minutes, depending on the size and shape of your loaf.
The bread should develop a deep golden-brown crust and sound hollow when gently tapped on the bottom.
If the top is browning too quickly, loosely cover it with aluminum foil during the final part of baking.
9. Cool before slicing
Remove the bread from the oven and place it on a wire rack.
Allow it to cool for at least 30 minutes before slicing.
Although the smell of freshly baked bread can make it difficult to wait, cutting it immediately can compress the delicate interior and release too much steam.
Method
The secret to this bread is not complicated. It is a combination of proper hydration, sufficient kneading, fermentation, shaping, and careful baking.
The yeast consumes sugars naturally available in the flour and produces carbon dioxide. This gas becomes trapped within the developing gluten network, causing the dough to expand. Kneading strengthens that gluten structure, while the two rising periods give the dough time to develop its characteristic texture and flavor.
The olive oil contributes tenderness and richness, making the loaf softer than a basic lean bread dough.
History of Homemade Bread
Bread is one of the oldest prepared foods in human history. Long before modern ovens, packaged yeast, and commercial bakeries existed, people mixed grains with water and baked the resulting dough over heated stones, in clay ovens, or beside fires.
The discovery and use of fermentation transformed breadmaking. Naturally occurring yeasts could cause dough to rise, producing bread that was lighter and more pleasant to eat.
Over centuries, breadmaking developed differently across cultures. Every region created its own varieties based on available grains, water, fats, seasonings, and baking traditions.
Today, commercial bread is convenient, but homemade bread continues to have a special place in kitchens because of its aroma, freshness, simplicity, and connection to traditional cooking.
Formation and Texture
During the first rise, the dough expands as yeast produces carbon dioxide. Kneading has already developed the gluten that helps hold those bubbles.
During the second rise, the shaped loaf becomes lighter and more aerated.
When the dough enters the hot oven, several important changes happen. The trapped gases expand, the yeast becomes highly active for a short period, and the loaf rapidly increases in volume. Eventually, the yeast stops working as the temperature rises, while the proteins and starches set to create the finished bread.
The result is a golden crust surrounding a soft and tender interior.
Tips for the Best Bread
- Use warm, not hot, water. Very hot water can damage the yeast.
- Do not overload the dough with flour. A slightly soft dough generally produces a lighter loaf.
- Knead properly. Smooth and elastic dough is a good indication that the gluten has developed.
- Give the dough enough time to rise. Rising time depends on room temperature, so judge the dough by its volume rather than the clock alone.
- Preheat the oven completely. A properly heated oven helps the loaf rise and develop a good crust.
- Let the bread cool. The interior continues setting as it cools.
- Store it properly. Once completely cool, keep the bread in a bread bag or airtight container at room temperature for the best texture.
Serving Ideas
This homemade bread is delicious while still slightly warm, especially with butter or olive oil.
It can also be served with:
- Eggs for breakfast
- Cheese and tomatoes
- Soups and stews
- Grilled vegetables
- Roasted meats
- Homemade sandwiches
- Garlic butter
- Jam or honey
- Olive oil and herbs
It also makes excellent toast the following day.
For Bread Lovers
For anyone who loves the smell of fresh bread filling the kitchen, this recipe is especially rewarding. There is something satisfying about taking flour, water, yeast, salt, and olive oil and turning them into a beautiful loaf with your own hands.
Once you become comfortable with the basic method, you can experiment with whole-wheat flour, seeds, herbs, roasted garlic, olives, or other additions.
Conclusion
Homemade bread does not need to be complicated. With a few simple ingredients, patience during the rising stages, and a properly heated oven, you can make a beautiful loaf at home.
The crust is golden, the inside is soft and tender, and the aroma is exactly what makes freshly baked bread so special. Once you master this recipe, it can become a dependable everyday bread for your family.
If you want to keep receiving my recipes, simply leave a “Thank you” in the comments.