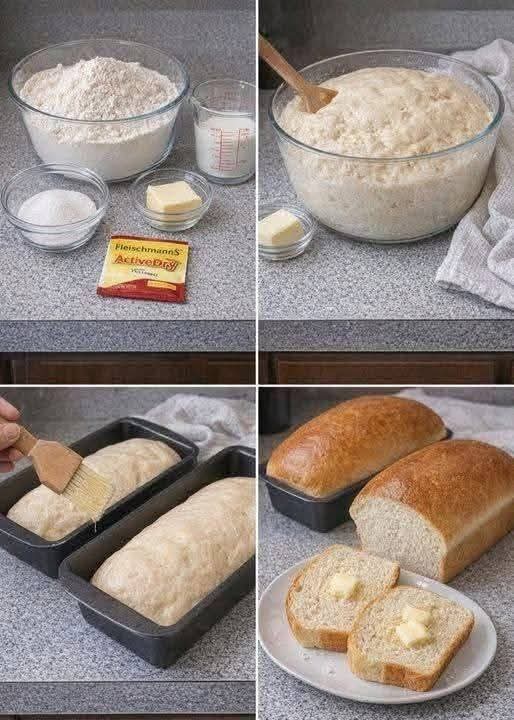
Homemade Bakery-Style White Bread
Introduction
There is something wonderfully comforting about the smell of freshly baked bread filling the kitchen. This homemade white bread is soft, tender, lightly sweet, and beautifully golden on the outside, with a fluffy interior that makes every slice irresistible. It is simple enough for a beginner but delicious enough to become a regular family favorite.
Once you make this bread at home, you may find yourself wondering why you ever needed to buy a loaf from the store. It is especially delicious while still warm, spread generously with butter.
Ingredients
For the Bread
- 1 cup warm milk, about 105–110°F (40–43°C)
- ½ cup warm water
- 2¼ teaspoons active dry yeast, 1 standard packet
- ¼ cup granulated sugar
- 2 tablespoons unsalted butter, melted
- 1 teaspoon salt
- 4 to 4½ cups all-purpose flour
- Additional butter for brushing the finished loaf, optional
For the Pan
- 1 tablespoon butter or neutral oil for greasing the loaf pan
Instructions
Step 1: Activate the Yeast
Pour the warm milk and warm water into a large mixing bowl. The liquids should feel comfortably warm, not hot.
Add the sugar and active dry yeast. Stir gently and allow the mixture to stand for approximately 5 to 10 minutes.
The yeast should become foamy or bubbly. This indicates that the yeast is active and ready to use.
If there is no bubbling at all, the yeast may be inactive, and it is better to start again with fresh yeast before continuing.
Step 2: Add the Butter and Salt
Once the yeast has activated, stir in the melted butter and salt.
Mix gently until everything is evenly incorporated.
Step 3: Add the Flour
Begin adding the flour one cup at a time, stirring after each addition.
Start with approximately 4 cups of flour. As the dough comes together, determine whether it needs additional flour.
The finished dough should be soft and slightly tacky but should not be extremely sticky.
Avoid adding too much flour. A slightly soft dough produces a much more tender loaf than a stiff, heavily floured dough.
Step 4: Knead the Dough
Transfer the dough to a lightly floured work surface.
Knead for approximately 8 to 10 minutes by hand.
Push the dough away with the heel of your hand, fold it back toward yourself, rotate it slightly, and repeat.
The dough should gradually become smooth, elastic, and easier to handle.
You can also use a stand mixer fitted with a dough hook. Mix on low speed until the ingredients come together, then knead on medium-low speed for approximately 6 to 8 minutes.
Step 5: First Rise
Lightly grease a large bowl with butter or oil.
Place the dough into the bowl and turn it once so the surface is lightly coated.
Cover the bowl with a clean kitchen towel or plastic wrap.
Place it somewhere warm and allow the dough to rise for approximately 1 to 1½ hours, or until it has roughly doubled in size.
The exact rising time will depend on the temperature of your kitchen.
Step 6: Shape the Loaf
Once the dough has doubled, gently press it down to release excess air.
Transfer it to a lightly floured surface.
Shape the dough into a smooth loaf by gently flattening it into a rectangle, folding the sides toward the center, and then rolling it tightly from one end to the other.
Pinch the seam closed.
Place the shaped dough seam-side down into a greased 9-by-5-inch loaf pan.
Step 7: Second Rise
Cover the loaf loosely and let it rise again for approximately 30 to 45 minutes.
The dough should become visibly puffy and rise above the edge of the pan or close to it.
Do not allow it to overproof, because an excessively risen loaf can collapse during baking.
Step 8: Bake
Preheat the oven to 350°F (175°C).
Place the loaf in the center of the oven.
Bake for approximately 30 to 35 minutes, or until the top is beautifully golden brown and the loaf sounds hollow when gently tapped.
If the top begins browning too quickly, loosely cover it with aluminum foil during the final portion of baking.
Step 9: Finish With Butter
Remove the bread from the oven.
While it is still hot, brush the top generously with a little butter.
This gives the crust a soft, flavorful finish and adds a beautiful shine.
Allow the bread to rest in the pan for about 10 minutes before carefully transferring it to a wire rack.
Let it cool before slicing for the cleanest slices, although enjoying a warm piece with butter is one of the best parts of making homemade bread.
Method
The success of this bread comes from a few simple techniques.
First, make sure the milk and water are warm rather than hot. Excessive heat can damage the yeast.
Second, add the flour gradually. Flour measurements can vary depending on humidity and how the flour is measured, so the dough should be judged by its texture rather than by blindly adding the entire amount.
Third, knead the dough sufficiently. Proper kneading develops gluten, which gives the bread its structure and allows it to rise into a soft, fluffy loaf.
Finally, give the dough enough time to rise. Yeast bread needs patience. A warm environment and adequate fermentation time help develop both texture and flavor.
History of Homemade Bread
Bread is one of the oldest prepared foods in human history. Early forms of bread were made from simple mixtures of ground grains and water, often cooked on heated stones or primitive cooking surfaces.
The development of yeast fermentation transformed bread-making. Over generations, bakers learned that fermented dough could produce lighter, softer, and more flavorful loaves.
The basic principles used in this recipe remain connected to those traditional methods: flour provides structure, liquid hydrates the flour, yeast produces fermentation, and kneading develops the dough.
Modern kitchens simply make the process easier and more predictable.
Formation of the Dough
The formation of this loaf happens in several important stages.
The flour contains proteins that form gluten when combined with liquid and worked through kneading. Gluten creates an elastic network capable of holding the gases produced by the yeast.
During fermentation, the yeast consumes available sugars and produces carbon dioxide. Those tiny pockets of gas become trapped within the gluten network, causing the dough to expand.
The second rise allows the shaped loaf to develop its final volume before baking.
When the bread enters the hot oven, the yeast becomes highly active for a short period before heat eventually stops fermentation. The gases expand, the dough rises further, and the gluten structure sets as the bread bakes.
Serving Ideas for Bread Lovers
This homemade bread is delicious in countless ways.
Serve thick slices warm with butter for a simple breakfast.
Use it for sandwiches, grilled cheese, French toast, or toasted bread with eggs.
It is also wonderful with homemade soups, stews, roasted vegetables, or hearty family dinners.
For a sweet option, toast a slice and serve it with honey, jam, cinnamon butter, or peanut butter.
Storage
Once completely cooled, store the bread in an airtight bread bag or container at room temperature.
For the best texture, enjoy it within several days.
You can also freeze the loaf. Wrap it tightly in plastic wrap or freezer-safe packaging and freeze for up to approximately 3 months. Thaw at room temperature before serving.
For individual portions, slice the bread before freezing so you can remove only the amount you need.
Helpful Tips
- Do not use extremely hot liquid when activating the yeast.
- Start with 4 cups of flour and add more only if necessary.
- Keep the dough soft rather than making it excessively firm.
- Knead until the dough becomes smooth and elastic.
- Allow the dough to fully rise during both fermentation stages.
- Avoid placing the dough in an excessively hot location.
- Let the baked loaf cool before cutting if you want neat slices.
- Brush the hot crust with butter for a softer, richer finish.
Conclusion
Homemade bread does not have to be complicated. With a handful of basic ingredients, a little kneading, and enough time for the dough to rise, you can create a beautiful loaf with a golden crust and soft, fluffy center.
The real reward is not only the taste but also the experience of making bread from scratch. The aroma while it bakes, the warmth of the freshly baked loaf, and that first slice spread with butter make this recipe especially memorable.
For bread lovers, this is the kind of recipe worth keeping close. Once you master it, you can use the same basic technique as a foundation for many other homemade breads.