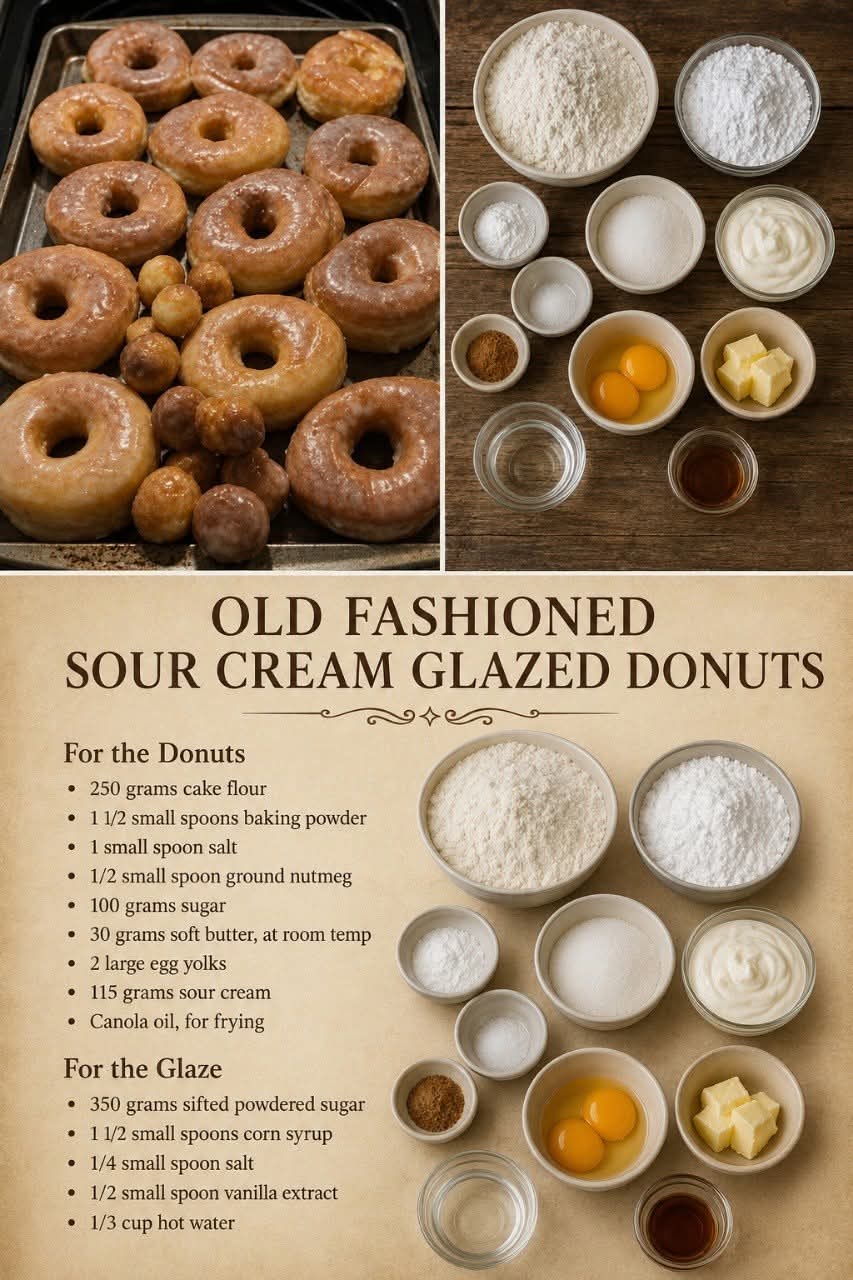
Old Fashioned Sour Cream Glazed Donuts
Introduction
Old Fashioned Sour Cream Glazed Donuts are the kind of homemade treat that brings back memories of classic bakeries, Sunday mornings, and family kitchens. Unlike yeast-raised donuts, these donuts are made with a rich, tender cake-style dough that gets its characteristic texture from sour cream.
The outside becomes lightly crisp and golden when fried, while the inside stays soft, dense, moist, and delicately crumbly. A simple sweet glaze adds the perfect finishing touch, soaking slightly into the warm ridges and creating that unmistakable old-fashioned donut experience.
This recipe is especially wonderful because it does not require yeast, rising time, or complicated equipment. With a few basic ingredients and careful frying, you can make bakery-style sour cream donuts right at home.
Ingredients
For the Donuts
- 250 grams cake flour
- 1 1/2 teaspoons baking powder
- 1 teaspoon salt
- 1/2 teaspoon ground nutmeg
- 100 grams granulated sugar
- 30 grams unsalted butter, softened at room temperature
- 2 large egg yolks
- 115 grams full-fat sour cream
- Canola oil, for frying
For the Glaze
- 180 grams powdered sugar
- 2 to 3 tablespoons milk
- 1/2 teaspoon vanilla extract
- A small pinch of salt
The glaze can be adjusted according to your preference. Add a little more milk for a thinner glaze or more powdered sugar for a thicker coating.
Instructions
Step 1: Prepare the Dry Ingredients
In a medium mixing bowl, whisk together the cake flour, baking powder, salt, and ground nutmeg.
Mix thoroughly so the baking powder, salt, and nutmeg are evenly distributed throughout the flour.
Set the bowl aside.
Step 2: Cream the Butter and Sugar
In a separate large bowl, place the softened butter and granulated sugar.
Beat them together until the mixture becomes smooth and slightly creamy.
Because these donuts are cake-style rather than yeast-raised, you do not need to whip the butter and sugar for a long period. Simply combine them until they are well incorporated.
Step 3: Add the Egg Yolks
Add the egg yolks one at a time, mixing well after each addition.
The yolks give the donuts richness, tenderness, and a beautiful golden color.
Scrape down the sides of the bowl if necessary so everything combines evenly.
Step 4: Add the Sour Cream
Add the sour cream to the butter mixture and stir until smooth.
Sour cream is one of the most important ingredients in this recipe. It adds moisture and richness while giving the donuts their distinctive tender, slightly tangy flavor.
Step 5: Combine the Wet and Dry Ingredients
Gradually add the dry ingredients to the sour cream mixture.
Stir gently just until the flour disappears and a soft dough forms.
Do not overmix. Overworking the dough can develop too much gluten and make the finished donuts tough instead of tender.
The dough should be soft and slightly sticky.
Step 6: Chill the Dough
Cover the bowl with plastic wrap and refrigerate the dough for approximately 30 to 60 minutes.
Chilling makes the dough easier to handle and helps the donuts maintain their shape during frying.
Do not skip this step if your dough feels particularly soft.
Step 7: Roll Out the Dough
Lightly flour your work surface.
Turn the chilled dough onto the surface and gently roll it to approximately 1/2 inch thick.
Avoid adding excessive flour. Too much flour can make the donuts dry and heavy.
Use a donut cutter or two round cutters to cut the donuts. If using two cutters, make a larger circle for the outside and a smaller circle for the center.
Transfer the cut donuts to a lightly floured tray.
Gather the scraps, gently press them together, and roll them out again. Try not to repeatedly knead the scraps because this can make the final donuts tougher.
Step 8: Heat the Oil
Pour enough canola oil into a heavy-bottomed pot or deep fryer to provide plenty of room for the donuts to float.
Heat the oil to approximately 175 to 180°C.
Use a kitchen thermometer if possible. Maintaining the correct temperature is important.
If the oil is too hot, the outside can brown before the inside is properly cooked. If it is too cool, the donuts may absorb too much oil and become greasy.
Step 9: Fry the Donuts
Carefully place a few donuts into the hot oil, making sure not to overcrowd the pot.
Fry until the bottoms become golden brown, then carefully turn them over.
Continue frying until both sides are evenly golden and the centers are cooked.
Depending on the size of your donuts, this usually takes several minutes per batch.
Remove the donuts with a slotted spoon and place them on a wire rack lined underneath with paper towels to catch excess oil.
Allow the donuts to cool slightly before glazing.
Method for Making the Glaze
Place the powdered sugar in a small bowl.
Add the milk one tablespoon at a time, stirring continuously.
Add the vanilla extract and a small pinch of salt.
Continue mixing until you have a smooth glaze.
The consistency should be thick enough to coat the donuts but fluid enough to spread naturally.
If the glaze becomes too thin, add more powdered sugar. If it is too thick, add a few drops of milk.
Glazing the Donuts
Dip the slightly warm donuts into the glaze, coating the top completely.
Lift each donut and allow the excess glaze to drip back into the bowl.
Place the glazed donuts on a wire rack and allow the glaze to set for approximately 15 to 20 minutes.
For a thicker coating, allow the first layer to set and dip the donuts a second time.
The Formation of the Perfect Donut
The texture of an old-fashioned sour cream donut comes from the balance between flour, sour cream, egg yolks, butter, and baking powder.
Cake flour keeps the crumb delicate, while sour cream contributes moisture and tenderness. Egg yolks add richness, butter provides flavor, and baking powder gives the donuts enough lift without turning them into a light, airy yeast donut.
The characteristic cracks and rough edges that appear during frying are part of what makes an old-fashioned cake donut special. They create little spaces where the sweet glaze can settle.
History of Old Fashioned Cake Donuts
Cake donuts have been enjoyed in American kitchens and bakeries for generations. Unlike yeast donuts, which rely on fermentation and rising time, cake donuts use chemical leaveners such as baking powder to create their structure.
Old-fashioned sour cream donuts became particularly beloved because sour cream provided a practical way to make a rich, tender pastry without complicated techniques.
Their rustic appearance is part of their charm. They are not supposed to look perfectly smooth like some modern commercial donuts. The cracked surface, crisp edges, tender center, and simple glaze are what give them their traditional character.
Important Tips for Success
Keep the Dough Cool
Cold dough is easier to roll and cut. If the dough becomes too soft while working, return it to the refrigerator for a short time.
Do Not Overmix
Once the flour is incorporated, stop mixing. Excessive mixing can produce a tougher donut.
Watch the Oil Temperature
Aim for approximately 175 to 180°C. Maintaining a consistent temperature is one of the most important secrets to properly fried donuts.
Do Not Overcrowd the Pot
Frying too many donuts at once can lower the oil temperature dramatically. Work in small batches.
Use Full-Fat Sour Cream
Full-fat sour cream gives the best flavor and texture. It contributes richness and helps keep the crumb moist.
Glaze While Slightly Warm
Donuts that are slightly warm allow the glaze to settle beautifully over the surface without melting completely.
Serving Suggestions
These donuts are wonderful served fresh with coffee, tea, hot chocolate, or a cold glass of milk.
For a special breakfast, arrange them on a large serving platter and allow everyone to choose between freshly glazed donuts and lightly dusted donuts.
They are also excellent for weekend breakfasts, family gatherings, brunches, bake sales, and afternoon treats.
Storage
Store completely cooled glazed donuts in an airtight container at room temperature for up to two days.
For the best texture, enjoy them on the day they are made.
If you need to keep them longer, place them in an airtight container and rewarm them very briefly before serving. Keep in mind that the glaze may become softer after storage.
A Few Variations
You can make several delicious variations from the same basic dough.
For a cinnamon version, add a small amount of ground cinnamon to the dry ingredients.
For a vanilla glaze, increase the vanilla slightly.
For a maple-style glaze, replace part of the milk with maple syrup.
For a chocolate glaze, combine powdered sugar with unsweetened cocoa powder before adding the milk.
You can also finish the glazed donuts with a light dusting of cinnamon or finely grated chocolate.
Conclusion
Old Fashioned Sour Cream Glazed Donuts are a beautiful example of simple baking done well. There is no yeast to activate, no long rising period, and no complicated decoration. The magic comes from the careful balance of a tender sour cream dough, properly heated oil, and a smooth sweet glaze.
The finished donuts should have a lightly crisp exterior, a rich and tender center, and just enough glaze to provide sweetness without overwhelming the delicate flavor of the donut.
This is the kind of recipe worth keeping in the family collection. It is comforting, dependable, and wonderfully nostalgic, making every batch feel like something special from an old-fashioned neighborhood bakery.
For the Lovers of Classic Homemade Donuts
If you love donuts that are rich, tender, slightly crisp around the edges, and generously coated with a simple glaze, this recipe deserves a permanent place in your kitchen.
The best part is that you can make them fresh, serve them warm, and enjoy that unmistakable homemade flavor that packaged donuts simply cannot reproduce.
A good old-fashioned donut does not need to be complicated. It only needs good ingredients, careful preparation, and a little patience.