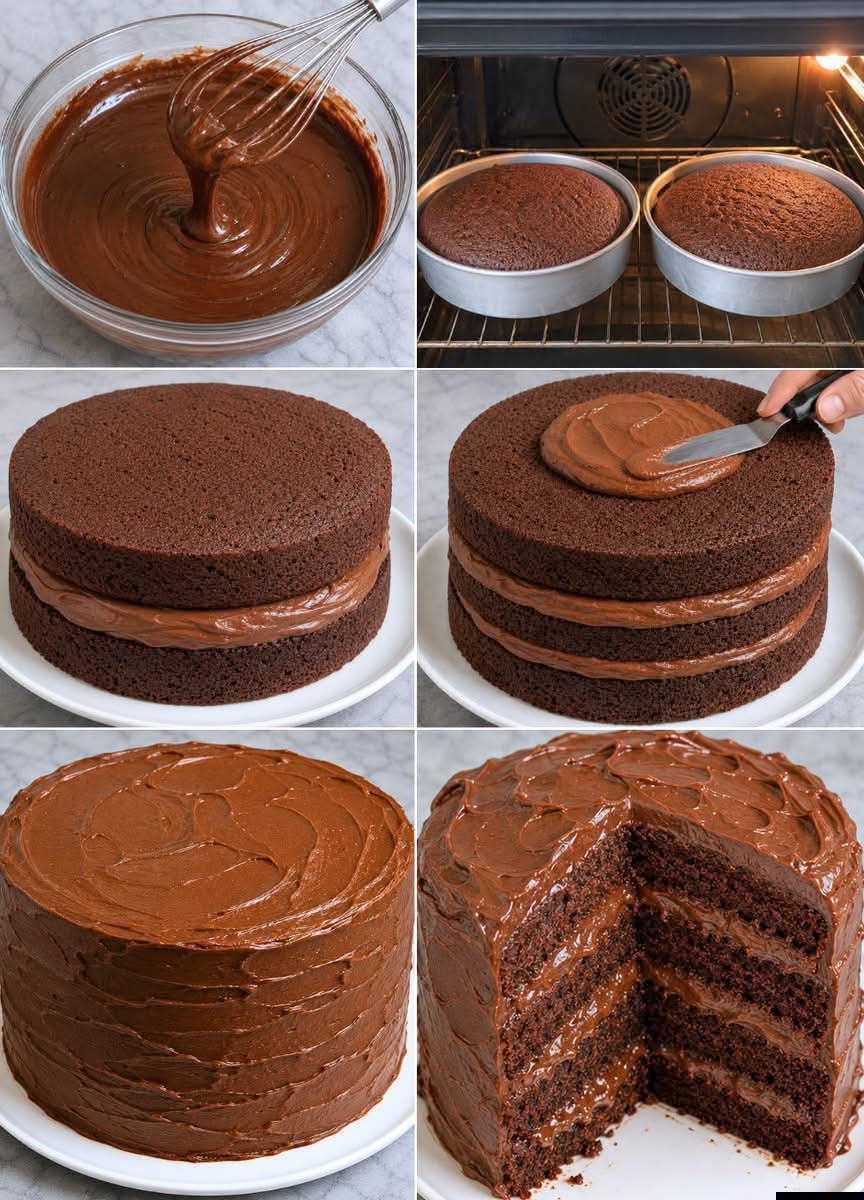
Homemade Chocolate Tart — Moist, Rich, and Decadent
Introduction
This homemade chocolate tart is a rich, moist, and deeply chocolatey dessert inspired by the indulgent style of the famous Matilda cake. It combines a soft cocoa cake, a simple soaking syrup, and a generous semi-sweet chocolate ganache. The result is a beautiful layered dessert with a tender crumb and a creamy chocolate finish.
The secret to its irresistible texture is the combination of vegetable oil, milk, syrup, and ganache. The cake stays moist without becoming heavy, while the chocolate ganache adds a smooth, luxurious richness. It is an excellent dessert for birthdays, family celebrations, holidays, dinner parties, or simply whenever you want an impressive homemade chocolate dessert.
Ingredients
For the Chocolate Cake
For one 22 cm round cake pan:
- 3 large eggs
- 200 g granulated sugar
- 120 ml vegetable oil
- 240 ml milk
- 200 g all-purpose flour
- 50 g unsweetened cocoa powder
- 1 tablespoon baking powder
- 1 teaspoon vanilla extract
- 1 small pinch of salt
For the Chocolate Ganache
- 300 g semi-sweet chocolate, finely chopped
- 300 ml heavy cream
For the Soaking Syrup
- 120 ml water
- 50 g granulated sugar
Equipment
- 22 cm round cake pan
- Mixing bowls
- Whisk
- Spatula
- Small saucepan
- Heat-resistant bowl
- Long, sharp knife
- Cake spatula
- Serving plate
Method
1. Prepare the Cake Pan
Preheat the oven to 175°C.
Grease a 22 cm round cake pan thoroughly with butter or vegetable oil. Line the bottom with parchment paper if desired. Dust the sides lightly with flour or cocoa powder.
This preparation helps the cake release easily after baking.
2. Prepare the Chocolate Cake Batter
In a large bowl, combine the eggs and sugar. Whisk until the mixture becomes smooth and slightly lighter in color.
Add the vegetable oil, milk, and vanilla extract. Mix gently until everything is well incorporated.
In a separate bowl, sift together the flour, unsweetened cocoa powder, baking powder, and salt.
Gradually add the dry ingredients to the wet mixture.
Mix slowly from the center outward until you have a smooth, lump-free batter. Do not overmix. Overmixing can develop too much gluten and make the finished cake less tender.
Pour the batter into the prepared cake pan and gently tap the pan against the counter once or twice to remove large air bubbles.
3. Bake the Cake
Place the cake in the preheated oven and bake for approximately 35 to 45 minutes.
The exact baking time will depend on your oven and pan. Begin checking around 35 minutes.
Insert a toothpick or skewer into the center. It should come out clean or with a few moist crumbs attached.
Do not overbake the cake. This is especially important because the goal is a moist, tender chocolate crumb.
Remove the cake from the oven and allow it to cool in the pan for approximately 10 to 15 minutes.
Then carefully transfer it to a wire rack and allow it to cool completely.
4. Prepare the Chocolate Ganache
Finely chop the semi-sweet chocolate and place it in a heat-resistant bowl.
Pour the heavy cream into a saucepan and heat over medium heat until it becomes very hot and begins to steam. Do not allow it to reach a vigorous boil.
Pour the hot cream over the chopped chocolate.
Let the mixture stand undisturbed for about 1 minute.
Using a spatula or whisk, slowly mix from the center outward. Continue stirring gently until the chocolate has completely melted and the ganache becomes smooth, glossy, and free of lumps.
Allow the ganache to cool at room temperature until it thickens enough to spread easily.
If you want to speed up the process, place it in the refrigerator for a few minutes. Check it frequently and stir occasionally so it does not become too firm.
The ideal consistency should be creamy and spreadable, similar to a thick chocolate frosting.
5. Prepare the Soaking Syrup
Place the water and sugar in a small saucepan.
Heat over medium heat for approximately 3 to 5 minutes, stirring occasionally, until the sugar has completely dissolved.
Remove from the heat and allow the syrup to cool completely.
The syrup does not need to become thick. Its purpose is simply to add moisture and a subtle sweetness to the cake layers.
6. Cut the Cake Into Layers
Once the cake is completely cold, inspect the top.
If the cake has developed a rounded or domed top, carefully trim it using a long, sharp knife.
Then divide the cake into two or three equal layers.
Work slowly and keep the knife level as you cut through the cake. Taking your time here will help create even layers and a more attractive finished dessert.
7. Assemble the Chocolate Tart
Place the first cake layer on a serving plate.
Using a pastry brush or spoon, gently moisten the surface with the cooled syrup.
Do not saturate the cake. The goal is to make it moist and tender without making it soggy.
Spread a generous layer of chocolate ganache evenly over the cake.
Place the second cake layer on top.
Again, lightly moisten it with syrup and cover it with another layer of ganache.
If you have divided the cake into three layers, repeat the same process with the remaining layer.
Finish with the final cake layer.
8. Cover the Cake With Ganache
Use the remaining ganache to cover the top and sides of the cake.
Spread it generously with a spatula.
The finish does not need to be perfectly smooth. In fact, creating natural waves, swirls, and textured strokes gives the cake a rustic homemade appearance.
For a dramatic chocolate-cake presentation, allow the ganache to form thick, generous swirls across the surface.
9. Chill and Set
Place the assembled cake in the refrigerator for approximately 30 minutes.
This allows the ganache to firm slightly and helps the layers hold together when sliced.
For the best texture, remove the cake from the refrigerator about 20 minutes before serving. This allows the ganache to soften and return to a creamy consistency.
Important Tips for an Extra-Moist Cake
The most important rule is to avoid overbaking. Chocolate cake can become dry quickly if left in the oven too long.
Do not overmix the batter once the flour has been added. Mix only until the ingredients are combined.
Allow the cake to cool completely before cutting it into layers. A warm cake is much more likely to crumble or break.
Use the syrup sparingly. Several light applications are better than pouring too much syrup onto one spot.
For the richest flavor, use good-quality unsweetened cocoa powder and semi-sweet chocolate.
For an especially moist and flavorful result, prepare the cake one day in advance. Keep it covered and refrigerated, then remove it approximately 20 minutes before serving.
Formation and Presentation
For a beautiful presentation, place the finished cake on a simple serving plate or cake stand.
Keep the ganache slightly textured rather than perfectly smooth. Rustic swirls make the dessert look generous and homemade.
When slicing, use a large sharp knife. For particularly clean slices, warm the knife under hot water, dry it thoroughly, and then cut the cake. Repeat between slices if necessary.
The contrasting layers of dark chocolate cake and creamy ganache make every slice look rich and inviting.
History and Inspiration
The style of this dessert is inspired by the extravagant chocolate cake associated with the film Matilda, particularly the memorable scene featuring an enormous chocolate cake.
The Matilda-style chocolate cake has become a popular inspiration for home bakers because of its deliberately excessive appearance: thick layers of moist chocolate cake covered with abundant chocolate frosting or ganache.
This homemade version captures that same spirit while using straightforward ingredients and a simple preparation method. The soaking syrup is an especially useful technique for maintaining moisture between the layers.
Serving Suggestions
Serve the cake slightly cool but not ice-cold so that the ganache has a soft, creamy texture.
It pairs beautifully with:
- Fresh strawberries
- Raspberries
- Fresh whipped cream
- Vanilla ice cream
- A dusting of cocoa powder
- Chocolate shavings
- Fresh berries
- A light drizzle of chocolate sauce
For a special occasion, serve each slice with a small spoonful of whipped cream or a scoop of vanilla ice cream.
Storage
Keep the finished cake covered in the refrigerator.
It is best enjoyed within several days while the cake and ganache remain fresh and moist.
Before serving, allow refrigerated slices to sit at room temperature for approximately 15 to 20 minutes. This softens the ganache and brings out the chocolate flavor.
Conclusion
This homemade chocolate tart is everything a chocolate dessert should be: moist, tender, rich, creamy, and intensely chocolatey. The soft cocoa cake absorbs just enough syrup to remain succulent, while the generous semi-sweet ganache provides a smooth and luxurious finish.
The recipe is simple enough for a home baker but impressive enough for celebrations. The rustic chocolate finish means you do not need perfect decorating skills—the more generous and textured the ganache looks, the more tempting the cake becomes.
For chocolate lovers, this is the kind of dessert that deserves a place among the most memorable homemade cakes. Its combination of moist chocolate layers and creamy ganache makes every bite rich, satisfying, and wonderfully indulgent.