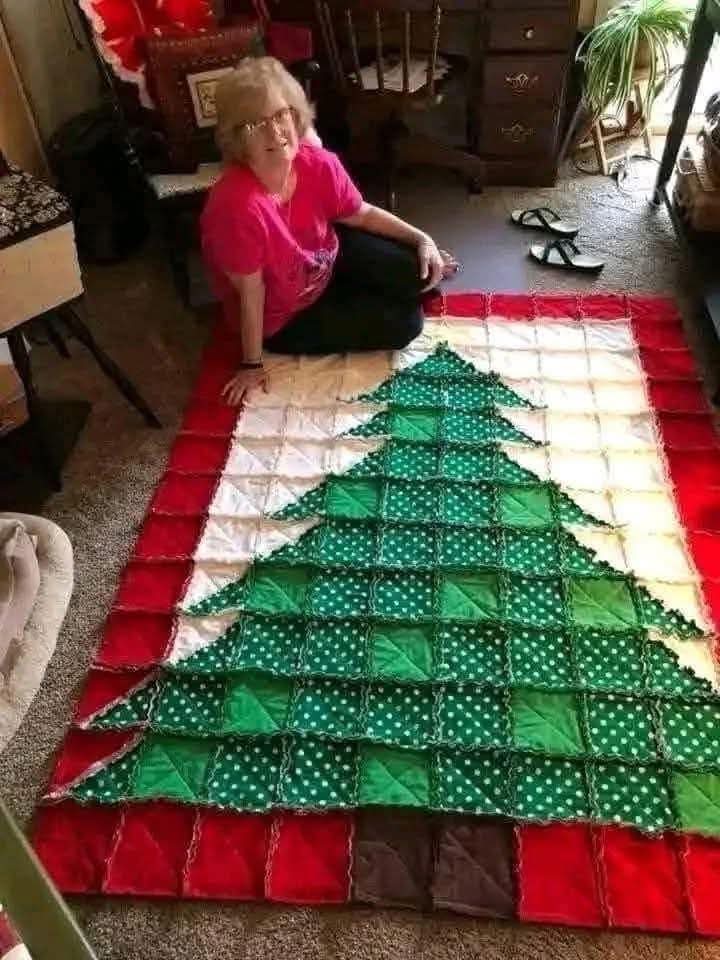
Patchwork Christmas Tree Quilt
Introduction
A patchwork Christmas tree quilt is more than a collection of fabric scraps stitched together. It is a handmade celebration of Christmas, creativity, memories, and personal style. Some quilts are elegant and traditional, while others are colorful, playful, and wonderfully imperfect. That is exactly what makes a patchwork Christmas tree quilt so special.
If you love yours, that is what matters most. Quilting is a form of personal expression, and there is no rule saying that every Christmas quilt must match a particular decorating style. A cheerful patchwork design can bring warmth and personality to a home during the holiday season.
This project creates a cozy Christmas tree quilt using fabric pieces, simple patchwork techniques, and careful quilting. It is suitable for beginners and experienced quilters alike.
Ingredients and Materials
For a finished quilt approximately 50 by 60 inches, you will need:
- 1½ yards green cotton fabric for Christmas tree pieces
- 1 yard assorted green fabric scraps for additional tree pieces
- 1 yard red cotton fabric for accents
- 1 yard cream or white cotton fabric for background
- ½ yard brown cotton fabric for tree trunks
- ½ yard assorted Christmas-print fabrics
- ⅓ yard gold or yellow fabric for stars
- 3½ yards cotton fabric for the quilt backing
- ½ yard fabric for binding
- Approximately 3½ yards quilt batting
- Coordinating cotton thread
- Sewing machine
- Rotary cutter
- Cutting mat
- Quilting ruler
- Fabric scissors
- Sewing pins or quilting clips
- Iron and ironing board
- Seam ripper
- Hand-sewing needle
- Fabric marking pencil
- Walking foot, if available
Choosing the Fabric
The beauty of a patchwork Christmas tree quilt comes from the combination of fabrics.
You can use traditional Christmas colors such as forest green, cranberry red, cream, gold, and brown. You can also mix in plaids, stripes, small florals, polka dots, vintage Christmas prints, or fabrics left over from previous projects.
Do not worry if the fabrics are not perfectly coordinated. Slight differences in color and pattern are part of the charm of patchwork.
For a softer vintage appearance, choose fabrics with slightly muted colors. For a cheerful modern quilt, choose brighter greens and reds.
Preparation
Before cutting the fabric, wash and dry the cotton pieces if you normally prewash your quilting fabrics. This helps prevent unexpected shrinking after the quilt is finished.
Press every fabric piece carefully so that the cutting process is accurate.
Prepare a clean workspace and arrange your fabrics by color. Keep your green fabrics together, your reds together, and your background fabrics together.
Forming the Christmas Trees
The Christmas trees can be made from simple triangular fabric pieces.
For each tree, cut several green triangles in different shades and patterns. The triangles can vary slightly in size to create a playful patchwork appearance.
Arrange the green pieces from smallest at the top to largest at the bottom. Place a small brown rectangle underneath each tree to represent the trunk.
Sew the triangle sections together carefully, pressing each seam after sewing.
The trees do not need to look identical. In fact, allowing each tree to have its own combination of fabrics gives the finished quilt more personality.
Making the Patchwork Blocks
Begin by cutting your background fabric into equal-sized squares.
For each block, position one Christmas tree in the center. Add the tree trunk underneath.
Surround the tree with cream, white, red, or Christmas-print fabric pieces.
Sew the pieces together using approximately a ¼-inch seam allowance.
After completing each seam, press it carefully. Consistent pressing will help the blocks remain flat and make the final quilt easier to assemble.
Continue making blocks until you have enough for the desired quilt size.
Arranging the Quilt
Lay all of your completed blocks on a large flat surface.
Do not sew them together immediately.
Move the blocks around until the colors and patterns are balanced. Try not to place too many dark green pieces next to one another unless you intentionally want a deeper, more traditional appearance.
Step back and look at the arrangement from a distance.
This is the stage where you can experiment freely. The quilt does not need to be perfectly symmetrical.
Once you are happy with the arrangement, take a photograph so you can remember the layout.
Sewing the Quilt Top
Sew the blocks together row by row.
First, join the blocks across each row. Press the seams.
Then sew the rows together, matching the seams as carefully as possible.
Pin or clip the intersections before sewing so the blocks remain aligned.
Once all the rows are connected, press the entire quilt top.
You now have the completed patchwork Christmas tree quilt top.
Adding Decorative Details
This is where you can make the quilt truly personal.
Add small stars above the Christmas trees using gold or yellow fabric.
You can also add:
- Small fabric ornaments
- Red bows
- Candy cane shapes
- Snowflake appliqué
- Tiny pockets
- Embroidered stars
- Decorative buttons
- Personalized initials
- Christmas-themed embroidery
- Small pieces of sentimental fabric
If you are making the quilt as a family keepsake, consider incorporating pieces of clothing, old Christmas pajamas, tablecloths, or other washable fabrics that have sentimental meaning.
Forming the Quilt Sandwich
Lay the backing fabric flat with the wrong side facing upward.
Place the batting over the backing.
Carefully place the finished quilt top over the batting with the right side facing upward.
Smooth all three layers from the center toward the edges.
Secure the layers with quilting pins, clips, or temporary basting.
Take your time with this step because wrinkles or folds trapped between the layers can affect the finished quilt.
Quilting Method
You can quilt the project by machine or by hand.
For a simple beginner-friendly method, quilt around the Christmas tree shapes.
Another option is straight-line quilting through the background sections.
You can also quilt gentle diagonal lines across the quilt to create a traditional geometric appearance.
If you prefer hand quilting, use a strong quilting thread and make evenly spaced stitches.
The quilting does not need to be perfect. Handmade quilts often become more beautiful because they show the maker’s individual touch.
Binding the Quilt
After quilting, trim the edges so that the backing, batting, and quilt top are even.
Cut your binding fabric into strips approximately 2½ inches wide.
Join the strips together to create one continuous length.
Sew the binding around the front edge of the quilt.
Fold it around the raw edge and hand-stitch or machine-stitch it securely to the back.
Press the finished binding carefully.
History of Patchwork Quilting
Patchwork quilting has a long history across many cultures. People have traditionally joined smaller pieces of fabric together to create blankets, clothing, household textiles, and decorative objects.
One of the practical reasons for patchwork was the desire to make use of leftover fabric rather than allowing valuable material to go to waste.
Over time, patchwork became much more than a practical sewing technique. Quilts became family heirlooms, gifts, memory pieces, and artistic expressions.
Christmas quilts developed as part of the broader tradition of seasonal textile decoration. Tree designs became especially popular because the Christmas tree is one of the most recognizable symbols of the holiday season.
A patchwork Christmas tree quilt therefore combines two traditions: the resourcefulness of patchwork and the warmth of handmade Christmas decoration.
The Formation of the Quilt
The formation of the quilt follows several important stages.
First comes the selection of fabrics. Then the fabrics are cut into individual pieces. Those pieces are sewn into Christmas tree blocks. The blocks are arranged into rows and joined together to create the quilt top.
The quilt top is then layered with batting and backing. Quilting secures the three layers together, while binding finishes the raw edges.
Each stage contributes to the final character of the quilt.
Why Handmade Quilts Are Special
A handmade quilt does not have to look like something from a department store.
It can be colorful, unusual, old-fashioned, modern, simple, elaborate, or even a little quirky.
The most important part is the meaning behind it.
Perhaps one fabric came from an old shirt. Another may have been leftover from another sewing project. One piece might remind you of a Christmas from years ago.
Those little details cannot be purchased in a store.
For Quilt Lovers
Quilt lovers understand that there is beauty in individuality.
A quilt does not have to please everyone. It only needs to bring happiness to the person who made it or the person who receives it.
If someone thinks a colorful patchwork Christmas tree quilt is tacky, that is simply their opinion. Someone else may see the same quilt as cheerful, nostalgic, cozy, and full of character.
The best handmade projects are often the ones that make us smile.
Care and Storage
Wash the quilt gently using a mild detergent.
Avoid harsh bleach unless the fabric manufacturer specifically recommends it.
Use cool or lukewarm water and a gentle cycle.
Dry the quilt on a low setting or allow it to air-dry.
For long-term storage, fold the quilt loosely and keep it in a cool, dry location. Avoid storing it in direct sunlight because prolonged exposure can fade the fabrics.
If the quilt is particularly valuable or sentimental, consider storing it in a breathable cotton cover rather than plastic.
Conclusion
A patchwork Christmas tree quilt is a celebration of creativity, patience, tradition, and personal taste.
It does not need to be perfect. It does not need to follow the latest decorating trend. It does not need to impress everyone.
If you made it with care and you love the way it looks, then it has already succeeded.
The colorful fabric pieces, uneven little details, handmade stitching, and Christmas tree shapes all become part of its story. Years from now, those imperfections may be exactly what makes the quilt memorable.
So make the quilt you love. Choose the colors that make you happy, use the fabrics that have meaning to you, and let your Christmas tree quilt be proudly, wonderfully yours.