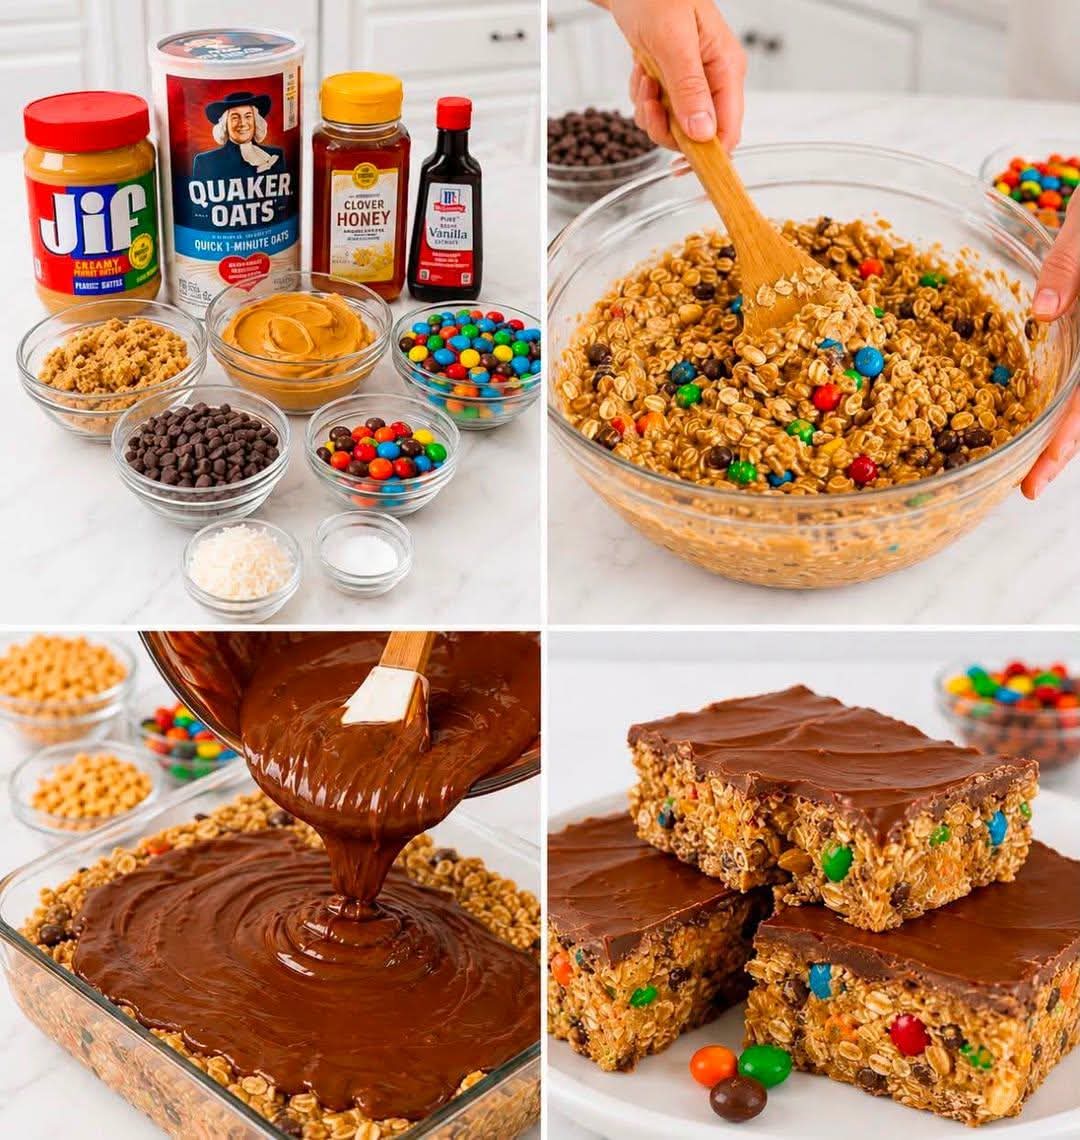
No-Bake Monster Cookie Bars
Introduction
No-Bake Monster Cookie Bars are a wonderfully easy treat for anyone who loves the classic combination of peanut butter, oats, chocolate chips, and colorful candy. These bars require no oven, making them especially convenient when you want a homemade dessert without heating the kitchen.
The texture is chewy and satisfying, with hearty oats held together by creamy peanut butter and honey. Mini chocolate chips and M&M’s add little bursts of chocolate and sweetness, while the smooth chocolate-peanut-butter topping creates a rich finish.
They are excellent for lunchboxes, bake sales, family gatherings, afternoon snacks, holiday dessert trays, or simply keeping a batch in the refrigerator for whenever a sweet craving appears.
Ingredients
For the Cookie Bars
- 3 cups quick oats
- 1½ cups creamy peanut butter
- ½ cup honey
- ½ cup packed brown sugar
- 1 teaspoon vanilla extract
- ½ teaspoon salt
- ½ cup mini chocolate chips
- ¾ cup mini M&M’s
- ¼ cup shredded coconut, optional
For the Chocolate Topping
- 1½ cups chocolate chips
- 2 tablespoons creamy peanut butter
For Preparing the Pan
- Parchment paper, or a small amount of butter or nonstick cooking spray
Preparation Time
- Preparation: 20 minutes
- Chilling: 1–2 hours
- Total time: approximately 1½–2½ hours
- Yield: about 16–20 bars, depending on size
History and Inspiration
Monster cookies are traditionally associated with a combination of familiar pantry ingredients such as oats, peanut butter, chocolate, and colorful candy pieces. Their name comes from their generous mixture of ingredients and their indulgent appearance.
The no-bake version takes the same playful idea and transforms it into a refrigerator-friendly treat. Instead of baking the oat mixture, peanut butter and honey help bind the ingredients together. The result is a chewy bar that captures the spirit of a monster cookie while eliminating the need for an oven.
No-bake desserts have long been popular because of their simplicity. They are particularly useful for busy families, summer gatherings, children’s parties, and occasions when a quick homemade dessert is needed.
Method
1. Prepare the Baking Dish
Line an 8×8-inch or 9×9-inch baking dish with parchment paper, leaving some parchment hanging over the sides. This will make the finished bars much easier to remove.
You can also lightly grease the pan if you do not have parchment paper.
For thicker bars, use an 8×8-inch dish. For slightly thinner bars, use a 9×9-inch dish.
2. Make the Peanut Butter Mixture
Place the creamy peanut butter, honey, brown sugar, and vanilla extract into a large mixing bowl.
Stir thoroughly until the ingredients are combined and the mixture becomes smooth and creamy.
The honey provides sweetness and helps bind the mixture, while the brown sugar contributes a deeper caramel-like flavor.
3. Add the Oats
Add the quick oats and salt to the peanut butter mixture.
Stir slowly but thoroughly until every oat is coated with the peanut butter mixture.
This step is important because evenly coated oats help create bars that hold together properly.
4. Add the Chocolate and Candy
Fold in the mini chocolate chips and mini M&M’s.
If you are using shredded coconut, add it at this stage as well.
Mix gently so the candy pieces remain intact and are distributed throughout the mixture.
5. Form the Bars
Transfer the mixture to the prepared baking dish.
Using the back of a spoon, spatula, or the bottom of a measuring cup, press the mixture firmly into the pan.
Take your time with this step. The mixture needs to be packed tightly so the finished bars do not crumble when sliced.
Pay particular attention to the corners and edges.
6. Prepare the Chocolate Topping
Place the 1½ cups of chocolate chips and 2 tablespoons of peanut butter into a microwave-safe bowl.
Microwave for 20–30 seconds at a time.
After each interval, remove the bowl and stir thoroughly.
Continue until the chocolate is almost completely melted. Stirring will help finish the melting process without overheating the chocolate.
If necessary, use shorter microwave intervals toward the end.
7. Cover the Bars
Pour the melted chocolate mixture over the oat base.
Use a spatula to spread the chocolate evenly across the entire surface.
Make sure the chocolate reaches the edges for a beautiful, consistent topping.
8. Chill
Place the baking dish in the refrigerator.
Allow the bars to chill for approximately 1–2 hours, or until the base is firm and the chocolate topping has completely set.
Do not rush this step. Proper chilling helps the bars develop their final texture and makes them easier to cut.
9. Remove From the Pan
Once firm, lift the bars from the baking dish using the parchment-paper overhang.
Place them on a cutting board.
Allow them to sit at room temperature for a few minutes before cutting if the chocolate topping is very firm.
10. Cut and Serve
Using a sharp knife, cut the slab into squares or rectangles.
For smaller snack-sized portions, cut into 20 pieces. For generous dessert bars, cut into 16 pieces.
Serve chilled or allow the bars to sit briefly at room temperature for a softer, chewier texture.
Formation of the Perfect Bars
The secret to successful no-bake cookie bars is achieving the right balance between binding ingredients and dry ingredients.
The peanut butter and honey form the foundation of the mixture. They coat the oats and help everything stick together. Brown sugar adds sweetness and flavor, while the oats provide the structure.
Pressing the mixture firmly into the pan is equally important. If the mixture is only lightly pressed, the finished bars may break apart when lifted or sliced.
The chocolate topping provides another layer of texture. Once chilled, it becomes firm enough to create a satisfying contrast against the softer oat-and-peanut-butter base.
Tips for the Best Results
Use Quick Oats
Quick oats work especially well because their smaller texture makes the bars easier to compact and bite through.
Press Firmly
Do not simply spread the mixture across the pan. Compress it firmly with a spatula or measuring cup.
Do Not Overheat the Chocolate
Chocolate can become thick or grainy if overheated. Short microwave intervals combined with frequent stirring provide better control.
Customize the Candy
You can use different varieties of M&M’s or other small chocolate candies depending on the occasion.
Add More Texture
For additional crunch, consider adding chopped peanuts, almonds, or sunflower seeds.
Make Them Extra Chocolatey
A small drizzle of melted chocolate over the finished bars can create an attractive bakery-style appearance.
Keep Them Cool
Because peanut butter and chocolate soften at warmer temperatures, refrigeration helps maintain the best texture.
Variations
Peanut Butter Chocolate Monster Bars
Add an additional handful of mini chocolate chips to the oat mixture for an even richer chocolate flavor.
Coconut Monster Bars
Use the optional shredded coconut and increase it slightly if you enjoy a stronger coconut flavor.
Peanut Crunch Bars
Add approximately ½ cup of chopped roasted peanuts for extra crunch.
Holiday Monster Bars
Use seasonal-colored candy pieces to match Christmas, Halloween, Valentine’s Day, birthdays, or other celebrations.
Dark Chocolate Version
Replace the regular chocolate chips with dark chocolate chips for a deeper, less sweet chocolate flavor.
White Chocolate Version
Use white chocolate chips for the topping and combine them with colorful candy pieces for a completely different appearance.
Storage
Store the finished bars in an airtight container in the refrigerator.
They can generally be enjoyed for several days when properly refrigerated.
For a softer texture, remove a bar from the refrigerator and let it sit at room temperature for several minutes before eating.
The bars can also be individually wrapped, making them convenient for packed lunches and grab-and-go snacks.
Serving Suggestions
These cookie bars are delicious on their own, but they can also be served with:
- A glass of cold milk
- Hot coffee
- Tea
- Hot chocolate
- Vanilla ice cream
- Fresh berries
- A drizzle of additional peanut butter
- A light chocolate drizzle
For parties, arrange the bars on a large dessert platter and cut them into small squares so guests can easily enjoy them alongside other treats.
Why People Love These Bars
These bars bring together several flavors that naturally complement one another. Peanut butter provides richness and saltiness, honey contributes sweetness, oats give the dessert a hearty chewy texture, while chocolate and M&M’s make every bite fun and indulgent.
The best part is that there is no baking required. Everything comes together in a mixing bowl and a baking dish, followed by a simple chilling period.
They are also highly adaptable. You can change the chocolate, candy, coconut, or nuts according to your preferences while keeping the basic method the same.
Conclusion
No-Bake Monster Cookie Bars are the kind of homemade treat that proves dessert does not have to be complicated. With quick oats, creamy peanut butter, honey, brown sugar, chocolate chips, and colorful M&M’s, you can create a rich, chewy, satisfying dessert with very little preparation.
The firm oat base, creamy peanut butter flavor, colorful candy pieces, and smooth chocolate topping make these bars especially appealing to both children and adults.
Whether you prepare them for a family gathering, a bake sale, a lunchbox treat, or simply as an easy homemade dessert, these No-Bake Monster Cookie Bars are a dependable recipe worth keeping in your collection.
Final Method at a Glance
- Line an 8×8 or 9×9-inch pan with parchment.
- Mix peanut butter, honey, brown sugar, and vanilla.
- Stir in oats and salt.
- Fold in mini chocolate chips, M&M’s, and optional coconut.
- Press the mixture firmly into the pan.
- Melt chocolate chips with peanut butter.
- Spread the chocolate topping over the bars.
- Refrigerate for 1–2 hours.
- Lift from the pan.
- Cut into squares and serve.
These are simple, chewy, chocolatey, peanut-butter-rich bars that require no oven and are perfect for making ahead.