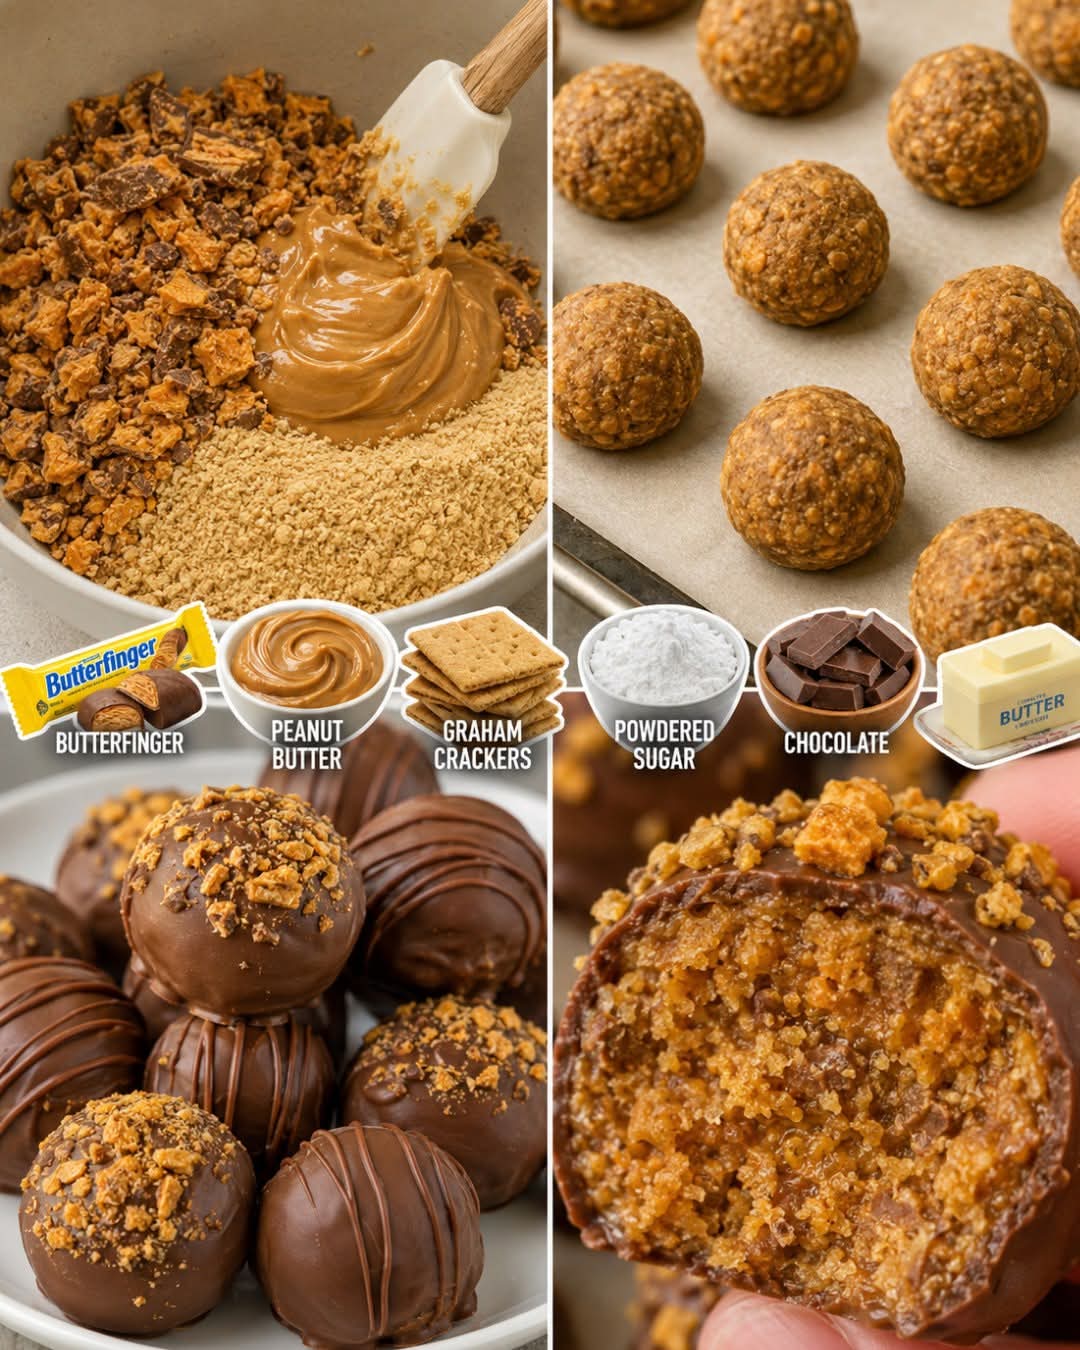
🍫 Butterfinger Balls — No-Bake Peanut Butter Chocolate Treat
Butterfinger Balls are one of those wonderfully simple desserts that taste far more complicated than they actually are. They combine creamy peanut butter, buttery sweetness, crunchy Butterfinger pieces, and a smooth chocolate coating into bite-sized treats that are perfect for holidays, parties, bake sales, cookie trays, or simply keeping in the refrigerator for a sweet snack.
This style of no-bake candy is closely related to peanut-butter balls and Buckeye-style treats, while the crushed Butterfinger adds an extra crispy, caramel-peanut crunch. Similar recipes commonly use peanut butter, powdered sugar, graham-cracker crumbs and crushed Butterfinger before dipping the balls in chocolate.
❤️ Why You’ll Love These Butterfinger Balls
- No oven required
- Easy enough for beginners
- Creamy and crunchy at the same time
- Chocolate and peanut butter make a classic combination
- Great for Christmas, birthdays, parties and potlucks
- Can be prepared ahead of time
- Beautiful enough for a dessert platter
- Easy to customize with different chocolate and toppings
🥜 Ingredients
For the Butterfinger Filling
- 1 cup creamy peanut butter
- 4 tablespoons unsalted butter, softened
- 1 teaspoon vanilla extract
- 1 cup powdered sugar
- ¾ cup finely crushed graham cracker crumbs
- ½ cup finely crushed Butterfinger candy bars
- ¼ teaspoon salt, optional
For the Chocolate Coating
- 10–12 ounces chocolate melting wafers, chocolate almond bark, or chocolate chips
- 1 teaspoon coconut oil or shortening, optional, for a smoother coating
For Decorating
- 2–3 tablespoons crushed Butterfinger pieces
- Chocolate drizzle, optional
- Holiday sprinkles, optional
- Flaky sea salt, optional
This ingredient combination follows the common no-bake Butterfinger-ball method of combining a peanut-butter base with crumbs and candy pieces, chilling the mixture, then coating the formed balls in chocolate.
🍬 Formation of the Butterfinger Balls
The recipe is built in four delicious layers of texture:
1. Creamy base: Peanut butter and butter create a rich, smooth foundation.
2. Sweet structure: Powdered sugar and graham-cracker crumbs thicken the mixture so it can be rolled.
3. Butterfinger crunch: Crushed candy pieces bring the distinctive crispy peanut-butter-caramel texture.
4. Chocolate shell: The chilled balls are dipped in melted chocolate, creating a firm exterior around the soft, crunchy center.
That contrast between the creamy center, crispy candy and chocolate coating is what makes these little treats so irresistible.
👩🍳 Instructions
Step 1: Prepare Your Workspace
Line a baking sheet with parchment paper or wax paper.
Set out a large mixing bowl, measuring cups, a cookie scoop or tablespoon, and a fork or dipping tool.
Keeping everything ready before you begin makes the process much easier.
Step 2: Crush the Butterfinger
Place the Butterfinger bars in a sealed food-storage bag.
Use a rolling pin or the bottom of a heavy glass to crush them into small pieces.
Don’t pulverize everything into powder. You want a mixture containing fine crumbs plus little crunchy pieces.
Reserve a few tablespoons of crushed Butterfinger for decorating.
Step 3: Make the Peanut Butter Base
Place the softened butter and peanut butter into a large mixing bowl.
Beat until smooth and creamy.
Add the vanilla extract and mix again.
The mixture should look silky and well combined.
Step 4: Add the Powdered Sugar
Gradually add the powdered sugar.
Mix after each addition rather than adding it all at once.
The mixture will become thicker and more dough-like.
If you’re mixing by hand, use a sturdy spatula or wooden spoon.
Step 5: Add the Crunch
Add:
- Graham-cracker crumbs
- Crushed Butterfinger
- Optional salt
Fold everything together until the candy pieces are evenly distributed.
The finished mixture should be thick enough to hold its shape when pressed together.
❄️ Step 6: Chill the Mixture
Cover the bowl and refrigerate for about 30 minutes.
Chilling makes the mixture easier to handle and helps the finished balls hold their shape. Similar recipes use approximately 30 minutes of chilling before shaping or dipping.
🍡 Step 7: Form the Balls
Scoop approximately 1 tablespoon of mixture at a time.
Roll between your palms until you have a smooth ball.
Place each ball on the prepared parchment-lined tray.
Continue until all of the mixture has been used.
You should get approximately 20–24 bite-sized balls, depending on how large you make them.
For a party platter, smaller balls are especially attractive because they’re easy to pick up and eat.
❄️ Step 8: Chill Again
Place the formed balls into the refrigerator or freezer.
- Refrigerator: about 30 minutes
- Freezer: approximately 15–20 minutes
You want them firm and cold before dipping them in chocolate.
🍫 Step 9: Melt the Chocolate
Place the chocolate in a microwave-safe bowl.
Heat in short intervals, stirring between each one, until completely smooth.
If using chocolate chips, a small amount of coconut oil or shortening can help produce a smoother dipping consistency.
You can also melt the chocolate gently using a double boiler.
Important: Don’t overheat the chocolate. Gentle heating and frequent stirring help prevent scorching.
🥄 Step 10: Dip the Butterfinger Balls
Take one chilled ball at a time.
Place it into the melted chocolate.
Use a fork to turn it gently until completely coated.
Lift it out and allow excess chocolate to drip back into the bowl.
Place it onto parchment paper.
Repeat with the remaining balls.
✨ Step 11: Decorate
While the chocolate is still wet, sprinkle each ball with crushed Butterfinger pieces.
You can also add:
- White chocolate drizzle
- Milk chocolate drizzle
- Sprinkles
- Chopped peanuts
- Flaky sea salt
For Christmas, use red and green sprinkles.
For Valentine’s Day, try pink, red and white.
For birthdays, use colorful sprinkles.
❄️ Step 12: Let the Chocolate Set
Place the finished Butterfinger Balls in the refrigerator until the chocolate coating becomes firm.
This usually takes around 20–30 minutes.
Once completely set, transfer them to an airtight container.
⭐ Best Method for Perfect Butterfinger Balls
The secret is temperature.
The peanut-butter mixture should be firm but rollable, and the balls should be cold before dipping.
If the mixture is too soft:
➡️ Add a little more graham-cracker crumb or powdered sugar.
If the mixture is too dry:
➡️ Add a small spoonful of peanut butter.
If the chocolate is too thick:
➡️ Add a tiny amount of coconut oil or shortening.
If the chocolate begins hardening while you’re dipping:
➡️ Warm it gently again and stir thoroughly.
🍫 Chocolate Variations
Milk Chocolate Butterfinger Balls
Use milk chocolate for an especially sweet, candy-bar-style dessert.
Dark Chocolate Butterfinger Balls
Dark chocolate provides a richer flavor and balances the sweetness of the filling.
White Chocolate Butterfinger Balls
White chocolate creates a beautiful contrast with the golden Butterfinger center.
Chocolate + Peanut Butter Drizzle
Dip the balls in chocolate and drizzle melted peanut butter-flavored candy coating across the top.
🥜 Butterfinger Lovers’ Version
If you’re a serious Butterfinger lover, increase the crushed candy in the filling and sprinkle additional Butterfinger pieces over the chocolate coating.
You can even press a tiny piece of Butterfinger into the top while the chocolate is still wet.
Every bite then gives you:
Chocolate → creamy peanut butter → crispy Butterfinger → more chocolate.
💡 Helpful Tips
Use conventional creamy peanut butter
Many recipes recommend regular, shelf-stable peanut butter rather than very oily natural peanut butter because the latter can make the mixture more difficult to shape.
Don’t make the balls too large
About 1 inch is ideal. Larger balls can become difficult to dip and are very rich.
Crush, don’t pulverize
A combination of fine Butterfinger crumbs and small crunchy pieces gives the best texture.
Keep them cold
Cold balls are much easier to coat in chocolate.
Don’t rush the chocolate
Let the coating completely set before moving the candies into a storage container.
🧁 Make-Ahead Method
Butterfinger Balls are excellent for preparing ahead.
Prepare the balls, coat them in chocolate, allow them to set completely, and then store them in an airtight container in the refrigerator.
They can also be frozen in an airtight container for longer storage; some recipe sources recommend freezing for up to several months.
For serving, allow frozen balls to thaw gradually in the refrigerator.
🎉 Perfect Occasions for Butterfinger Balls
These little treats are perfect for:
- Christmas cookie trays
- Thanksgiving dessert tables
- Birthday parties
- Baby showers
- Bridal showers
- Family gatherings
- Potlucks
- Bake sales
- School celebrations
- Game-day parties
- Homemade food gifts
- Holiday candy boxes
They are especially convenient for gatherings because they are small, portionable and can be made ahead.
📖 A Little History & Inspiration
Butterfinger Balls aren’t a traditional historical candy with one universally recognized inventor. Rather, they’re part of the broader American tradition of homemade peanut-butter balls and chocolate-coated candies.
The concept resembles Buckeye-style candies, which pair peanut butter with chocolate, but Butterfinger Balls add crushed candy and often graham-cracker crumbs for extra texture.
Over time, home cooks have developed many variations—some use graham crackers, while others use crispy cereal such as Corn Flakes or Rice Krispies to create additional crunch.
The result is a modern no-bake treat that combines familiar candy-shop flavors with the simplicity of a homemade dessert.
❤️ Why Lovers of Peanut Butter Desserts Love Them
There is something special about the combination of peanut butter and chocolate.
The peanut butter brings richness and creaminess.
The Butterfinger provides crispness and caramelized sweetness.
The chocolate adds a smooth, slightly bitter contrast.
And the graham crackers give the mixture structure while contributing a subtle toasted flavor.
Together, those textures make every bite more interesting than an ordinary chocolate truffle.
🍽️ Serving Method
For the prettiest presentation, arrange the Butterfinger Balls on a white or glass serving platter.
Place them in small cupcake liners.
Add a little crushed Butterfinger over the top.
For a holiday table, arrange them in rows according to decoration or chocolate type.
Serve chilled or slightly cool.
🏆 Final Result
After chilling and coating, you should have beautiful little golden-centered candies covered in a glossy chocolate shell.
When you bite through the chocolate, you get a soft peanut-butter center followed by crunchy Butterfinger pieces.
They’re rich, sweet, creamy, crispy and wonderfully chocolatey—all without turning on the oven.
❤️ Final Conclusion
Butterfinger Balls are the kind of dessert that disappears quickly from the table. They’re easy enough for a beginner, impressive enough for a party, and versatile enough to customize for practically any holiday.
Make a batch, chill them well, dip them generously in chocolate, sprinkle them with extra Butterfinger crunch, and watch everyone reach for just one more. 🍫🥜❤️
**If you love peanut butter + chocolate + Butterfinger crunch, this recipe is definitely one to save!**