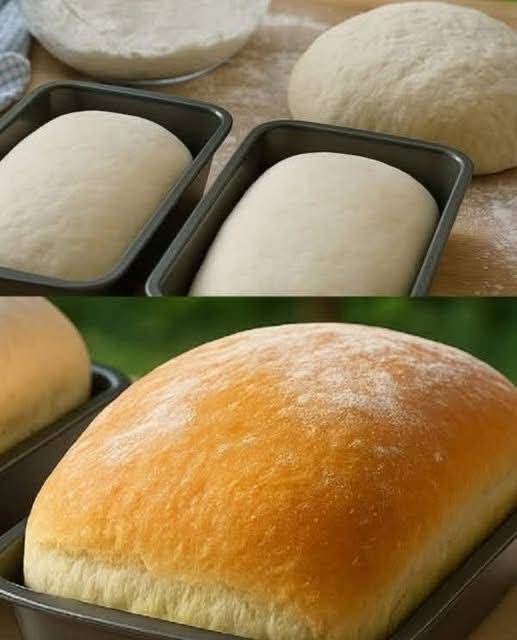
Absolutely! Here is a detailed, comforting, from-scratch version of The Best White Bread, with a soft crumb, golden crust, and that wonderful homemade-bread aroma. 🍞❤️
🍞 The Best White Bread from Scratch
Introduction
There is something truly special about a loaf of freshly baked white bread. The smell fills the kitchen, the crust is beautifully golden, and the inside is soft, tender, and perfect for sandwiches, toast, French toast, or simply enjoying warm with butter.
This classic recipe uses simple pantry ingredients—yeast, warm water, sugar, salt, fat, and flour—but the result is wonderfully satisfying. The secret is giving the dough enough time to develop and rise properly.
🛒 Ingredients
For the Bread
- 2¼ teaspoons active dry yeast (1 packet)
- 2¼ cups warm water, about 110°F / 43°C
- 2 tablespoons granulated sugar
- 1 tablespoon salt
- 2 tablespoons vegetable oil or melted butter
- 6 to 6½ cups all-purpose flour
- Extra butter for brushing the finished loaves, optional
Optional for a Softer Loaf
For an especially tender texture, you can replace about ¼ cup of the water with milk or add 1 tablespoon of softened butter to the dough.
👩🍳 Instructions
1. Activate the Yeast
Pour the warm water into a large mixing bowl.
Add the sugar and active dry yeast. Stir gently and allow the mixture to stand for about 5–10 minutes.
The yeast should become slightly foamy. This tells you that the yeast is active.
Important: The water should feel pleasantly warm, not hot. Water that is too hot can damage the yeast.
2. Add the Remaining Ingredients
Add the salt and vegetable oil or melted butter.
Begin adding the flour, about 1 cup at a time, mixing after each addition.
At first, the mixture will be sticky and rough. Keep adding flour gradually until a soft dough forms.
You may not need the entire 6½ cups, so avoid adding all the flour at once.
🥣 3. Knead the Dough
Transfer the dough onto a lightly floured work surface.
Knead for approximately 8–10 minutes by hand.
Push the dough forward with the heel of your hand, fold it back toward yourself, rotate it, and repeat.
The finished dough should be:
- Smooth
- Elastic
- Soft
- Slightly tacky but not excessively sticky
If the dough is extremely sticky, add flour 1 tablespoon at a time rather than adding a large amount.
Stand Mixer Method
Place the ingredients into the mixer bowl and use the dough hook.
Mix on low speed until the flour is incorporated, then knead on medium-low speed for about 6–8 minutes, until the dough becomes smooth and elastic.
🌾 4. First Rise
Place the dough into a lightly greased bowl.
Turn the dough once so the surface is lightly coated with oil.
Cover the bowl with plastic wrap or a clean kitchen towel.
Place it somewhere warm and allow it to rise for approximately 1–1½ hours, or until it has doubled in size.
The exact time depends on the temperature of your kitchen.
🤲 5. Shape the Loaves
Once the dough has doubled, gently press it down to release excess air.
Turn it onto a lightly floured surface.
Divide the dough into two equal portions.
Shape each portion into a loaf:
- Flatten the dough into a rough rectangle.
- Fold the top third toward the center.
- Fold the bottom third upward.
- Roll the dough into a firm cylinder.
- Pinch the seam closed.
- Place each loaf seam-side down into a greased 9×5-inch loaf pan.
Try to make the loaves approximately the same size so they bake evenly.
⏳ 6. Second Rise
Cover the pans loosely with a clean towel.
Let the dough rise again for approximately 30–45 minutes.
The dough should become noticeably puffy and rise above the rim of the pan.
Don’t rush this stage. A proper second rise helps create that beautiful soft texture inside the finished bread.
🔥 7. Bake
Preheat your oven to 375°F (190°C).
Place the risen loaves in the center of the oven.
Bake for approximately 30–35 minutes, or until the tops are beautifully golden brown and the loaves sound hollow when gently tapped.
If the tops begin browning too quickly, loosely cover them with aluminum foil during the final portion of baking.
🧈 8. Finish the Bread
Remove the loaves from the oven.
Immediately brush the tops with a little melted butter if you want a softer, richer crust.
Allow the bread to cool in the pans for about 10 minutes.
Then carefully remove the loaves and place them on a wire rack.
Let them cool before slicing.
Although the smell will make it incredibly difficult to wait! 😍
🍞 The Method Behind Perfect Homemade Bread
Don’t Over-Flour the Dough
One of the biggest mistakes when making homemade bread is adding too much flour.
A dough that feels slightly soft and tacky often produces a much more tender loaf than a stiff, heavily floured dough.
Give the Dough Time
Yeast needs time to work.
The first rise develops the dough’s structure and flavor, while the second rise helps produce a lighter, softer loaf.
Knead Properly
Kneading develops gluten, which gives the bread enough structure to rise while still remaining soft and chewy.
Watch the Dough, Not Just the Clock
Rising times are approximate. A warm kitchen can make dough rise quickly, while a cool kitchen can slow it down.
The best indicator is the dough itself.
📜 A Little History of White Bread
White bread has a long history, although the modern soft sandwich loaf became especially popular with the development of industrial milling and commercial baking.
For centuries, refined white flour was more expensive and was associated in many places with wealth because producing very white flour required removing much of the bran and germ.
As milling technology improved, refined flour became increasingly accessible.
By the 19th and 20th centuries, commercially produced white bread became a major household staple in many countries. Sliced bread later made it even more convenient for sandwiches and toast.
But homemade white bread has never lost its charm. Making it at home brings the process back to its simplest form: flour, water, yeast, salt, a little sweetness, and patience.
❤️ Why Bread Lovers Love This Recipe
This loaf is wonderfully versatile.
For Breakfast
Toast a slice and spread it with:
- Butter
- Jam
- Honey
- Peanut butter
- Cream cheese
For Lunch
Use it for:
- Turkey sandwiches
- Grilled cheese
- Tuna sandwiches
- Egg salad
- Chicken salad
- Ham and cheese
For Dinner
Serve warm slices alongside:
- Soup
- Stew
- Roast chicken
- Pasta
- Chili
For Something Sweet
Turn leftover bread into:
- French toast
- Bread pudding
- Cinnamon toast
- Homemade croutons
❄️ Storage
Once completely cool, keep the bread in an airtight bag or bread container at room temperature for approximately 3–4 days.
For longer storage, wrap the loaf tightly and freeze it.
You can freeze the entire loaf or slice it first so individual pieces can be removed as needed.
For the best texture, allow frozen bread to thaw at room temperature.
⭐ Helpful Baker’s Tips
For a softer crust: Brush the hot loaf with melted butter.
For a more golden crust: Brush the top lightly with milk before baking.
For taller loaves: Make sure the yeast is active and allow sufficient rising time.
For better slices: Let the loaf cool before cutting.
For extra flavor: Replace some of the vegetable oil with melted butter.
For sandwich bread: Shape the dough firmly and evenly so the loaf develops a consistent crumb.
🍞 Final Formation
The transformation is simple but beautiful:
Yeast + warm water + sugar → active yeast
Flour + salt + fat → dough
Kneading → gluten development
First rise → fermentation and flavor
Shaping → beautiful loaves
Second rise → light, airy texture
Baking → golden crust and soft interior
And finally…
Warm homemade bread → happiness at the kitchen table. ❤️
🌟 Conclusion
Homemade white bread doesn’t need complicated ingredients or fancy equipment. What makes it special is the process.
You mix a few humble ingredients, knead the dough with your hands, give it time to rise, shape it into beautiful loaves, and let the oven work its magic.
The reward is two gorgeous loaves with a golden crust, tender crumb, and comforting homemade flavor.
Slice it warm, add a little butter, and you have something that tastes like home.
If you love homemade bread, say “𝐘𝐄𝐒” ❤️🍞 to keep getting these recipes!