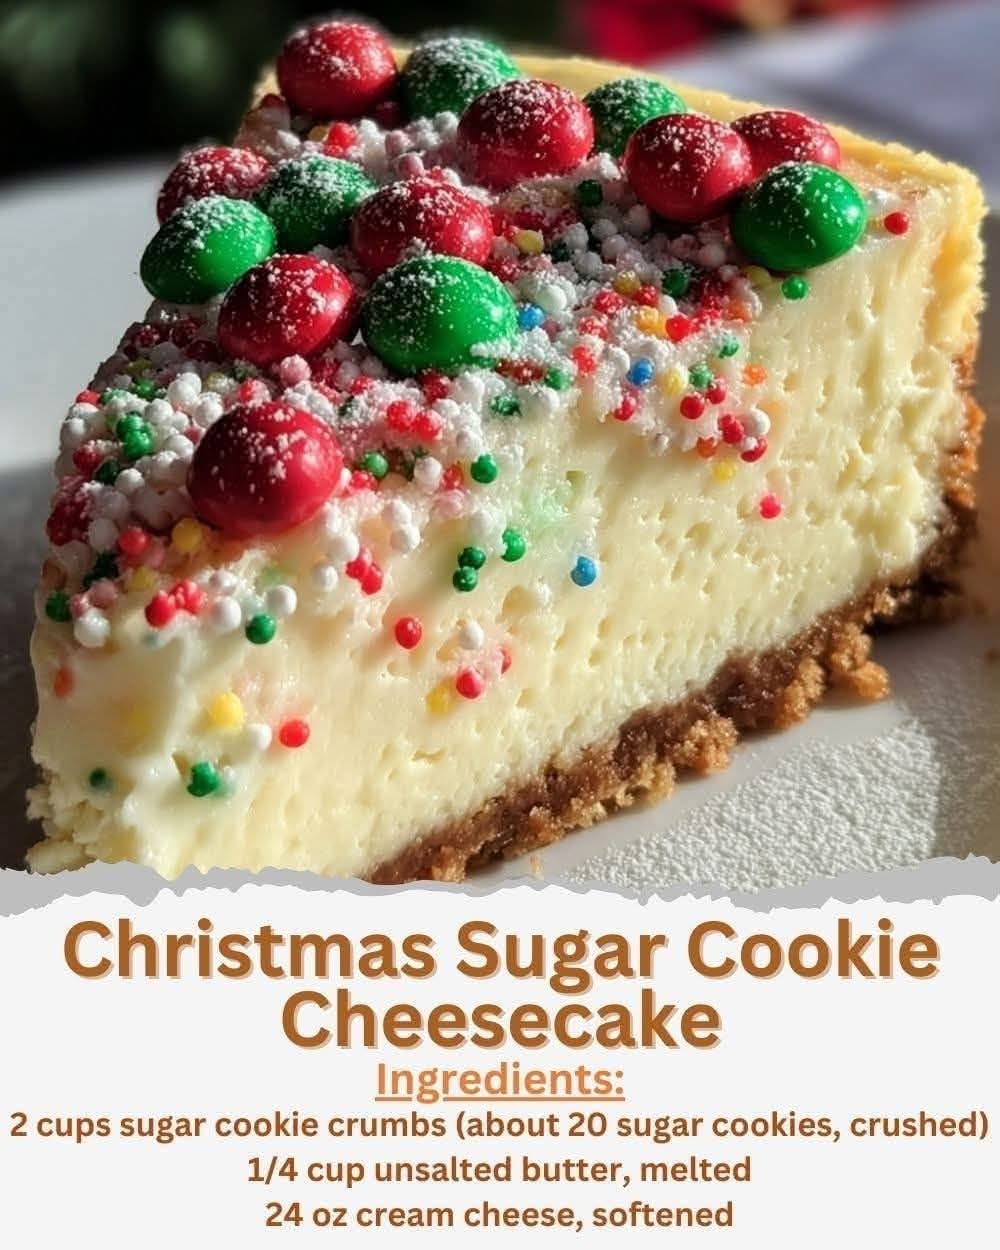
🎄 Christmas Sugar Cookie Cheesecake 🎄
A Creamy, Festive Holiday Cheesecake with a Buttery Sugar Cookie Crust
❤️ Introduction
Christmas baking has a special way of turning an ordinary kitchen into the heart of the home. The smell of vanilla, butter, sugar, and warm spices seems to bring back memories of decorated trees, Christmas music, family gatherings, and plates of homemade treats waiting on the dessert table.
This Christmas Sugar Cookie Cheesecake combines two beloved desserts into one spectacular holiday treat: soft, sweet sugar cookies and rich, creamy cheesecake.
The buttery sugar cookie crust gives every slice a delicate crunch, while the cheesecake filling is smooth, velvety, and perfectly sweet. Red and green candy-coated chocolate pieces scattered over the top add a cheerful Christmas touch, making this cheesecake beautiful enough for a holiday centerpiece.
Whether you’re making it for Christmas Eve, a family dinner, a cookie exchange, a holiday party, or simply because you love Christmas desserts, this cheesecake is sure to become one of those recipes everyone asks you to make again.
🎄 Recipe at a Glance
Prep Time: 20 minutes
Bake Time: 50–60 minutes
Cooling Time: About 1 hour
Chilling Time: At least 4 hours
Total Time: Approximately 5 hours 20 minutes
Servings: 12 slices
Calories: Approximately 420 kcal per serving
🛒 Ingredients
For the Sugar Cookie Crust
- 2 cups sugar cookie crumbs, approximately 20 sugar cookies
- 1/4 cup unsalted butter, melted
For the Cheesecake Filling
- 24 ounces cream cheese, softened to room temperature
- 1 cup granulated sugar
- 3 large eggs
- 1 teaspoon vanilla extract
- 1/2 cup sour cream
- 1/4 cup heavy cream
For the Christmas Decoration
- 1/2 cup mini red and green candy-coated chocolate pieces
- Powdered sugar, for dusting, optional
❤️ The History Behind the Recipe
Sugar cookies have long been associated with holiday baking because they are simple, buttery, sweet, and wonderfully adaptable. Families have traditionally used sugar cookies for Christmas cutouts, decorating them with colorful icing, sprinkles, and candies.
Cheesecake has an even older history, with early versions of cheese-based cakes dating back thousands of years. The modern cheesecake that many people recognize today developed through European baking traditions and later became especially popular in America.
Combining sugar cookies with cheesecake creates a delicious modern holiday dessert. Instead of serving cookies and cheesecake separately, this recipe brings their best qualities together in one beautiful dessert.
The result is festive, creamy, buttery, and wonderfully indulgent.
🍪 Step 1: Prepare the Sugar Cookie Crumbs
If you’re using whole sugar cookies, place them into a food processor and pulse until they become fine crumbs.
You can also place the cookies in a sealed plastic bag and crush them with a rolling pin or the bottom of a heavy glass.
Measure out 2 cups of crumbs.
You want the crumbs to be fairly fine so that the crust holds together properly.
🧈 Step 2: Make the Crust
Preheat your oven to 325°F (163°C).
Grease a 9-inch springform pan lightly.
Place the sugar cookie crumbs into a bowl and pour in the melted butter.
Stir until all of the crumbs are evenly coated and the mixture resembles damp sand.
Transfer the mixture into the springform pan.
Using the bottom of a measuring cup or glass, press the crumbs firmly and evenly across the bottom of the pan.
Important Tip
Press the crust firmly, but don’t make it excessively thick. A compact, even crust gives you the perfect foundation for the creamy cheesecake.
Set the crust aside while preparing the filling.
🧀 Step 3: Prepare the Cheesecake Filling
Place the softened cream cheese and granulated sugar into a large mixing bowl.
Beat on medium speed until the mixture is completely smooth and creamy.
Scrape down the sides of the bowl as needed.
Why room-temperature cream cheese matters
Cold cream cheese can leave small lumps throughout your cheesecake batter. Allowing it to soften at room temperature makes it much easier to create a silky, smooth filling.
🥚 Step 4: Add the Eggs
Add the eggs one at a time.
Beat gently after each addition until the egg is incorporated before adding the next one.
Avoid overbeating the mixture.
Too much air can become trapped in the batter and may contribute to cracks as the cheesecake bakes and cools.
✨ Step 5: Add the Creamy Ingredients
Add:
- 1 teaspoon vanilla extract
- 1/2 cup sour cream
- 1/4 cup heavy cream
Mix until everything is completely incorporated and the batter is smooth.
The sour cream adds a subtle tang that balances the sweetness, while the heavy cream contributes to the rich, luxurious texture.
🎂 Step 6: Assemble the Cheesecake
Pour the cheesecake batter slowly over the prepared sugar cookie crust.
Use a spatula to gently smooth the surface.
Give the pan a very gentle tap on the counter a couple of times to encourage any large air bubbles to rise to the surface.
Don’t bang the pan forcefully.
🔥 Step 7: Bake
Place the cheesecake in the preheated 325°F (163°C) oven.
Bake for approximately 50–60 minutes.
The cheesecake is ready when:
- The edges look set.
- The surface appears mostly firm.
- The center still has a slight gentle wobble.
- The edges may be very lightly golden.
Don’t wait for the entire cheesecake to become completely firm in the oven. Cheesecake continues setting as it cools.
🌬️ Step 8: Cool Gradually
Once the baking time is finished, turn off the oven.
Leave the cheesecake inside with the oven door slightly open for approximately 1 hour.
This gradual cooling helps reduce the dramatic temperature change that can cause cheesecake surfaces to crack.
Afterward, carefully remove the cheesecake from the oven.
Allow it to cool further at room temperature if necessary.
❄️ Step 9: Refrigerate
Once the cheesecake has cooled sufficiently, place it in the refrigerator.
Chill for at least 4 hours, although overnight is even better.
This step is extremely important.
The cheesecake needs time to fully set and develop its rich, creamy texture.
For the cleanest slices, an overnight chill is ideal.
🎄 Step 10: Decorate
When you’re ready to serve, carefully remove the cheesecake from the springform pan.
Scatter the mini red and green candy-coated chocolate pieces over the top.
For an elegant snowy Christmas effect, lightly dust the surface with powdered sugar.
You can decorate the cheesecake just before serving or prepare the decoration several hours in advance.
✨ Christmas Formation & Presentation
Presentation can turn this cheesecake from delicious into spectacular.
Place the cheesecake on a white or festive Christmas cake stand.
Arrange the red and green candies around the outer edge or scatter them naturally across the center.
For an extra festive presentation, you can add:
- Christmas sprinkles
- White chocolate curls
- Mini sugar cookies
- Red and green sprinkles
- Fresh mint leaves
- Small edible Christmas decorations
Keep the decoration simple enough that the beautiful creamy cheesecake remains the star.
🔪 How to Get Beautiful Slices
For clean, bakery-style slices, use a sharp knife.
Dip the knife into hot water, wipe it dry, and then slice.
Clean and warm the knife between cuts.
This little technique helps create smooth, professional-looking slices without dragging the cheesecake filling.
❤️ Tips for Cheesecake Lovers
1. Use full-fat cream cheese
Full-fat cream cheese generally gives cheesecake the richest and creamiest texture.
2. Don’t overmix
Once the eggs are added, mix only until incorporated.
3. Don’t overbake
A slight jiggle in the center is perfectly normal.
4. Cool slowly
The gradual cooling process helps minimize cracking.
5. Chill completely
Don’t rush the refrigerator stage. Cheesecake becomes firmer and more flavorful as it chills.
6. Make it ahead
This is an excellent make-ahead Christmas dessert. Preparing it the day before allows you to spend more time with your family and less time in the kitchen on Christmas Day.
🎁 Make-Ahead Instructions
You can prepare the entire cheesecake 1–2 days before serving.
Keep it covered in the refrigerator until you’re ready to decorate and serve.
For the best appearance, add the candy-coated chocolate pieces relatively close to serving time.
🧊 Storage
Store leftover cheesecake covered in the refrigerator.
It should keep well for several days when properly refrigerated.
Individual slices can also be wrapped and frozen for longer storage. Thaw them slowly in the refrigerator before serving.
🎄 Perfect Occasions for This Cheesecake
This dessert is perfect for:
❤️ Christmas Eve dinner
🎄 Christmas Day celebrations
🎁 Holiday parties
🍪 Cookie exchanges
☕ Christmas brunches
👨👩👧👦 Family gatherings
🎅 Santa-themed parties
✨ Winter birthdays
🎁 Holiday dessert tables
❤️ Homemade Christmas gifts
🍓 Serving Ideas
Although this cheesecake is wonderful on its own, you can serve each slice with a little extra holiday flair.
Try adding:
- Whipped cream
- Strawberry or raspberry sauce
- Chocolate sauce
- Caramel sauce
- Fresh berries
- Crushed sugar cookies
- A light dusting of powdered sugar
A small cup of hot coffee, tea, or hot chocolate makes an especially lovely pairing.
💕 For the Lovers of Christmas Baking
This is the kind of dessert for people who believe that Christmas isn’t just a holiday—it’s a feeling.
It’s the feeling of flour on the kitchen counter.
It’s Christmas music playing while something delicious bakes in the oven.
It’s sneaking a taste before dinner.
It’s family members asking, “Is that cheesecake ready yet?”
And it’s that wonderful moment when everyone gathers around the table and the first slice disappears.
For cheesecake lovers, this recipe offers the creamy richness they crave.
For sugar-cookie lovers, the buttery cookie crust brings familiar holiday flavor.
And for Christmas dessert lovers, the red and green decorations make every slice feel like a celebration.
🎅 Chef’s Method Summary
Prepare → Press → Mix → Add → Pour → Bake → Cool → Chill → Decorate → Slice → Enjoy
- Prepare the sugar cookie crumbs.
- Mix them with melted butter.
- Press the mixture into a 9-inch springform pan.
- Beat cream cheese and sugar until smooth.
- Add eggs one at a time.
- Mix in vanilla, sour cream, and heavy cream.
- Pour over the crust.
- Bake at 325°F for 50–60 minutes.
- Cool gradually in the turned-off oven.
- Refrigerate for at least 4 hours.
- Decorate with red and green candies.
- Dust with powdered sugar if desired.
- Slice and serve.
🎄 Conclusion
This Christmas Sugar Cookie Cheesecake is more than just a dessert. It’s a combination of two classic favorites transformed into one creamy, festive centerpiece.
The buttery sugar cookie crust provides the perfect foundation for the smooth cheesecake filling, while the colorful Christmas candies add a cheerful finishing touch.
The best part is that much of the work can be done ahead of time, making it an ideal dessert for busy holiday celebrations.
So gather your loved ones, put on your favorite Christmas music, pour yourself a warm drink, and cut yourself a generous slice.
Because Christmas is the perfect time for a little extra sweetness. ❤️🎄🍰
🎄 Merry Christmas & Happy Baking! 🎄
May your kitchen be warm, your cheesecake creamy, your cookies sweet, and your holiday table filled with people you love. ❤️