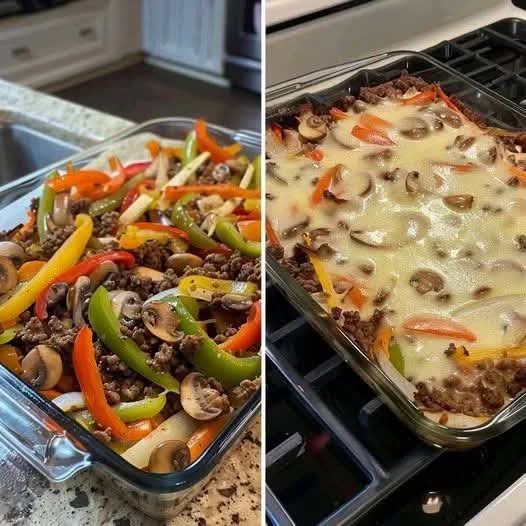
🧀🥩 Diabetic-Friendly Philly Cheesesteak Casserole
Introduction
If you love the classic flavors of a Philly cheesesteak but want something comforting, simple, and lower in carbohydrates, this Diabetic-Friendly Philly Cheesesteak Casserole is a wonderful choice. ❤️
It combines tender, seasoned beef, sweet bell peppers, onions, mushrooms, and plenty of melted cheese in one delicious casserole. There is no complicated dough, no sandwich roll, and no need for fancy cooking techniques. Everything comes together in one hearty dish that is perfect for beginners.
This casserole is especially satisfying on busy evenings because it delivers that familiar cheesesteak flavor in a warm, cheesy, family-style meal.
Important: “Diabetic-friendly” does not mean carbohydrate-free or suitable for everyone with diabetes. Portion size and individual carbohydrate needs matter, so check the nutrition information of the specific ingredients you use and follow your personal meal plan.
🛒 Ingredients
For the Cheesesteak Filling
- 1½ lb (680 g) lean ground beef
- 1 tablespoon olive oil
- 1 medium onion, finely chopped
- 1 green bell pepper, diced
- 1 red bell pepper, diced
- 8 oz (225 g) mushrooms, sliced
- 2 cloves garlic, minced
- 1 teaspoon salt, or to taste
- ½ teaspoon black pepper
- 1 teaspoon smoked paprika
- 1 teaspoon Italian seasoning
- 1 tablespoon Worcestershire sauce
- 1 tablespoon Dijon mustard, optional
- ½ cup (120 ml) beef broth, preferably lower-sodium
For the Creamy Cheese Mixture
- 4 oz (113 g) cream cheese, softened
- ½ cup (120 ml) heavy cream or unsweetened low-carb alternative
- 1 cup shredded mozzarella cheese
- 1 cup shredded provolone cheese
- ½ cup shredded cheddar cheese
- ¼ teaspoon garlic powder
- ¼ teaspoon black pepper
For the Topping
- ½ cup shredded provolone
- ½ cup shredded mozzarella
- 2 tablespoons finely chopped parsley, optional
- A little freshly cracked black pepper
👩🍳 Instructions
Step 1: Prepare the Oven
Preheat your oven to 375°F (190°C).
Lightly grease a 9 × 13-inch baking dish with cooking spray or a small amount of olive oil.
Set the dish aside while you prepare the filling.
Step 2: Brown the Beef
Place a large skillet over medium-high heat.
Add the olive oil, followed by the ground beef.
Cook for approximately 6–8 minutes, breaking the meat apart with a wooden spoon as it cooks.
Continue cooking until the beef is browned and no longer pink.
If there is a large amount of excess grease, carefully drain it.
Step 3: Add the Vegetables
Add the chopped onion, green bell pepper, red bell pepper, and sliced mushrooms to the skillet.
Cook for about 5–7 minutes, stirring occasionally.
The vegetables should become tender while still retaining some texture.
Add the minced garlic and cook for another 30–60 seconds.
Step 4: Season Everything
Add:
- Salt
- Black pepper
- Smoked paprika
- Italian seasoning
- Worcestershire sauce
- Dijon mustard, if using
Pour in the beef broth and stir everything together.
Allow the mixture to simmer for approximately 2–3 minutes.
This helps the flavors come together while keeping the filling juicy.
🧀 Step 5: Make the Creamy Cheese Sauce
Reduce the skillet heat to low.
Add the softened cream cheese and heavy cream.
Stir gently until the cream cheese melts into the beef mixture.
Add the mozzarella, provolone, and cheddar.
Continue stirring until the cheeses melt and create a rich, creamy mixture.
Do not boil the sauce. Gentle heat will help keep the cheese smooth.
🍲 Step 6: Form the Casserole
Transfer the cheesy beef mixture into your prepared baking dish.
Spread it evenly from corner to corner.
Sprinkle the remaining provolone and mozzarella over the top.
For an extra cheesy crust, add a small amount of cheddar as well.
🔥 Step 7: Bake
Place the casserole in the preheated oven.
Bake for approximately 15–20 minutes, or until the cheese is completely melted and bubbling around the edges.
For a beautifully browned top, switch to broil for 1–2 minutes at the end.
Watch it carefully because cheese can brown very quickly under the broiler.
🌿 Step 8: Rest and Garnish
Remove the casserole from the oven and allow it to rest for 5–10 minutes.
Sprinkle with fresh parsley and a little black pepper if desired.
Resting allows the casserole to set slightly, making it easier to serve.
🥄 The Method
The secret to this casserole is building the flavor in layers.
First, brown the beef until it develops a delicious savory flavor. Next, sauté the onions, peppers, mushrooms, and garlic until tender.
The beef broth helps keep everything moist, while Worcestershire sauce adds depth.
Then comes the best part—the cheese. Cream cheese creates a creamy base, while provolone gives the casserole that classic cheesesteak character. Mozzarella adds stretchiness, and cheddar contributes a stronger cheesy flavor.
Finally, everything goes into the oven so the cheese on top becomes bubbling, golden, and irresistible.
🥩 A Little History of the Philly Cheesesteak
The original Philly cheesesteak is associated with Philadelphia, Pennsylvania, where the iconic sandwich became popular in the early 20th century.
Traditionally, thinly sliced beef is cooked on a griddle and served inside a long roll, often with onions and cheese. Provolone, American cheese, and Cheez Whiz are among the cheeses associated with different versions of the sandwich.
This casserole takes those beloved flavors and transforms them into a crustless, fork-friendly dinner.
Instead of putting the beef and vegetables inside a bread roll, everything is layered together with melted cheese.
🥗 Why This Version Can Be Lower in Carbohydrates
Traditional cheesesteaks are usually served on a large bread roll, which contributes a significant amount of carbohydrate.
This casserole removes the roll completely and focuses on:
🥩 Beef
🫑 Peppers
🧅 Onions
🍄 Mushrooms
🧀 Cheese
For someone managing diabetes, removing the bread can make it easier to create a lower-carbohydrate meal.
However, onions, peppers, dairy products, sauces, and other ingredients still contain some carbohydrates. Always check the labels and portion sizes, especially if you are counting carbohydrates.
💡 Helpful Beginner Tips
Don’t overcook the beef
Cook the beef until browned, but avoid cooking it excessively before it goes into the oven.
Cut the vegetables evenly
Uniform pieces cook at approximately the same rate and make every bite more enjoyable.
Soften the cream cheese
Room-temperature cream cheese melts much more easily than a cold block straight from the refrigerator.
Don’t rush the cheese
Keep the heat relatively low when melting the cheese mixture. Very high heat can cause cheese sauces to become greasy or grainy.
Let it rest
Those 5–10 minutes after baking make a difference. The casserole becomes easier to scoop and serve.
🌶️ Delicious Variations
Mushroom Lovers’ Version 🍄
Add an additional 4 oz of mushrooms for an extra savory casserole.
Bacon Cheesesteak Version 🥓
Add a small amount of cooked, crumbled bacon for a smoky flavor. Remember that bacon can be high in sodium and saturated fat.
Spicy Version 🌶️
Add sliced jalapeños, crushed red pepper flakes, or a dash of hot sauce.
Chicken Cheesesteak Casserole 🍗
Replace the ground beef with cooked chopped chicken breast.
Extra Vegetable Version 🫑
Add zucchini, spinach, or extra mushrooms to increase the vegetables in the dish.
🍽️ What to Serve With It
Because the casserole is already rich and filling, pair it with lighter sides.
Great choices:
- 🥗 Green salad with vinaigrette
- 🥦 Roasted broccoli
- 🥬 Steamed green beans
- 🥒 Cucumber salad
- 🥬 Sautéed cabbage
- 🥑 Avocado salad
- 🥦 Cauliflower rice
For a lower-carbohydrate meal, choose non-starchy vegetables instead of bread, fries, or regular rice.
🧊 Storage
Allow leftovers to cool before refrigerating.
Store in an airtight container in the refrigerator for approximately 3–4 days.
For individual servings, reheat in the microwave until thoroughly hot.
You can also reheat portions in a covered oven-safe dish at 350°F (175°C) until heated through.
❄️ Can You Freeze It?
Yes, you can freeze the cooked casserole.
Allow it to cool completely before transferring it to a freezer-safe container.
For best texture, use within approximately 2–3 months.
Thaw overnight in the refrigerator before reheating.
Because dairy-based sauces can sometimes change texture after freezing, the casserole may not be quite as creamy as when freshly made, but it can still make a convenient meal.
❤️ For the Cheese Lovers
If you’re someone who believes there is no such thing as too much cheese, this recipe is for you!
The combination of cream cheese, provolone, mozzarella, and cheddar creates several layers of cheesy flavor.
For the ultimate cheese pull, add the final mozzarella and provolone right before baking and allow the casserole to become bubbling and golden.
Just remember that cheese can be calorie-dense and high in saturated fat, so moderation and portion size still matter.
👨👩👧👦 Family-Friendly Serving Idea
Place the casserole in the center of the table with several toppings so everyone can customize their portion.
Try:
- Chopped parsley
- Jalapeños
- Sliced green onions
- Extra mushrooms
- Hot sauce
- A little grated Parmesan
- Fresh avocado
This makes dinner feel more like a fun cheesesteak bar while keeping the preparation incredibly simple.
📏 Portioning
For a balanced meal, consider dividing the casserole into 6–8 portions, depending on your nutritional needs.
Pair one serving with a generous portion of non-starchy vegetables.
If you are managing diabetes, don’t rely solely on the recipe title to determine whether it fits your diet. Total carbohydrate, serving size, and your individual blood-glucose response are more important than the label “diabetic-friendly.”
❤️ Conclusion
This Diabetic-Friendly Philly Cheesesteak Casserole is proof that a comforting dinner doesn’t need to be complicated.
You get juicy seasoned beef, tender peppers and onions, savory mushrooms, creamy cheese, and a beautifully melted topping—all without the traditional cheesesteak roll.
It’s quick enough for a weeknight, simple enough for beginners, and satisfying enough to become a regular family favorite.
The best part is that you can easily customize it to your own taste. Add mushrooms, make it spicy, switch to chicken, increase the vegetables, or choose your favorite cheese.
Serve it hot, grab a fork, and enjoy all the classic cheesesteak flavors in every delicious bite! 🥩🧀🫑
If you love easy, comforting, lower-carb recipes, save this one and share it with someone who would enjoy it! ❤️😋