Classic Buttermilk Biscuits 🧈🥐
Introduction
Classic buttermilk biscuits are one of the most loved comfort breads in many homes. They are soft, flaky, buttery, and golden on the outside with a tender inside. Perfect for breakfast, dinner, or as a snack, these biscuits are simple yet rich in flavor. Whether served with honey, jam, gravy, or butter, they bring warmth and happiness to every table.
Ingredients
Here’s everything you need:
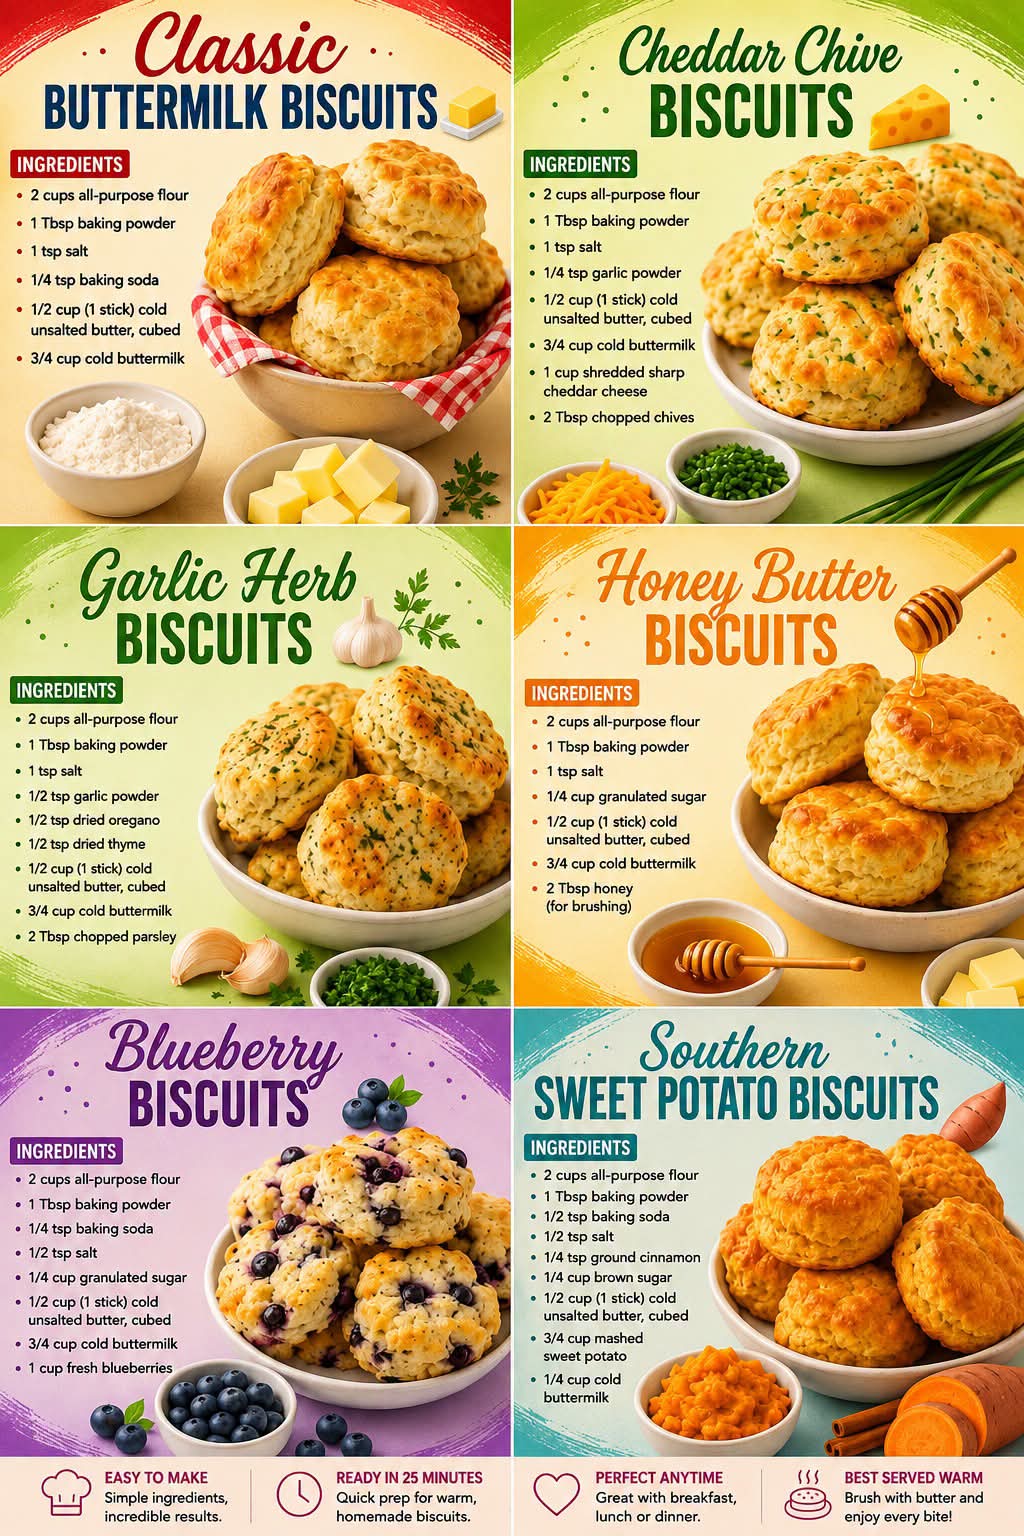
- 2 cups all-purpose flour
- 1 tablespoon baking powder
- 1 teaspoon salt
- ¼ teaspoon baking soda
- ½ cup (1 stick) cold unsalted butter, cubed
- ¾ cup cold buttermilk
Optional Add-ins:
- 1 tablespoon sugar (for slightly sweet biscuits)
- ½ teaspoon garlic powder (for savory biscuits)
- 1 cup shredded cheese (for cheesy biscuits)
Equipment Needed
- Large mixing bowl
- Pastry cutter or fork
- Rolling pin
- Biscuit cutter or glass
- Baking tray
- Parchment paper
History of Buttermilk Biscuits 📜
Buttermilk biscuits have deep roots in Southern American cooking. In the 1800s, biscuits became popular because they were quick to make compared to yeast bread. Buttermilk, which was left after churning butter, was used because it added flavor and helped make biscuits softer. Over time, they became a symbol of comfort food, especially served with fried chicken, gravy, or preserves.
Formation of the Biscuit 🥣
The secret to biscuit formation is the cold butter. When mixed into flour, small butter pockets remain. During baking, the butter melts and creates steam, which forms layers. This is what gives biscuits their flaky texture.
The buttermilk reacts with baking soda and baking powder, helping the dough rise beautifully.
Step-by-Step Instructions 👩🍳
Method 1: Traditional Hand Mixing
Step 1: Prepare
Preheat your oven to 425°F (220°C).
Line a baking tray with parchment paper.
Step 2: Mix Dry Ingredients
In a large bowl, combine:
- Flour
- Baking powder
- Salt
- Baking soda
Whisk well.
Step 3: Cut in the Butter
Add the cold cubed butter.
Use a pastry cutter or fork to mix until the texture looks like coarse crumbs.
Step 4: Add Buttermilk
Pour in cold buttermilk slowly.
Mix gently until the dough just comes together.
Important: Do not overmix.
Step 5: Shape the Dough
Turn dough onto a floured surface.
Pat it into a rectangle about 1 inch thick.
Fold the dough over itself 3–4 times for extra flaky layers.
Step 6: Cut Biscuits
Use a biscuit cutter to cut circles.
Do not twist the cutter, just press down.
Step 7: Bake
Place biscuits close together on the tray.
Bake for 12–15 minutes until golden brown.
Step 8: Serve
Brush tops with melted butter and serve warm.
Alternative Methods 🍴
Method 2: Drop Biscuits
For quicker biscuits:
- Keep the dough wetter.
- Scoop spoonfuls onto the tray.
- Bake directly.
These are rustic and soft.
Method 3: Layered Folding Method
For extra flaky biscuits:
- Fold dough like a letter several times.
- This creates more layers like pastry.
Tips for Perfect Biscuits ⭐
- Use very cold butter
- Use cold buttermilk
- Handle dough gently
- Do not overwork the dough
- Bake in a hot oven
- Place biscuits touching for softer sides
Why People Love Buttermilk Biscuits ❤️
Buttermilk biscuits are loved because:
- They are quick and easy
- They taste buttery and rich
- They pair with sweet or savory foods
- They feel homemade and comforting
- They remind many people of family meals
Biscuit lovers enjoy them with:
- Honey 🍯
- Jam 🍓
- Sausage gravy 🥩
- Fried chicken 🍗
- Butter 🧈
Serving Ideas 🍽️
- Breakfast sandwiches
- Biscuits and gravy
- Alongside soup
- With tea or coffee
- Dessert with strawberries and cream
Conclusion
Classic buttermilk biscuits are timeless, simple, and delicious. Their flaky layers, buttery taste, and soft texture make them a favorite across generations. Whether you make them for breakfast, dinner, or special family gatherings, they always bring comfort and joy. One bite of a warm homemade biscuit can make any day feel special.
Golden, fluffy, buttery, and made with love — that’s the magic of classic buttermilk biscuits. 🥐✨