Fluffy Homemade Rising Bread
Introduction
There is something magical about homemade bread rising in the oven. This fluffy, soft, and airy bread recipe creates a loaf that rises beautifully, filling your kitchen with the irresistible aroma of freshly baked bread. Its tender crumb and golden crust make it perfect for breakfast, sandwiches, or simply enjoying warm with butter. Once you learn this method, you’ll find yourself making it again and again because the results are truly bakery-quality.
Ingredients
For the Dough
- 1 cup (240 ml) warm milk
- ½ cup (120 ml) warm water
- 2¼ teaspoons active dry yeast (1 packet)
- ¼ cup (50 g) granulated sugar
- 2 tablespoons unsalted butter, melted
- 1 teaspoon salt
- 4 to 4½ cups (500–560 g) all-purpose flour
For Brushing
- 1 tablespoon melted butter
- Optional: 1 egg beaten with 1 tablespoon milk for a shiny crust
Equipment Needed
- Large mixing bowl
- Measuring cups and spoons
- Wooden spoon
- Stand mixer (optional)
- Loaf pan or baking sheet
- Clean kitchen towel
- Cooling rack
Instructions
Step 1: Activate the Yeast
- In a large bowl, combine warm milk and warm water.
- Add sugar and stir until dissolved.
- Sprinkle yeast over the liquid.
- Let sit for 5–10 minutes until frothy and bubbly.
This step ensures the yeast is alive and ready to make the bread rise.
Step 2: Make the Dough
- Add melted butter and salt to the yeast mixture.
- Gradually add flour, one cup at a time.
- Stir until a soft dough forms.
- Continue adding flour until the dough is slightly sticky but manageable.
Step 3: Knead the Dough
- Transfer dough to a lightly floured surface.
- Knead for 8–10 minutes.
- The dough should become smooth, elastic, and soft.
Windowpane Test
Stretch a small piece of dough gently. If it becomes thin without tearing, the gluten is properly developed.
Step 4: First Rise
- Place dough in a lightly greased bowl.
- Cover with a clean towel.
- Let rise in a warm place for 1–1½ hours.
The dough should double or even triple in size.
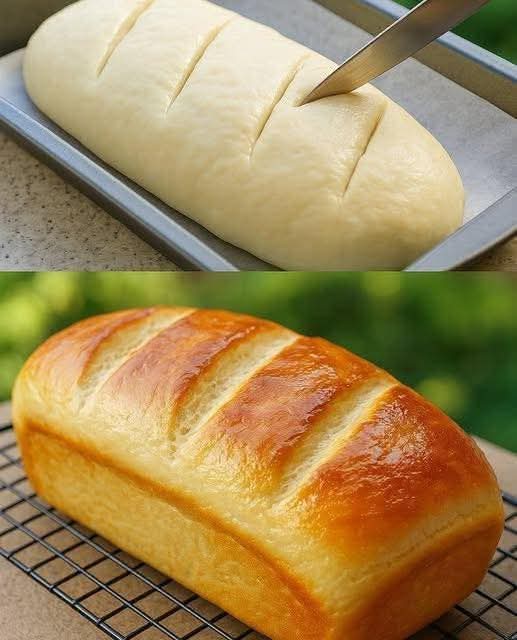
Step 5: Shape the Bread
- Punch down the risen dough gently.
- Shape into a loaf or divide into rolls.
- Place into a greased loaf pan or on a baking sheet.
Step 6: Second Rise
- Cover again with a towel.
- Let rise for 30–45 minutes.
The dough will become puffy and nearly double once more.
Step 7: Bake
- Preheat oven to 375°F (190°C).
- Brush dough with egg wash if desired.
- Bake for 25–30 minutes until golden brown.
- The loaf should sound hollow when tapped.
Step 8: Finish
- Remove from oven.
- Brush with melted butter for a softer crust.
- Cool on a wire rack for at least 20 minutes before slicing.
Bread-Making Methods
Traditional Hand-Kneading Method
Produces excellent texture and allows you to feel the dough develop.
Stand Mixer Method
Mix with a dough hook for 6–8 minutes until smooth and elastic.
Overnight Method
Refrigerate the dough after the first rise and bake the next day for enhanced flavor.
The Science Behind the Fluffiness
The remarkable rise comes from yeast fermentation. As yeast feeds on sugar, it produces carbon dioxide gas. The gluten network traps these bubbles, creating a light and airy structure. Proper kneading strengthens gluten, while warm temperatures encourage vigorous yeast activity.
History of Homemade Bread
Bread has been a staple food for over 10,000 years. Ancient civilizations in Mesopotamia and Egypt discovered that naturally occurring yeasts could ferment dough, creating lighter loaves. Over centuries, bakers refined techniques that led to the soft, fluffy breads enjoyed today. Homemade bread remains one of the world’s most beloved comfort foods.
Formation and Structure
A well-made loaf contains:
- A golden, slightly crisp crust
- A soft and tender interior
- Even air pockets throughout the crumb
- Moist texture that stays fresh for days
The two-rise method is key to achieving this beautiful structure.
Tips for Perfect Results
- Use warm, not hot, liquids.
- Measure flour accurately.
- Do not rush the rising times.
- Knead thoroughly.
- Bake until fully golden.
- Cool before slicing.
Why Bread Lovers Adore This Recipe
Bread enthusiasts love this recipe because:
- It rises dramatically.
- The texture is incredibly fluffy.
- It stays soft for days.
- It works for sandwiches, toast, and dinner rolls.
- The ingredients are simple and affordable.
- The aroma is irresistible.
Serving Ideas
- Warm with butter and honey
- Toasted with jam
- Used for sandwiches
- Served alongside soup
- Made into French toast
- Paired with cheese and fruit
Conclusion
This fluffy homemade bread is proof that simple ingredients can create something extraordinary. With its impressive rise, cloud-like texture, and rich homemade flavor, it is a recipe every bread lover should master. Whether enjoyed fresh from the oven, toasted for breakfast, or used in your favorite sandwiches, this bread delivers bakery-quality results that will impress family and friends every time. 🍞✨❤️