Here is a comprehensive, detailed guide to creating a spectacular Orange Creamsicle Cake, complete with all the elements you requested.
—
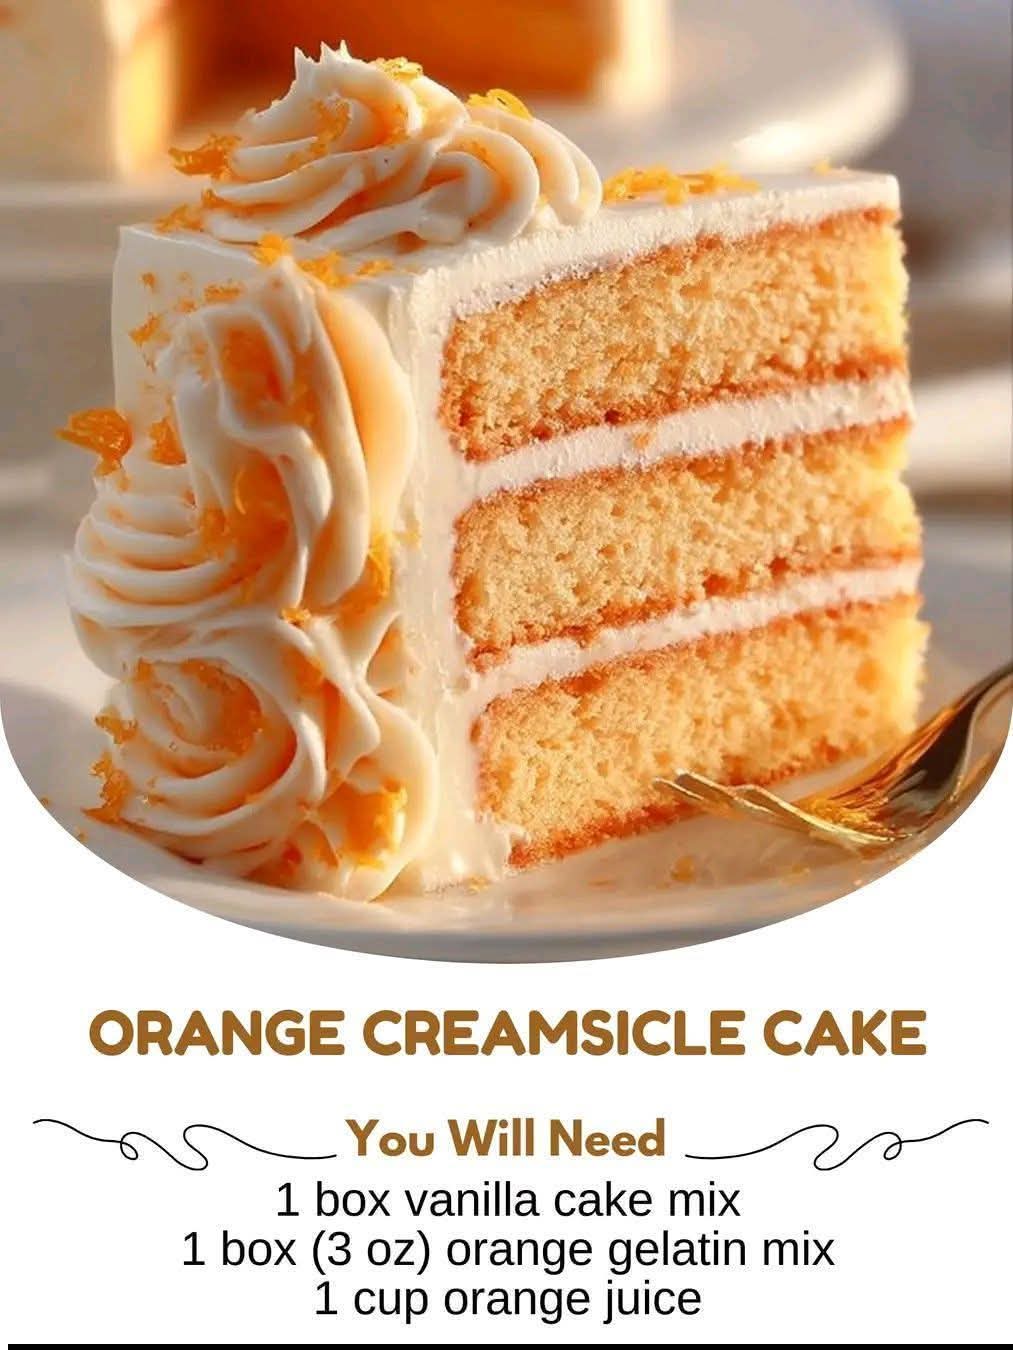
The Sunshine Slice: A Complete Guide to Orange Creamsicle Cake
Introduction
Imagine the perfect summer day: the sun is warm on your skin, a gentle breeze is blowing, and you’re enjoying a classic, frosty Creamsicle—that iconic treat of creamy vanilla ice cream swirled with bright, tangy orange sherbet. Now, imagine capturing that nostalgic flavor and transforming it into a stunning, crowd-pleasing dessert. That is the magic of the Orange Creamsicle Cake.
This cake is more than just a dessert; it’s an experience. It’s a vibrant, moist, and incredibly flavorful cake that perfectly balances the sweet, creamy richness of vanilla with the zesty, refreshing punch of orange. The secret lies in a simple boxed cake mix transformed by orange gelatin and orange juice, creating a tender crumb with pockets of intense citrus flavor. Topped with a light, fluffy, and luscious whipped cream frosting, every bite tastes like a dreamy trip down memory lane. This recipe is foolproof, guaranteed to bring a smile to faces of all ages, and is the perfect centerpiece for birthdays, barbecues, or any occasion that calls for a little bit of sunshine.
The History & Origin
The Orange Creamsicle cake is a delightful product of mid-20th-century American baking ingenuity, specifically the “poke cake” trend. Poke cakes rose to fame in the 1970s, popularized by brands like Jell-O. The concept was brilliantly simple and designed for the home baker: bake a simple cake (often from a boxed mix), poke holes in it while it’s still warm, and pour a flavored gelatin mixture over the top. The liquid gelatin would seep into the holes, creating colorful, flavorful ribbons throughout the cake and ensuring incredible moisture.
The genius of this particular variation is pairing orange gelatin with a vanilla cake base, directly mimicking the two-toned flavor profile of the beloved Creamsicle. The Creamsicle itself was invented in 1905 by Frank Epperson, the same man who created the Popsicle. Originally called a “Creamsicle,” it combined vanilla ice cream with a fruity, frozen shell. By combining the poke cake technique with this classic flavor pairing, home cooks created a dessert that was both novel and nostalgically familiar, cementing its place as a beloved potluck and family favorite.
The Benefits (Why You’ll Love This Cake)
· Incredibly Moist: The combination of the gelatin mixture and the oil in the cake mix guarantees a cake that stays moist and tender for days.
· Bursting with Flavor: The orange gelatin infuses every bite with a bright, concentrated citrus flavor that you just can’t get from zest alone.
· Effortless Elegance: It starts with a boxed mix, making it achievable for bakers of any skill level, yet the final result is impressive and beautiful.
· Perfect for Any Occasion: Its vibrant color and refreshing taste make it a hit at summer gatherings, while its comforting, nostalgic flavor is perfect for cozy fall and winter events.
· Crowd-Pleaser: It’s a universally loved flavor combination. Kids adore the fun, fruity taste, and adults appreciate the sophisticated balance of sweet and tart.
The Formation (Building the Cake)
This recipe is built in three simple stages, each one crucial to the final masterpiece:
1. The Base: A simple vanilla cake is baked and slightly cooled. Using a boxed mix ensures a consistent, reliable texture.
2. The Infusion: While still warm, the cake is poked all over with the handle of a wooden spoon. A sweet-tart orange gelatin mixture is then poured over the surface, seeping into the holes and creating the signature Creamsicle swirl and intense moisture.
3. The Crown: A billowy, cloud-like whipped topping (stabilized with instant vanilla pudding) is spread over the completely cooled cake. This creamy, not-too-sweet layer is the perfect counterpart to the tangy orange cake beneath.
—
The Complete Recipe
Ingredients
For the Cake:
· 1 box (15.25 oz) vanilla cake mix (plus the eggs, oil, and water called for on the box)
· 1 package (3 oz) orange flavored gelatin (like Jell-O)
· 1 cup orange juice
For the Creamy Topping:
· 1 package (3.4 oz) instant vanilla pudding mix
· 1 cup cold milk
· 1 tub (8 oz) frozen whipped topping (like Cool Whip), thawed
For Garnish (Optional but Recommended):
· Orange zest, for a pop of color and fresh scent
· Mandarin orange segments, well-drained
· White chocolate curls or shavings
—
Instructions & Methods
Step 1: Bake the Cake
1. Preheat your oven to 350°F (175°C). Grease and flour a 9×13-inch baking pan.
2. Prepare the vanilla cake batter according to the package directions. Pour the batter into the prepared pan and spread it evenly.
3. Bake for the time specified on the box, or until a toothpick inserted into the center comes out clean. (Typically 25-30 minutes).
Step 2: Create the Orange Infusion
1. While the cake is baking, prepare the gelatin mixture. In a small bowl, whisk the orange gelatin powder into 1 cup of boiling water until completely dissolved. Then, stir in 1 cup of cold orange juice. Set aside.
2. Once the cake is done, remove it from the oven and place it on a wire rack. Immediately, while the cake is still hot, use the round handle of a wooden spoon or a skewer to poke holes all over the cake. Space the holes about 1 inch apart, poking all the way down to the bottom of the pan.
3. Slowly and carefully pour the orange gelatin mixture evenly over the entire surface of the warm cake, making sure to fill the holes. Don’t worry if it seems like a lot of liquid; the cake will absorb it.
4. Let the cake cool completely on the wire rack. Once it’s at room temperature, cover the pan and refrigerate for at least 2-3 hours, or overnight. This chilling step is essential for the gelatin to set and the flavors to meld.
Step 3: Make the Creamy Topping
1. In a medium bowl, whisk together the instant vanilla pudding mix and 1 cup of cold milk. Whisk for about 2 minutes until it begins to thicken.
2. Gently fold the thawed whipped topping into the pudding mixture until fully combined and smooth. This creates a stabilized, fluffy frosting that won’t weep.
Step 4: Assemble and Decorate
1. Spread the creamy topping evenly over the chilled cake.
2. Garnish with freshly grated orange zest, well-drained mandarin orange segments, and white chocolate shavings for a beautiful, professional finish.
3. Return the cake to the refrigerator to chill for at least another hour before serving. This allows the topping to set and makes for cleaner slices.
Nutrition Information (Approximate, per serving, based on 15 servings)
· Calories: 280-320
· Fat: 10-14g
· Saturated Fat: 4-6g
· Carbohydrates: 45-50g
· Sugar: 32-38g
· Protein: 3-4g
· Sodium: 320-380mg
Note: Nutritional values are estimates and will vary based on the specific brands of cake mix, pudding, and other ingredients used.
For the Lovers (Who is this cake for?)
This cake is a love letter to several groups of people:
· The Nostalgic: It’s for anyone who has fond memories of chasing down the ice cream truck on a hot summer day for a sweet, frosty treat.
· The Citrus Enthusiast: The bright, bold orange flavor is a delight for those who love a little tang in their sweets.
· The Beginner Baker: It’s a foolproof recipe that delivers stunning results with minimal effort, perfect for building baking confidence.
· The Crowd-Pleaser: If you need to bring a dessert to a party, potluck, or family gathering, this cake is guaranteed to disappear quickly and have people asking for the recipe.
· The Creamsicle Devotee: Most importantly, this cake is for the lovers of the original frozen treat itself, offering a new, delicious way to enjoy that perfect flavor harmony year-round.
Conclusion
The Orange Creamsicle Cake is a testament to the beauty of simple, clever baking. It transforms humble, everyday ingredients into a dessert that is far greater than the sum of its parts. It’s a celebration of flavor, texture, and nostalgia, all baked into one beautiful pan. With its incredibly moist crumb, refreshing citrus infusion, and dreamy creamy topping, this cake is more than just a recipe; it’s a little slice of sunshine ready to brighten your table and your day. Whether you’re making it for a special occasion or just because, prepare to be transported by every single, delicious bite.