Here’s a full, flavorful, and beautifully written No-Bake Pineapple Cream Dessert recipe—complete with a juicy introduction, ingredients, step-by-step instructions, some fun historical context, formation guide, and even a little poetic shoutout to the dessert’s die-hard fans. Get ready to fall in love with pineapple all over again!
No-Bake Pineapple Cream Dessert
A Tropical Dream You’ll Never Want to Wake Up From
Introduction
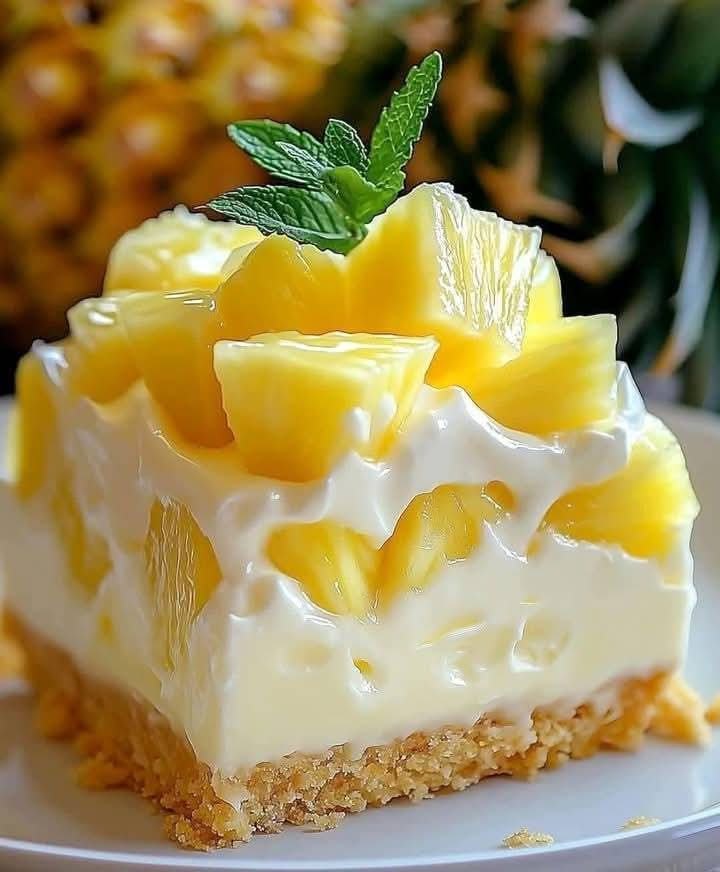
The No-Bake Pineapple Cream Dessert is a cloud-like dream of tropical flavor, whipped cream, and juicy crushed pineapple—all layered atop a buttery graham cracker crust. Perfect for summer BBQs, holiday gatherings, or those “just because” sweet cravings, this dessert comes together in minutes and chills to perfection. No oven, no hassle—just pure creamy indulgence.
This dessert is a favorite among busy moms, sweet-toothed uncles, island lovers, and everyone who’s ever wanted sunshine in a spoonful. Keep this recipe close. People will ask for it.
History of the Dessert
Pineapple as a dessert star has roots in tropical cuisine, especially across Southeast Asia, Hawaii, and the Caribbean. Its vibrant acidity and sweetness make it a go-to for refreshing treats. In the 1950s, when canned fruit and gelatin-based sweets rose in popularity in America, pineapple desserts surged in the form of ambrosia, upside-down cakes, and yes—chilled cream pies.
The No-Bake Pineapple Cream Dessert is a modern-day twist that reflects our love for simplicity and flavor. It’s part fridge cake, part tropical dream, and all love.
Ingredients
For the Crust:
- 2 cups graham cracker crumbs
- ½ cup unsalted butter, melted
- 2 tablespoons sugar (optional)
For the Cream Filling:
- 1 (8 oz) package cream cheese, softened
- 1 cup powdered sugar
- 1 teaspoon vanilla extract
- 1 container (8 oz) whipped topping (Cool Whip or homemade whipped cream)
For the Pineapple Layer:
- 1 can (20 oz) crushed pineapple, well-drained
- 1 tablespoon pineapple juice (from the can – optional)
Optional Toppings:
- Toasted coconut flakes
- Pineapple chunks or slices
- Maraschino cherries
- Additional whipped topping
Instructions & Method
1. Prepare the Crust
- In a bowl, mix graham cracker crumbs, melted butter, and sugar (if using).
- Press mixture into the bottom of a 9×13 inch baking dish.
- Chill in the refrigerator while you prepare the filling (10–15 minutes).
2. Make the Cream Filling
- In a large bowl, beat softened cream cheese until smooth.
- Add powdered sugar and vanilla extract; beat again until light and fluffy.
- Fold in whipped topping gently until fully combined.
- Spread evenly over the chilled graham cracker crust.
3. Add the Pineapple Layer
- Make sure the crushed pineapple is very well-drained to avoid sogginess.
- Spoon the crushed pineapple over the cream layer, spreading it gently.
- Optional: drizzle 1 tablespoon of reserved juice on top for extra flavor.
4. Chill & Set
- Cover the dessert with plastic wrap or a lid.
- Chill in the refrigerator for at least 4 hours or preferably overnight.
Formation
Layer by layer, this dessert is built for beauty and taste:
- Bottom layer: Buttery graham cracker base
- Middle layer: Silky, tangy cream cheese filling
- Top layer: Sweet, juicy crushed pineapple
- Optional final touch: Whipped topping and a cherry on top!
It’s like sunshine in dessert form—layered like love letters from the tropics.
Conclusion
The No-Bake Pineapple Cream Dessert is more than a recipe—it’s a vibe. A celebration of lightness, ease, and the kind of sweetness that doesn’t require effort. Whether you’re making it for your family, your date, or just your sweet tooth, it never disappoints.
And the best part? No oven, no stress, no sweat—just chill, slice, and serve.
For the Lovers of This Dessert
To the pineapple-lovers, the cream cheese dreamers, the no-bake heroes…
You know this dessert is the one. You’ve made it more times than you can count. You’ve guarded this recipe like treasure, scribbled it on sticky notes, sent it in DMs, and passed it down like sweet inheritance.
This dessert belongs to you now.
Don’t lose this recipe. Share it, save it, and love it like it deserves.
Would you like this recipe as a printable card, or should I turn it into a cute shareable image?