Bread in a Bag
Introduction
Bread in a Bag is a simple, fun, and surprisingly effective way to make homemade bread without needing a stand mixer or a complicated bread-making setup. The dough is mixed and kneaded directly inside a resealable plastic bag, which keeps the process tidy and makes it especially convenient for beginners, children, or anyone who wants fresh bread with minimal cleanup.
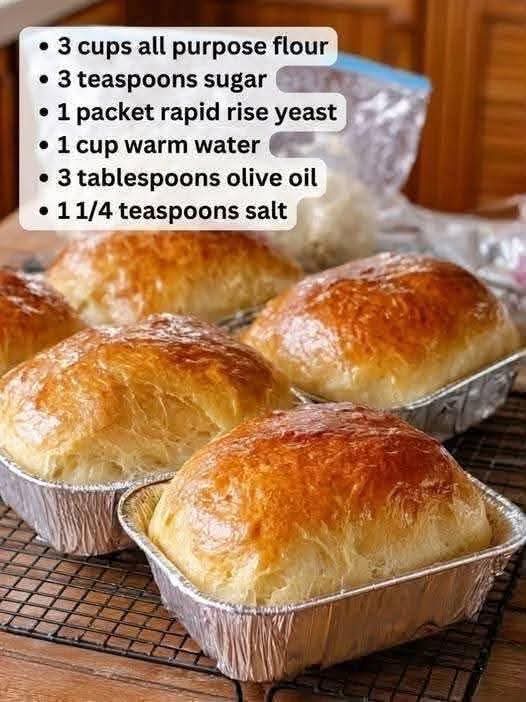
The finished loaf has a soft, tender interior, a lightly crisp golden crust, and the comforting aroma of freshly baked bread. Although the method is modern and playful, it follows the same basic principles that have been used in bread making for centuries: flour, water, yeast, salt, kneading, fermentation, shaping, and baking.
Ingredients
For the Dough
- 3 cups all-purpose flour, divided
- 3 teaspoons granulated sugar
- 1 packet rapid-rise yeast, approximately 2 1/4 teaspoons
- 1 cup warm water, approximately 110°F (43°C)
- 3 tablespoons olive oil
- 1 1/4 teaspoons salt
For the Work Surface
- A small amount of flour for shaping, if needed
- A little olive oil or cooking spray for greasing the pan
Optional Additions
The basic loaf is delicious on its own, but you can customize it with:
- 1 teaspoon garlic powder
- 1 teaspoon dried Italian seasoning
- 1 tablespoon dried herbs
- 2 tablespoons grated Parmesan cheese
- 1 tablespoon sesame seeds
- 1 tablespoon poppy seeds
- A handful of shredded cheese
Equipment
- 1 large resealable plastic bag
- Measuring cups and spoons
- Large mixing bowl, optional
- 8 1/2 x 4 1/2-inch loaf pan or similar baking pan
- Clean kitchen towel
- Cooling rack
- Oven
Instructions
Step 1: Prepare the Yeast Mixture
Pour the warm water into a measuring cup.
The water should feel comfortably warm rather than hot, around 110°F. Water that is too hot can damage the yeast, while water that is too cool may slow fermentation.
Set the water aside while you prepare the dry ingredients.
Step 2: Start the Dough in the Bag
Place 1 cup of the flour into a large resealable plastic bag.
Add the sugar and rapid-rise yeast.
Seal the bag securely and shake it several times until the flour, sugar, and yeast are evenly distributed.
This first mixture creates the foundation of the dough and helps distribute the yeast throughout the flour.
Step 3: Add the Warm Water
Carefully pour the warm water into the bag.
Add the olive oil.
Seal the bag again, making sure there is some air space inside.
Gently squeeze and knead the contents of the bag with your hands until the mixture forms a loose, sticky dough.
Work carefully so the bag does not tear.
Step 4: Add More Flour
Add another cup of flour to the bag.
Seal it and knead the dough through the plastic.
Once the flour has been absorbed, add the remaining 1 cup of flour gradually.
Add the salt along with the final portion of flour.
Continue kneading until the dough becomes cohesive and begins pulling away from the sides of the bag.
The dough should be soft and slightly tacky but not extremely sticky.
If it feels excessively wet, add a tablespoon of flour at a time. Avoid adding too much flour because a very stiff dough can produce a dense loaf.
Step 5: Knead the Dough
Once the dough has come together, continue kneading it inside the sealed bag for approximately 5 to 8 minutes.
Press, fold, squeeze, and turn the dough through the plastic.
You are developing gluten, the network of proteins that gives bread its structure and allows it to rise.
The dough should gradually become smoother and more elastic.
Step 6: First Rise
Leave the dough inside the sealed bag, or transfer it to a lightly oiled bowl and cover it.
Place it in a warm, draft-free location.
Allow it to rise for approximately 45 to 60 minutes, or until it has roughly doubled in size.
The exact rising time will depend on the temperature of your kitchen.
Step 7: Prepare the Pan
Lightly grease a loaf pan with olive oil or cooking spray.
Once the dough has doubled, gently remove it from the bag.
Place it on a lightly floured work surface.
Press the dough gently to release some of the larger air bubbles.
Step 8: Shape the Loaf
Flatten the dough into a rough rectangle.
Fold the sides toward the center and then roll the dough tightly from one end to the other.
Pinch the seam closed.
Place the shaped dough into the prepared loaf pan with the seam facing downward.
Step 9: Second Rise
Cover the loaf loosely with a clean kitchen towel.
Allow it to rise again for approximately 30 to 45 minutes.
The dough should become noticeably puffy and rise above the sides of the pan.
Do not allow it to overproof, because an excessively risen loaf can collapse during baking.
Step 10: Preheat the Oven
While the bread is completing its second rise, preheat the oven to 375°F (190°C).
Allow the oven to reach the proper temperature before placing the bread inside.
Step 11: Bake
Place the loaf in the preheated oven.
Bake for approximately 30 to 35 minutes, or until the top is golden brown and the bread sounds hollow when gently tapped.
If the top becomes brown too quickly, loosely cover it with aluminum foil during the final portion of baking.
Step 12: Cool
Remove the bread from the oven and allow it to rest in the pan for approximately 5 to 10 minutes.
Carefully remove it from the pan and transfer it to a cooling rack.
Allow the loaf to cool for at least 30 minutes before slicing.
Although it can be tempting to cut into freshly baked bread immediately, cooling allows the interior to finish setting and makes cleaner slices possible.
The Method Behind Bread in a Bag
The special feature of this recipe is not the ingredients but the method.
Instead of beginning in a traditional mixing bowl, the flour, yeast, sugar, water, and oil are combined inside a resealable bag. The plastic bag becomes a temporary mixing and kneading surface.
This method has several advantages.
First, it reduces the amount of equipment required. Second, it keeps sticky dough contained while the gluten begins developing. Third, it makes cleanup easier because most of the initial mixing takes place inside the bag.
Once the dough has developed enough structure, it is removed from the bag for rising, shaping, and baking.
Why the Ingredients Work
Flour
All-purpose flour provides the gluten-forming proteins needed to create the structure of the loaf. When flour is combined with water and kneaded, gluten develops and creates an elastic network that traps the gases produced by the yeast.
Yeast
Rapid-rise yeast is responsible for fermentation and leavening. The yeast consumes available sugars and produces carbon dioxide, which becomes trapped inside the gluten network and causes the dough to expand.
Warm Water
Water hydrates the flour, activates the yeast, and allows the gluten-forming proteins to interact.
Sugar
The small amount of sugar contributes sweetness and helps support yeast activity. It also encourages browning during baking.
Olive Oil
Olive oil contributes richness and tenderness. It also helps create a softer crumb and gives the bread a pleasant flavor.
Salt
Salt enhances the flavor of the bread and helps regulate yeast activity. It also strengthens the gluten structure, giving the loaf better texture.
History of Homemade Bread
Bread is among the oldest prepared foods in human history. Early flatbreads were made from simple mixtures of grains and water, but over time people discovered that fermentation could transform dough into lighter, more flavorful loaves.
The development of yeast-leavened bread was an important milestone in baking. Natural fermentation allowed dough to rise, producing the airy textures associated with many traditional breads.
For generations, bread was commonly mixed and kneaded by hand. As kitchens became more modern, stand mixers, bread machines, and commercial yeast made bread production easier.
Bread in a Bag represents a more recent approach: instead of relying on specialized equipment, the baker uses an ordinary resealable bag as a temporary mixing and kneading tool.
The method is particularly appealing for family baking because it turns bread making into a hands-on activity while reducing the mess associated with traditional dough preparation.
Formation of the Bread
The formation of this loaf takes place in several important stages.
First, the ingredients are combined to create the dough.
Second, kneading develops gluten, giving the dough elasticity and strength.
Third, the first fermentation allows yeast to produce carbon dioxide, causing the dough to expand.
Fourth, shaping organizes the gluten structure and gives the dough its final form.
Fifth, the second rise allows the shaped loaf to become light and airy.
Finally, baking transforms the soft dough into a finished loaf. Heat causes the dough to expand rapidly, the starches and proteins to set, and the crust to develop its characteristic golden-brown color.
Tips for the Best Bread in a Bag
- Measure the flour carefully. Too much flour can make the bread heavy and dry.
- Use warm, not hot, water. Extremely hot water can interfere with the yeast.
- Do not rush the rising process. Yeast needs time to produce gas and develop flavor.
- Do not add excessive flour. Slightly tacky dough is usually preferable to stiff dough.
- Knead thoroughly. Proper kneading helps create a strong gluten network.
- Give the dough room to rise. A warm, draft-free area works best.
- Cool before slicing. This helps the crumb finish setting.
- Use a sturdy resealable bag. A strong bag reduces the possibility of tearing during kneading.
- Check the loaf near the end of baking. Ovens vary, so the bread may finish slightly earlier or later than the suggested time.
Serving Suggestions
Fresh Bread in a Bag is wonderful served warm with butter, but there are many other ways to enjoy it.
Serve thick slices alongside soups, stews, pasta, roasted vegetables, or grilled meats.
For breakfast, toast slices and top them with butter, jam, honey, peanut butter, or eggs.
For lunch, use the bread to make sandwiches with turkey, chicken, cheese, vegetables, or tuna.
You can also turn leftover bread into French toast, garlic toast, croutons, bread pudding, or homemade breadcrumbs.
Variations
Garlic Herb Bread
Add garlic powder and dried Italian herbs to the flour before kneading. Brush the finished loaf with melted butter and additional herbs.
Cheese Bread
Add shredded cheddar, mozzarella, Parmesan, or another favorite cheese after the initial dough has formed.
Seeded Bread
Sprinkle sesame seeds, sunflower seeds, flaxseeds, or poppy seeds over the loaf before baking.
Herb and Olive Oil Bread
Add dried rosemary, thyme, oregano, or basil to the dough and increase the olive-oil flavor slightly.
Troubleshooting
The Dough Is Too Sticky
Add flour one tablespoon at a time and knead again. Avoid adding large amounts at once.
The Dough Will Not Rise
Check that the yeast is fresh and that the water was warm rather than extremely hot. A cold kitchen can also significantly slow fermentation.
The Bread Is Dense
The most common causes are too much flour, insufficient kneading, inactive yeast, or insufficient rising time.
The Bread Collapses
The dough may have been allowed to rise for too long. During the second rise, bake the bread once it becomes noticeably puffy rather than waiting for it to become excessively swollen.
The Crust Is Too Dark
Cover the loaf loosely with aluminum foil during the latter part of baking.
Conclusion
Bread in a Bag is a wonderfully approachable introduction to homemade bread. With just flour, yeast, water, olive oil, sugar, and salt, you can create a soft and flavorful loaf using a simple mixing method that keeps the process relatively clean and uncomplicated.
The real beauty of this recipe is its combination of simplicity and traditional bread-making technique. The bag makes mixing and kneading easier, while fermentation, shaping, and baking still produce the familiar characteristics of a classic homemade loaf.
Once you become comfortable with the basic recipe, you can experiment with herbs, cheeses, seeds, garlic, and other additions to create your own signature loaf.
For Bread Lovers
For anyone who loves the smell of freshly baked bread, this recipe is a great place to begin. There is something especially satisfying about watching a handful of basic ingredients transform into a risen, golden loaf.
Bread making does not have to be complicated or require expensive equipment. Sometimes, the simplest method produces the most rewarding result: a warm homemade loaf, sliced at the table and shared with family and friends.