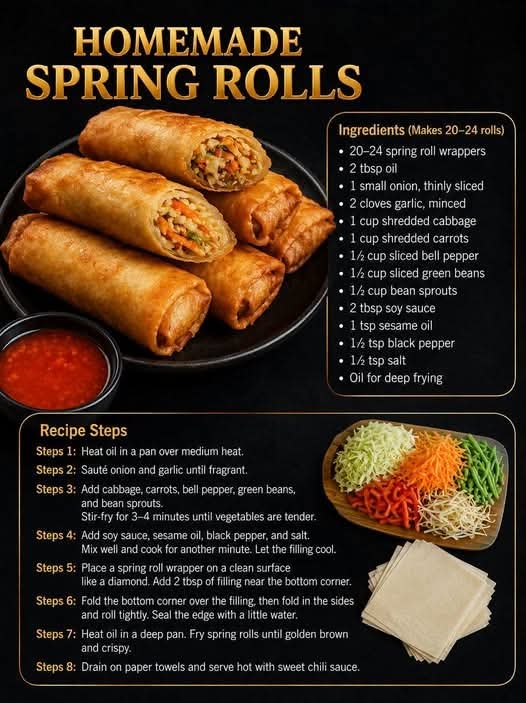
Homemade Crispy Vegetable Spring Rolls
Introduction
Homemade Spring Rolls are a delicious, crispy, and satisfying appetizer filled with colorful vegetables and aromatic seasonings. The combination of crunchy cabbage, sweet carrots, bell peppers, green beans, and fresh bean sprouts creates a flavorful filling that is wrapped in thin pastry and fried until beautifully golden.
Making spring rolls at home is easier than it may seem. The filling comes together quickly in a hot pan, and once the vegetables have cooled, the rolls can be assembled, shaped, and fried. They are perfect for family dinners, parties, appetizers, snacks, or gatherings where everyone can enjoy something freshly made and wonderfully crisp.
One of the best things about homemade spring rolls is their versatility. You can keep them completely vegetarian as written, or add cooked chicken, shrimp, beef, or other ingredients according to your preference. They can also be prepared in advance and frozen, making them convenient for busy days.
History and Background
Spring rolls have a long culinary history in East and Southeast Asia. Their exact origins and styles vary from country to country, and the name “spring roll” refers to several different preparations rather than one single recipe.
In Chinese cuisine, spring rolls are traditionally associated with the arrival of spring and were historically prepared with seasonal vegetables. Over time, different regions developed their own versions, with variations in wrapper thickness, filling, cooking method, and dipping sauces.
In Southeast Asia, particularly in countries such as the Philippines, Vietnam, Thailand, Indonesia, and Malaysia, similar filled rolls became popular and developed their own distinctive characteristics. Some versions are fried until crisp, while others are served fresh with delicate wrappers.
The vegetable spring roll presented here is inspired by the popular crispy fried versions. It combines a selection of fresh vegetables with soy sauce and sesame oil before being enclosed in thin wrappers and fried until golden.
Ingredients
For the Spring Rolls
- 20–24 spring roll wrappers
- 2 tablespoons cooking oil
- 1 small onion, thinly sliced
- 2 cloves garlic, minced
- 1 cup shredded cabbage
- 1 cup shredded carrots
- 1/2 cup thinly sliced bell pepper
- 1/2 cup thinly sliced green beans
- 1/2 cup bean sprouts
- 2 tablespoons soy sauce
- 1 teaspoon sesame oil
- 1/2 teaspoon freshly ground black pepper
- 1/2 teaspoon salt
For Frying
- Enough neutral cooking oil for deep frying
For Sealing
- A small bowl of water
For Serving
- Sweet chili sauce
- Soy sauce, if desired
- Your favorite dipping sauce
Preparation
Before beginning, prepare all the vegetables. Thinly slice the onion, shred the cabbage and carrots, slice the bell pepper and green beans, and mince the garlic.
Having everything prepared before cooking is important because the vegetables cook quickly. Spring roll wrappers should also remain covered with a clean, slightly damp kitchen towel while you work so they do not dry out.
Method 1: Preparing the Vegetable Filling
Place a large skillet or wok over medium heat and add 2 tablespoons of cooking oil.
Add the sliced onion and sauté for approximately 2 minutes, stirring occasionally, until it begins to soften.
Add the minced garlic and cook for another 30 seconds to 1 minute. Stir continuously so the garlic becomes fragrant without burning.
Add the shredded cabbage, shredded carrots, sliced bell pepper, green beans, and bean sprouts.
Increase the heat slightly and stir-fry the vegetables for approximately 3 to 4 minutes. The vegetables should become tender but still retain some of their natural texture and slight crunch.
Add the soy sauce, sesame oil, black pepper, and salt.
Stir everything together thoroughly and cook for another minute.
Taste the filling and adjust the seasoning if necessary.
Remove the pan from the heat and transfer the vegetable mixture to a wide plate or shallow bowl. Allow it to cool completely before filling the wrappers.
This cooling step is important because hot filling can soften the wrappers and make the spring rolls difficult to seal.
Method 2: Preparing the Wrappers
Place one spring roll wrapper on a clean, dry work surface. Position it so that it looks like a diamond, with one corner pointing toward you.
Keep the remaining wrappers covered while working to prevent them from drying out.
Place approximately 2 tablespoons of cooled vegetable filling slightly below the center of the wrapper.
Do not overfill the wrapper. Too much filling can cause it to tear or open during frying.
Method 3: Forming the Spring Rolls
Fold the bottom corner of the wrapper up and over the filling.
Gently tuck the wrapper around the filling to create a firm cylinder.
Next, fold the left side toward the center.
Fold the right side toward the center.
Continue rolling the spring roll upward and forward, keeping the roll reasonably tight without tearing the wrapper.
When you reach the final corner, lightly moisten the edge with a little water.
Press the edge firmly against the roll to seal it.
Repeat the process with the remaining wrappers and vegetable filling.
Place the finished spring rolls seam-side down on a plate or tray while you prepare the remaining rolls.
Method 4: Deep-Frying
Pour enough neutral cooking oil into a deep, heavy-bottomed pan to allow the spring rolls to cook without touching the bottom too closely.
Heat the oil to approximately 175°C to 180°C.
To test the oil, you can carefully place a small piece of wrapper into it. It should immediately begin bubbling and rise toward the surface without burning quickly.
Carefully place several spring rolls into the hot oil. Do not overcrowd the pan because adding too many at once can lower the oil temperature and result in greasy spring rolls.
Fry the spring rolls for approximately 3 to 5 minutes, turning them occasionally if necessary, until the wrappers become evenly golden brown and crisp.
Remove the cooked spring rolls using tongs or a slotted spoon.
Allow excess oil to drain before transferring them to a plate lined with paper towels.
Continue frying the remaining spring rolls in batches.
Method 5: Keeping the Spring Rolls Crispy
For the crispiest results, avoid stacking the hot spring rolls on top of one another immediately after frying.
Arrange them in a single layer so steam can escape.
If preparing a large quantity, place the cooked spring rolls on a wire rack positioned over a baking tray. This allows air to circulate around them and helps prevent the bottoms from becoming soggy.
Serve them while they are still warm and crisp.
Alternative Cooking Methods
Air Fryer Method
For a lighter preparation, lightly brush or spray the assembled spring rolls with oil.
Arrange them in a single layer in the air fryer basket, leaving space between each roll.
Cook at approximately 190°C for about 10 to 15 minutes, turning halfway through cooking, until golden and crisp.
Cooking times can vary depending on the air fryer and the thickness of the wrappers.
Oven Method
Preheat the oven to approximately 200°C.
Arrange the spring rolls on a lightly greased baking tray, leaving space between them.
Lightly brush the outside with oil.
Bake for approximately 18 to 25 minutes, turning them halfway through cooking, until crisp and golden.
Filling Variations
The vegetable filling can easily be adapted.
For a chicken version, add finely shredded cooked chicken to the vegetables.
For a shrimp version, use finely chopped cooked shrimp.
For a beef version, add finely cooked and seasoned ground beef.
For a mushroom version, sauté finely sliced mushrooms with the vegetables.
You can also add finely shredded zucchini, snow peas, bamboo shoots, or other vegetables that cook quickly.
If using additional ingredients, make sure the filling is not excessively wet. Excess moisture can make the wrappers soggy and difficult to seal.
Important Tips for Perfect Spring Rolls
Keep the wrappers covered while assembling the rolls.
Always allow the filling to cool before wrapping.
Do not add too much filling to each wrapper.
Roll firmly but gently so the wrappers do not tear.
Seal the final edge with only a small amount of water.
Maintain a steady frying temperature.
Avoid overcrowding the pan.
Drain the spring rolls immediately after frying.
Serve them soon after cooking for the best texture.
Serving Suggestions
Homemade spring rolls are excellent served as an appetizer or snack.
Sweet chili sauce is one of the most popular accompaniments because its combination of sweetness, mild heat, and acidity balances the savory filling and crispy wrapper.
You can also serve the spring rolls with soy sauce, garlic chili sauce, spicy dipping sauce, or a simple mixture of soy sauce, rice vinegar, sesame oil, and a little chili.
For a complete meal, serve the spring rolls alongside fried rice, noodles, stir-fried vegetables, soup, or a fresh Asian-inspired salad.
Make-Ahead and Freezing Instructions
Spring rolls can be prepared ahead of time.
Assemble the uncooked rolls and place them in a single layer on a tray lined with parchment paper. Make sure they do not touch one another.
Freeze them until firm, then transfer them to a freezer-safe container or bag.
They can be fried directly from frozen. Do not thaw them first, because thawing can make the wrappers soft and cause them to stick together.
When frying frozen spring rolls, use moderate heat and allow them a little more cooking time so the filling becomes hot while the outside becomes crisp and golden.
Storage
Cooked spring rolls are best enjoyed immediately because the wrappers gradually lose their crispness.
If you have leftovers, allow them to cool completely before refrigerating them in an airtight container.
To restore some of their crispness, reheat them in an oven or air fryer rather than a microwave.
Conclusion
Homemade Vegetable Spring Rolls are a wonderful combination of fresh vegetables, savory seasoning, delicate wrappers, and irresistible crispiness. They are simple enough for everyday cooking but impressive enough to serve at parties and special gatherings.
The key to excellent spring rolls is controlling moisture, cooling the filling completely, wrapping them securely, and maintaining the correct frying temperature. Once you master the basic rolling technique, you can experiment with different vegetables, proteins, seasonings, and dipping sauces.
The result is a batch of golden, crunchy spring rolls that are best served hot and fresh with your favorite dipping sauce. They are a delicious homemade treat that brings together texture, color, aroma, and flavor in every bite.
Final Method at a Glance
Prepare and slice all vegetables.
Sauté the onion and garlic.
Add the vegetables and stir-fry until tender but still slightly crisp.
Season with soy sauce, sesame oil, black pepper, and salt.
Cool the filling completely.
Place approximately 2 tablespoons of filling onto each wrapper.
Fold the bottom and sides over the filling.
Roll tightly and seal with water.
Heat the frying oil to approximately 175°C to 180°C.
Fry in batches until golden and crisp.
Drain thoroughly.
Serve hot with sweet chili sauce or your preferred dipping sauce.
A Recipe to Share and Enjoy
These spring rolls are especially enjoyable when made together with family or friends. Preparing the filling, rolling each wrapper, and cooking the finished rolls can turn a simple recipe into a shared kitchen experience.
Whether served as an appetizer, party snack, or part of a larger meal, homemade spring rolls are a reliable favorite because they offer a satisfying contrast between a crisp exterior and a flavorful vegetable filling.
Once you make them at home, you can easily adjust the filling and seasonings to create your own signature version.