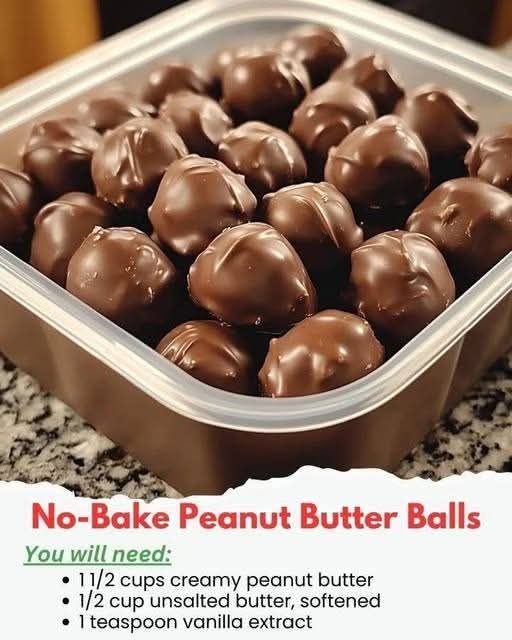
No-Bake Peanut Butter Balls
Introduction
No-Bake Peanut Butter Balls are a wonderfully simple homemade treat made with creamy peanut butter, butter, vanilla, powdered sugar, and chocolate. They require no oven and only a handful of ingredients, making them perfect for holidays, parties, cookie exchanges, family gatherings, or whenever you want something sweet without spending hours in the kitchen.
The combination of rich peanut butter and smooth chocolate creates a classic flavor that appeals to both children and adults. The centers are soft, creamy, and slightly crumbly, while the chocolate coating provides a satisfying snap when chilled.
One of the best things about this recipe is its flexibility. You can make the balls small for bite-sized treats, large for an indulgent dessert, or decorate them with different toppings to create an attractive homemade candy assortment.
Ingredients
For the Peanut Butter Filling
- 1 1/2 cups creamy peanut butter
- 1/2 cup unsalted butter, softened
- 1 teaspoon vanilla extract
- 3 to 4 cups powdered sugar, sifted
- 1/4 teaspoon salt, optional
For the Chocolate Coating
- 2 cups semi-sweet chocolate chips
- 1 tablespoon coconut oil or shortening, optional
- 1/2 cup milk chocolate chips, optional for a sweeter coating
Optional Decorations
- Finely chopped peanuts
- White chocolate, melted
- Milk chocolate, melted
- Chocolate sprinkles
- Crushed peanut butter cookies
- Flaky sea salt
- Colored sprinkles for holidays or celebrations
Equipment
- Large mixing bowl
- Electric hand mixer or stand mixer
- Measuring cups and spoons
- Baking sheet
- Parchment paper or wax paper
- Small cookie scoop
- Microwave-safe bowl or double boiler
- Refrigerator
Preparation
Before beginning, allow the butter to soften at room temperature. It should be soft enough to mix easily but should not be melted.
Line a large baking sheet with parchment paper or wax paper. This prevents the peanut butter balls from sticking and makes cleanup easier.
Sift the powdered sugar if it contains lumps. This helps create a smoother peanut butter mixture.
Method 1: Making the Peanut Butter Mixture
Place the softened butter and creamy peanut butter in a large mixing bowl.
Beat them together until completely smooth and creamy. This usually takes about 2 to 3 minutes with an electric mixer.
Add the vanilla extract and optional salt. Mix again until everything is evenly incorporated.
Begin adding the powdered sugar gradually, about 1/2 cup at a time.
Continue mixing after each addition.
The mixture should eventually become thick enough to hold its shape when pressed together.
If the mixture feels too soft or sticky, add a little more powdered sugar.
If it becomes too dry and difficult to shape, add a small spoonful of peanut butter and mix again.
Method 2: Forming the Peanut Butter Balls
Using a small cookie scoop or tablespoon, portion out the mixture.
Roll each portion gently between your palms to form a smooth ball.
Try to make the balls approximately the same size so they look uniform and chill at the same rate.
Place each ball onto the prepared baking sheet.
Continue until all of the peanut butter mixture has been used.
Place the tray in the refrigerator for approximately 30 to 45 minutes.
Chilling makes the peanut butter centers firmer and much easier to coat with chocolate.
Method 3: Preparing the Chocolate
Place the chocolate chips in a microwave-safe bowl.
Microwave for 20 to 30 seconds at a time, stirring thoroughly between each interval.
Continue until the chocolate is almost completely melted.
Stir until the remaining pieces disappear from the residual heat.
If desired, add 1 tablespoon of coconut oil or shortening. This creates a smoother, thinner coating that is easier to work with.
Alternatively, melt the chocolate gently in a double boiler over barely simmering water.
Do not allow water or steam to come into direct contact with the chocolate.
Method 4: Coating the Peanut Butter Balls
Remove the chilled peanut butter balls from the refrigerator.
Place one ball into the melted chocolate.
Use a fork or dipping tool to gently roll it through the chocolate until completely covered.
Lift the ball out and allow excess chocolate to drip back into the bowl.
Place the chocolate-covered ball back onto the parchment-lined baking sheet.
Repeat with the remaining peanut butter balls.
If the chocolate becomes too thick while dipping, warm it briefly and stir well.
Method 5: Decorating
For a simple presentation, leave the chocolate coating plain.
For a more decorative finish, immediately sprinkle the tops with finely chopped peanuts.
You can also drizzle melted white chocolate over the finished balls.
For an elegant version, add a tiny pinch of flaky sea salt before the chocolate sets.
For holidays, use appropriate sprinkles or decorative chocolate drizzles.
Allow the decorations to set completely before transferring the candy to a container.
Chilling and Setting
Place the completed peanut butter balls in the refrigerator for approximately 20 to 30 minutes, or until the chocolate has completely hardened.
Once firm, transfer them to an airtight container.
Separate layers with parchment paper if necessary.
For the best texture, allow the balls to sit at room temperature for several minutes before serving.
History
Peanut butter and chocolate have become one of the most recognizable flavor combinations in American-style desserts.
Peanut butter became increasingly popular in the United States during the late 19th and early 20th centuries. As peanut butter became more widely available commercially, home cooks began incorporating it into cookies, candies, sandwiches, cakes, and other desserts.
Chocolate and peanut butter eventually became especially popular together. The combination is particularly appealing because the salty, nutty richness of peanut butter balances the sweetness and bitterness of chocolate.
No-bake peanut butter balls developed as a simple homemade confection that could be prepared without an oven. Recipes of this type became especially popular for holiday candy trays and family gatherings because they were inexpensive, easy to prepare, and could be made ahead of time.
Today, countless variations exist, but the basic concept remains the same: a creamy peanut butter center formed into small balls and finished with chocolate.
Formation and Texture
The formation of these peanut butter balls is simple but important.
The peanut butter and softened butter create the rich foundation of the filling. Powdered sugar provides sweetness while also absorbing some of the natural oils from the peanut butter, giving the mixture enough structure to be rolled.
Vanilla enhances the overall flavor and gives the filling a pleasant dessert-like aroma.
Chilling is an important part of the process. A cold peanut butter center is firmer and much easier to dip into melted chocolate without breaking apart.
The finished candy should have three main textural qualities:
- A smooth chocolate exterior
- A soft, creamy peanut butter center
- A slight firmness from refrigeration
Important Tips for Success
Use creamy peanut butter for the smoothest filling.
Avoid adding all of the powdered sugar at once. Different peanut butters have different consistencies, so gradually adding the sugar gives you better control.
Do not melt the butter. Softened butter blends more effectively and produces a better filling.
Chill the peanut butter balls before dipping them.
Keep water away from melted chocolate because even a small amount can cause chocolate to seize and become grainy.
If the chocolate coating is too thick, add a small amount of coconut oil or shortening.
Work relatively quickly when dipping, especially if your kitchen is warm.
For perfectly uniform balls, use a small cookie scoop.
Storage
Store the finished peanut butter balls in an airtight container.
They can be refrigerated for approximately 1 to 2 weeks.
For longer storage, they can also be frozen in a freezer-safe airtight container.
Place parchment paper between layers to prevent them from sticking together.
When ready to serve, allow frozen peanut butter balls to thaw gradually in the refrigerator.
Serving Ideas
No-Bake Peanut Butter Balls are excellent served as part of a dessert platter.
They can also be placed in small candy cups for parties or gift boxes.
For holidays, decorate them according to the occasion.
For Christmas, use festive sprinkles or white chocolate drizzle.
For birthdays, use colorful sprinkles.
For an elegant dessert table, keep the chocolate coating simple and finish each piece with a small amount of flaky sea salt.
They also make a wonderful homemade food gift when arranged in a decorative box or jar.
Variations
Dark Chocolate Peanut Butter Balls
Use dark chocolate instead of semi-sweet chocolate for a richer and less sweet flavor.
White Chocolate Peanut Butter Balls
Coat the peanut butter centers in melted white chocolate for a sweeter and creamier variation.
Crunchy Peanut Butter Balls
Replace creamy peanut butter with crunchy peanut butter for extra texture.
Chocolate Peanut Butter Centers
Add a few tablespoons of unsweetened cocoa powder to the peanut butter mixture for a chocolate-flavored center.
Coconut Peanut Butter Balls
Add finely shredded coconut to the peanut butter filling before forming the balls.
Salted Peanut Butter Balls
Finish the chocolate coating with a tiny amount of flaky sea salt. The contrast between salty, sweet, chocolate, and peanut butter is especially delicious.
Why People Love This Recipe
People love No-Bake Peanut Butter Balls because they deliver the flavor of a classic chocolate-peanut butter dessert without complicated baking techniques.
There is no cake batter to prepare, no oven to preheat, and no complicated decorating process.
The recipe is also easy to make in large batches. Once the centers are formed, the rest of the process is simply chilling, dipping, and decorating.
They are particularly popular during the holiday season because they can be prepared several days in advance.
Conclusion
No-Bake Peanut Butter Balls are a classic homemade treat that proves a delicious dessert does not have to be complicated.
With creamy peanut butter, rich butter, vanilla, powdered sugar, and a smooth chocolate coating, every bite combines sweetness, nuttiness, creaminess, and chocolate richness.
The recipe is easy enough for beginners while still being impressive enough for parties and special occasions.
Whether you make them for your family, prepare them as holiday gifts, or simply keep a batch in the refrigerator for an afternoon treat, these peanut butter balls are a dependable dessert that is simple to prepare and difficult to resist.
The best part is that you can make the recipe your own by changing the chocolate, adding crunchy ingredients, experimenting with toppings, or creating seasonal decorations.
Once you make them, they are likely to become one of those recipes you return to again and again.