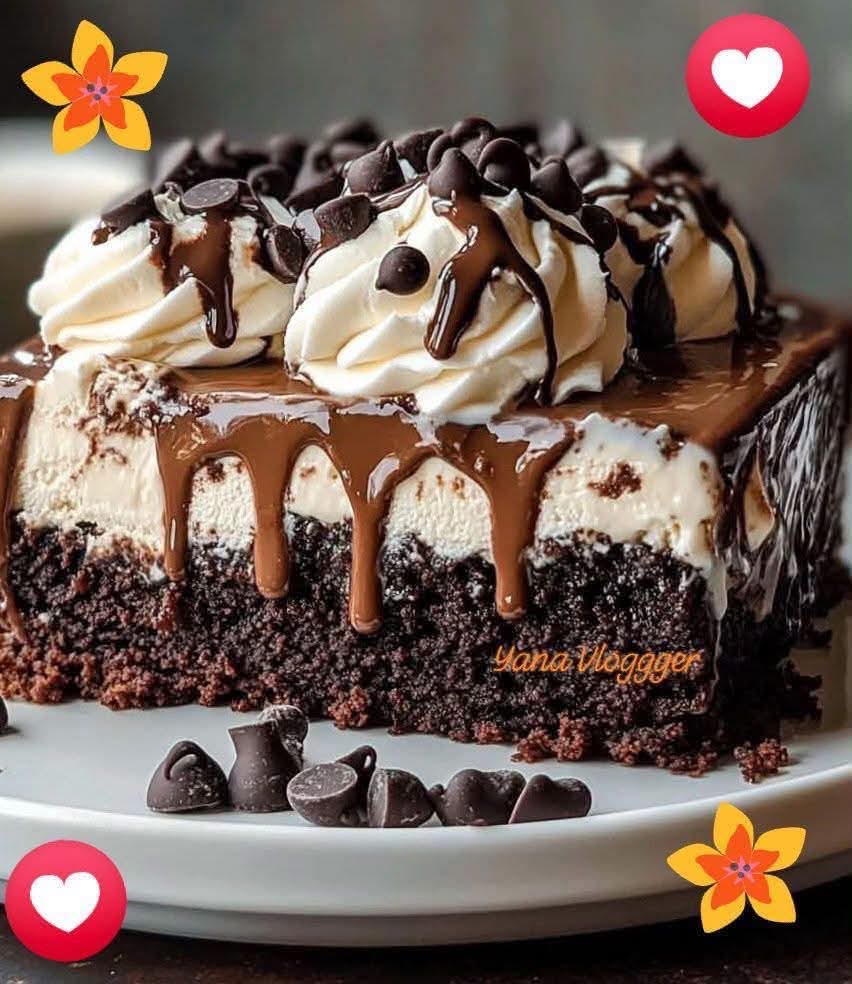
Mocha Brownie Ice Cream Cake
.
Introduction
Mocha Brownie Ice Cream Cake is a rich, indulgent dessert that combines three irresistible elements: a fudgy chocolate brownie base, creamy coffee or mocha ice cream, and a smooth chocolate ganache. The result is a beautiful frozen cake with contrasting textures and deep chocolate-coffee flavor.
This dessert is especially wonderful for birthdays, dinner parties, holidays, summer gatherings, or any occasion when you want something impressive without spending hours decorating a traditional cake. The brownie provides a chewy foundation, the ice cream creates a cool and creamy center, and the ganache adds a glossy layer of chocolate that makes every slice feel luxurious.
The recipe is also wonderfully adaptable. You can use coffee, mocha, chocolate, or even vanilla ice cream, and you can decorate the finished cake simply or make it elegant enough for a special celebration.
Ingredients
For the Brownie Base
- 1 box brownie mix
- Ingredients required on the brownie mix package, usually eggs, oil, and water
- 1 teaspoon espresso powder, optional
- Butter or nonstick cooking spray for preparing the pan
For the Ice Cream Layer
- 1 quart coffee or mocha ice cream, softened slightly
- 1/2 cup semi-sweet or milk chocolate chips
For the Chocolate Ganache
- 1 cup semi-sweet chocolate chips
- 1/2 cup heavy cream
For the Topping
- Whipped cream
- Chocolate shavings
- Chocolate sprinkles, optional
- Chocolate-covered espresso beans or espresso beans, optional
Equipment
- 9-inch springform pan
- Mixing bowl
- Spatula
- Small saucepan
- Heatproof bowl
- Plastic wrap
- Freezer-safe surface or tray
Preparation and Formation
The cake is built in distinct layers. First comes the brownie foundation, which needs to be completely cool before the ice cream is added. The second layer is softened coffee or mocha ice cream, scattered with chocolate chips for additional texture. Once frozen solid, the cake receives a warm chocolate ganache topping.
The final stage is decoration with whipped cream and chocolate accents. Because the dessert is assembled and frozen in stages, it is an excellent make-ahead dessert.
Instructions
Step 1: Prepare the Pan
Grease the bottom and sides of a 9-inch springform pan. For easier removal, you can also line the bottom with a round piece of parchment paper.
Make sure the springform pan closes securely because the softened ice cream will need to remain inside while the cake freezes.
Step 2: Prepare the Brownie Batter
Preheat the oven according to the temperature indicated on your brownie mix package.
Prepare the brownie batter according to the package directions, using the required eggs, oil, and water.
For a stronger mocha flavor, stir 1 teaspoon of espresso powder into the brownie batter. Espresso powder does not necessarily make the brownie taste like coffee; instead, it can intensify the chocolate flavor while adding a subtle mocha character.
Pour the batter into the prepared springform pan and smooth the surface with a spatula.
Step 3: Bake the Brownie Base
Bake according to the brownie mix instructions until the brownie is set and a toothpick inserted near the center comes out with moist crumbs rather than wet batter.
Avoid overbaking because the brownie is the foundation of the ice cream cake and should remain pleasantly fudgy.
Remove the pan from the oven and allow the brownie to cool completely.
For the best results, do not rush this step. If the brownie is still warm, it can melt the ice cream when the second layer is added.
Step 4: Soften the Ice Cream
Remove the coffee or mocha ice cream from the freezer and allow it to soften until it becomes spreadable but is not completely melted.
The ideal consistency is similar to thick, soft frosting. If the ice cream becomes liquid, return it to the freezer briefly before assembling the cake.
Step 5: Create the Ice Cream Layer
Once the brownie has cooled completely, spoon the softened ice cream over the brownie.
Using an offset spatula or the back of a spoon, carefully spread the ice cream into an even layer.
Sprinkle 1/2 cup of chocolate chips evenly over the ice cream.
Press the chocolate chips very gently into the ice cream so they remain in place without disturbing the brownie underneath.
Step 6: Freeze the Cake
Cover the springform pan tightly with plastic wrap.
Place the cake in the freezer for at least 4 hours, or preferably overnight, until the ice cream is completely firm.
A fully frozen layer is important because it provides a stable surface for the ganache.
Step 7: Prepare the Chocolate Ganache
Place 1 cup of semi-sweet chocolate chips in a heatproof bowl.
Pour 1/2 cup of heavy cream into a small saucepan.
Heat the cream over medium heat until it becomes hot and begins to gently simmer around the edges. Do not allow it to boil vigorously.
Pour the hot cream over the chocolate chips.
Allow the mixture to sit undisturbed for about 2 minutes. Then slowly stir from the center outward until the chocolate has completely melted and the ganache becomes smooth, glossy, and uniform.
Step 8: Cool the Ganache Slightly
Allow the ganache to cool for several minutes.
This is an important part of the method. The ganache should remain pourable but should not be extremely hot. Pouring very hot ganache directly over frozen ice cream can cause the surface to melt unevenly.
Step 9: Add the Ganache
Remove the frozen cake from the freezer.
Pour the slightly cooled ganache over the top, using a spatula to spread it evenly toward the edges.
If desired, allow a small amount of ganache to drip naturally over the sides for a dramatic appearance.
Work relatively quickly so the ice cream remains firm.
Step 10: Freeze Again
Return the cake to the freezer for approximately 1 hour, or until the ganache has completely set.
If preparing the cake several hours or a day ahead, keep it covered securely in the freezer to prevent it from absorbing freezer odors.
Step 11: Decorate the Cake
When ready to serve, remove the cake from the freezer.
Carefully release the springform pan.
Decorate the top with whipped cream, chocolate shavings, chocolate sprinkles, or chocolate-covered espresso beans.
For an elegant presentation, pipe small whipped-cream rosettes around the edge and place a chocolate shaving or espresso bean on each rosette.
Step 12: Slice and Serve
Allow the cake to sit at room temperature for approximately 5 to 10 minutes before slicing. This gives the brownie enough time to soften slightly while keeping the ice cream firm.
Use a sharp knife warmed under hot water and then dried thoroughly before cutting.
For clean slices, wipe the knife between cuts.
Serve immediately.
Detailed Method and Helpful Tips
Choosing the Brownie
A fudgy brownie mix works particularly well because it creates a rich contrast against the cold ice cream. Avoid baking the brownie longer than necessary because a dry brownie can become quite firm after freezing.
Choosing the Ice Cream
Coffee or mocha ice cream provides the strongest mocha flavor. Chocolate ice cream creates a more chocolate-forward dessert, while vanilla ice cream offers a milder flavor that allows the espresso and ganache to stand out.
For an even richer dessert, you can use an ice cream containing chocolate pieces or a coffee ice cream with chocolate swirls.
Working With Softened Ice Cream
The ice cream should be soft enough to spread but still thick enough to hold its shape.
If it becomes too soft, place it back in the freezer for several minutes before continuing.
Making Smooth Ganache
The ratio of chocolate to cream in this recipe produces a rich, spreadable ganache.
For an especially smooth result, chop large chocolate pieces before adding the hot cream. Stir gently rather than aggressively whisking, which can introduce unnecessary air bubbles.
Getting Clean Layers
For sharply defined layers, make sure each stage is thoroughly chilled before adding the next.
The brownie should be completely cold before adding ice cream, and the ice cream should be completely frozen before adding ganache.
Variations
Chocolate Mocha Brownie Cake
Use chocolate ice cream instead of coffee ice cream and add espresso powder to both the brownie and ganache for a stronger mocha profile.
White Chocolate Mocha Cake
Replace the semi-sweet chocolate chips in the ganache with white chocolate and use coffee ice cream for a creamy white-chocolate mocha combination.
Caramel Mocha Version
Add a thin layer of caramel sauce between the brownie and ice cream. Finish the cake with chocolate ganache and a light drizzle of caramel.
Nutty Mocha Cake
Add chopped toasted pecans, walnuts, or hazelnuts to the ice cream layer for crunch.
Extra Chocolate Version
Use chocolate brownie mix, chocolate ice cream, chocolate chips, chocolate ganache, and chocolate shavings for an intensely rich chocolate dessert.
Make-Ahead Instructions
This cake is ideal for making ahead.
Once assembled, it can remain covered in the freezer until needed. For the best texture and flavor, keep it tightly covered and serve within several days.
If preparing it for a party, complete the brownie and ice cream layers the day before. Prepare and add the ganache after the ice cream has frozen firmly, then decorate shortly before serving.
Storage
Keep the finished cake covered in the freezer.
When storing leftovers, wrap the cake securely or place individual slices in airtight freezer-safe containers.
Allow individual slices to soften slightly before serving, but do not leave the entire cake at room temperature for an extended period because the ice cream layer will melt.
The History and Inspiration Behind the Dessert
The Mocha Brownie Ice Cream Cake brings together several dessert traditions that became popular in modern American home baking.
Brownies emerged as a distinctly American chocolate dessert in the late nineteenth and early twentieth centuries, eventually becoming a staple of home baking. Ice cream cakes developed from the longstanding tradition of combining frozen desserts with cake and other baked components, particularly as home refrigeration and commercial ice cream became increasingly accessible.
Coffee and chocolate have also been paired together for generations. The bitterness and roasted character of coffee can deepen the perception of chocolate, creating the familiar mocha flavor.
This recipe brings those traditions together in a modern layered dessert: a baked brownie foundation, a frozen ice cream center, and a chocolate ganache finish.
Presentation and Formation
For an elegant presentation, place the finished cake on a chilled serving platter.
Pipe whipped cream around the perimeter and garnish with delicate chocolate curls. A few espresso beans can be added for visual contrast and to immediately communicate the coffee flavor.
For a more casual presentation, simply spread whipped cream over the top and sprinkle generously with chocolate shavings.
You can also drizzle additional chocolate sauce over each individual slice just before serving.
Serving Suggestions
Mocha Brownie Ice Cream Cake pairs beautifully with:
- Fresh strawberries
- Raspberries
- Extra whipped cream
- Chocolate sauce
- Caramel sauce
- Chopped toasted nuts
- Fresh berries
- A small cup of coffee
- Espresso
- Hot chocolate
Because the cake is rich, relatively small slices are usually satisfying.
Troubleshooting
The ice cream is melting while I assemble the cake.
The ice cream may be too soft, or the brownie may not have cooled sufficiently. Freeze the brownie thoroughly and work quickly with softened rather than melted ice cream.
The brownie is difficult to cut.
Let the finished cake stand for a few additional minutes before slicing. A warmed, dry knife also makes cutting easier.
The ganache is too thick.
Gently warm it and stir until it becomes pourable. Add a small amount of warm cream if necessary.
The ganache is too thin.
Allow it to cool for several minutes. As it cools, it will naturally thicken.
The layers are uneven.
Use an offset spatula to level the ice cream before freezing. Taking a few extra minutes at this stage makes the finished cake much more attractive.
Conclusion
Mocha Brownie Ice Cream Cake is a spectacular dessert that combines the comforting richness of brownies with the cool creaminess of coffee ice cream and the luxurious texture of chocolate ganache. Despite its impressive appearance, the preparation is straightforward because each component can be made separately and assembled in stages.
The key to success is patience: cool the brownie completely, freeze the ice cream layer until firm, allow the ganache to cool slightly before spreading, and give the finished cake enough time to set.
The finished dessert is rich, creamy, chocolaty, and infused with the unmistakable character of coffee. It is the kind of dessert that looks beautiful on a celebration table but is simple enough to prepare for an ordinary family dessert.
For chocolate and coffee lovers, this cake offers the best of both worlds in every chilled, fudgy, creamy slice.