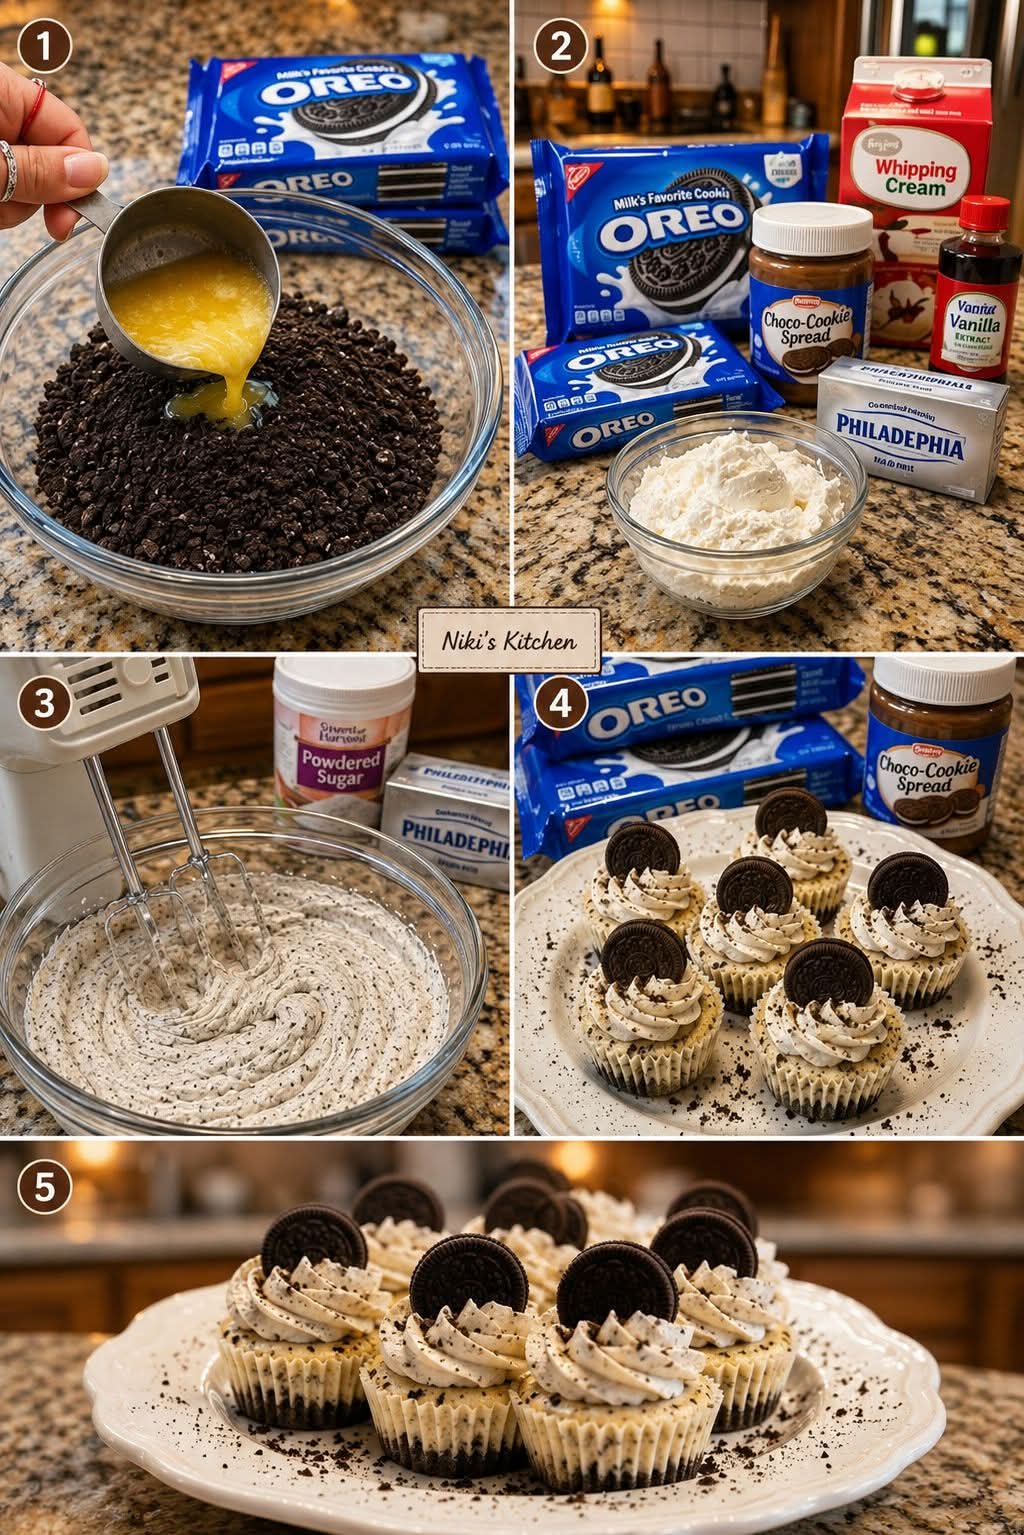
No-Bake Oreo Cheesecake Minis
Introduction
No-Bake Oreo Cheesecake Minis are an irresistible little dessert made for anyone who loves the classic combination of chocolate sandwich cookies and creamy cheesecake. Each individual serving begins with a buttery Oreo crust, followed by a smooth cheesecake filling generously dotted with crushed Oreo pieces. A delicate swirl of whipped cream and a whole Oreo cookie complete the dessert.
The greatest advantage of this recipe is its simplicity. There is no oven, no complicated water bath, and no lengthy baking process. After a short preparation, the mini cheesecakes simply need time to chill and firm up in the refrigerator. They are perfect for birthdays, holidays, parties, afternoon treats, family gatherings, or whenever you want an elegant dessert without spending hours in the kitchen.
Ingredients
For the Oreo Crust
- 24 Oreo cookies
- 5 tablespoons unsalted butter, melted
For the Cheesecake Filling
- 16 ounces Philadelphia cream cheese, softened
- 1 cup powdered sugar
- 2 teaspoons pure vanilla extract
- 1 cup heavy whipping cream, cold
- 12 Oreo cookies, finely crushed or chopped
- 2 tablespoons chocolate cookie spread, optional
For the Whipped Cream Topping
- 1 cup cold heavy whipping cream
- 2 tablespoons powdered sugar
- 1 teaspoon vanilla extract
For Decoration
- 12 to 16 whole Oreo cookies
- Additional Oreo crumbs, optional
- Chocolate cookie spread, optional
Equipment
- 12-cup muffin pan
- Paper or silicone cupcake liners
- Food processor or rolling pin
- Mixing bowls
- Electric hand mixer or stand mixer
- Rubber spatula
- Piping bag with a decorative tip
- Refrigerator
History and Inspiration
The Oreo cookie has become one of the most recognizable chocolate sandwich cookies in the world. Its combination of dark cocoa-flavored biscuits and sweet vanilla-flavored cream has inspired countless desserts, including cakes, milkshakes, ice creams, brownies, truffles, and cheesecakes.
Cheesecake itself has a much older history. Versions of cheese-based cakes have existed for centuries, with ancient civilizations preparing sweetened cheese mixtures for special occasions. Modern cheesecake eventually developed into the rich, creamy dessert familiar today.
The no-bake version became especially popular because it offers the luxurious texture of cheesecake without requiring an oven. Combining this technique with Oreo cookies creates a dessert that is both nostalgic and modern, while individual portions make it especially convenient for entertaining.
Preparation and Formation
The beauty of these mini cheesecakes comes from the way the layers are formed. The Oreo crumbs and butter create a firm chocolate base once chilled. The cream cheese mixture provides the rich and creamy center, while crushed cookies throughout the filling add texture and extra chocolate flavor. Finally, whipped cream creates a light contrast to the dense cheesecake.
For the best appearance, the crust should be pressed firmly and evenly into each liner. The filling should be smooth and well aerated, but not overmixed. Chilling is essential because it allows the cheesecake mixture to become firm enough to hold its shape when served.
Instructions
Step 1: Prepare the Muffin Pan
Line a 12-cup muffin pan with paper or silicone cupcake liners. This makes removing the mini cheesecakes much easier after they have chilled.
Set the prepared pan aside while you make the crust.
Step 2: Make the Oreo Crust
Place 24 Oreo cookies into a food processor and process them until they become fine crumbs.
If you do not have a food processor, place the cookies inside a sturdy sealed bag and crush them with a rolling pin until finely ground.
Transfer the crumbs to a bowl and add the melted butter. Mix thoroughly until the crumbs are evenly coated and the mixture resembles damp sand.
Divide the mixture evenly among the 12 cupcake liners. Use approximately 2 tablespoons of crust mixture per cup.
Press the crumbs firmly into the bottom of each liner using the back of a spoon or the bottom of a small glass.
Place the pan in the refrigerator while preparing the filling.
Step 3: Prepare the Cream Cheese
Place the softened cream cheese in a large mixing bowl.
Beat the cream cheese on medium speed until completely smooth and creamy. Scrape down the sides of the bowl as necessary.
Add the powdered sugar and vanilla extract. Continue mixing until everything is incorporated and the mixture is smooth.
If you are using chocolate cookie spread, add it at this stage and mix until evenly combined.
Step 4: Whip the Cream
Pour the cold heavy whipping cream into a separate bowl.
Using an electric mixer, beat the cream until stiff peaks form. The whipped cream should be thick enough to hold its shape.
Do not overbeat it, as excessive mixing can turn the cream grainy.
Step 5: Combine the Filling
Gently fold the whipped cream into the cream cheese mixture using a rubber spatula.
Fold slowly and carefully to preserve the light texture of the whipped cream.
Add the crushed Oreo cookies and gently fold them through the mixture until they are evenly distributed.
The finished filling should be creamy, fluffy, and speckled with small pieces of Oreo.
Step 6: Fill the Cheesecake Minis
Remove the chilled crusts from the refrigerator.
Spoon or pipe the cheesecake filling evenly over each Oreo crust.
Fill each liner almost to the top while leaving enough room for the whipped cream decoration.
Smooth the surface with the back of a spoon or a small offset spatula.
Step 7: Chill the Cheesecakes
Cover the muffin pan loosely with plastic wrap or foil.
Refrigerate the mini cheesecakes for at least 4 hours.
For the firmest texture and best flavor, refrigerate them overnight.
This chilling period allows the filling to set properly and gives the Oreo crust time to become firm.
Method for the Whipped Cream Topping
Place the cold heavy whipping cream, powdered sugar, and vanilla extract into a clean mixing bowl.
Beat on medium-high speed until stiff peaks form.
Transfer the whipped cream to a piping bag fitted with your preferred decorating tip.
Once the mini cheesecakes are completely chilled, pipe a small decorative swirl of whipped cream onto each one.
Place a whole Oreo cookie on top of each cheesecake.
For an additional chocolate finish, sprinkle a small amount of Oreo crumbs over the whipped cream or drizzle a little warmed chocolate cookie spread over the top.
Important Tips for Success
Use cream cheese that has been softened to room temperature. Cold cream cheese can leave small lumps in the filling.
Use cold heavy whipping cream when making the whipped cream. Cold cream whips more efficiently and holds its shape better.
Do not skip the chilling stage. Since these are no-bake cheesecakes, refrigeration is what gives them their structure.
Press the Oreo crust firmly into the liners. A loose crust may crumble when the cheesecake is removed.
For clean presentation, allow the cheesecakes to remain refrigerated until shortly before serving.
If you want particularly neat individual portions, silicone cupcake liners can make removal easier.
Variations
Chocolate Oreo Cheesecake Minis
Add 2 tablespoons of unsweetened cocoa powder to the cheesecake filling for a deeper chocolate flavor.
Double Oreo Minis
Use extra crushed Oreos in the crust and filling, then decorate each cheesecake with additional Oreo crumbs.
Chocolate Ganache Version
Prepare a small amount of chocolate ganache and allow it to cool slightly. Spoon a thin layer over the chilled cheesecakes before adding the whipped cream.
Peanut Butter Oreo Minis
Add a few tablespoons of smooth peanut butter to the cheesecake filling for a chocolate-and-peanut-butter combination.
Mint Oreo Cheesecake Minis
Add a small amount of peppermint or mint extract to the filling and use mint-flavored Oreo cookies for an especially refreshing variation.
Storage
Store the finished mini cheesecakes in an airtight container in the refrigerator.
They are best enjoyed within 3 to 4 days.
Keep the desserts refrigerated until serving because the cheesecake filling and whipped cream are both perishable.
If you want to prepare them ahead of time, the cheesecake portion can be prepared a day in advance. Add the whipped cream and decorative Oreo shortly before serving for the freshest presentation.
Serving Suggestions
These mini cheesecakes are excellent served cold directly from the refrigerator.
For a dessert table, arrange them on a large serving platter and decorate each one with a whole Oreo. You can also add a light dusting of Oreo crumbs around the platter for an attractive presentation.
They are especially suitable for birthdays, holiday gatherings, baby showers, dinner parties, potlucks, and family celebrations because every guest receives an individual portion.
Conclusion
No-Bake Oreo Cheesecake Minis combine everything people love about a classic cheesecake into a small, elegant dessert. The buttery Oreo crust provides a satisfying chocolate crunch, the cream cheese filling delivers a rich and silky texture, and the crushed cookies throughout add another layer of flavor and texture. The whipped cream topping keeps the dessert light and finishes each serving beautifully.
The recipe is simple enough for beginners but impressive enough for entertaining. Most importantly, it does not require an oven. With a few basic ingredients, careful preparation, and enough time in the refrigerator, you can create creamy, perfectly portioned Oreo cheesecakes that are ready to impress.
These little desserts are made for Oreo lovers, cheesecake lovers, chocolate lovers, and anyone who appreciates a delicious homemade treat without complicated baking methods.