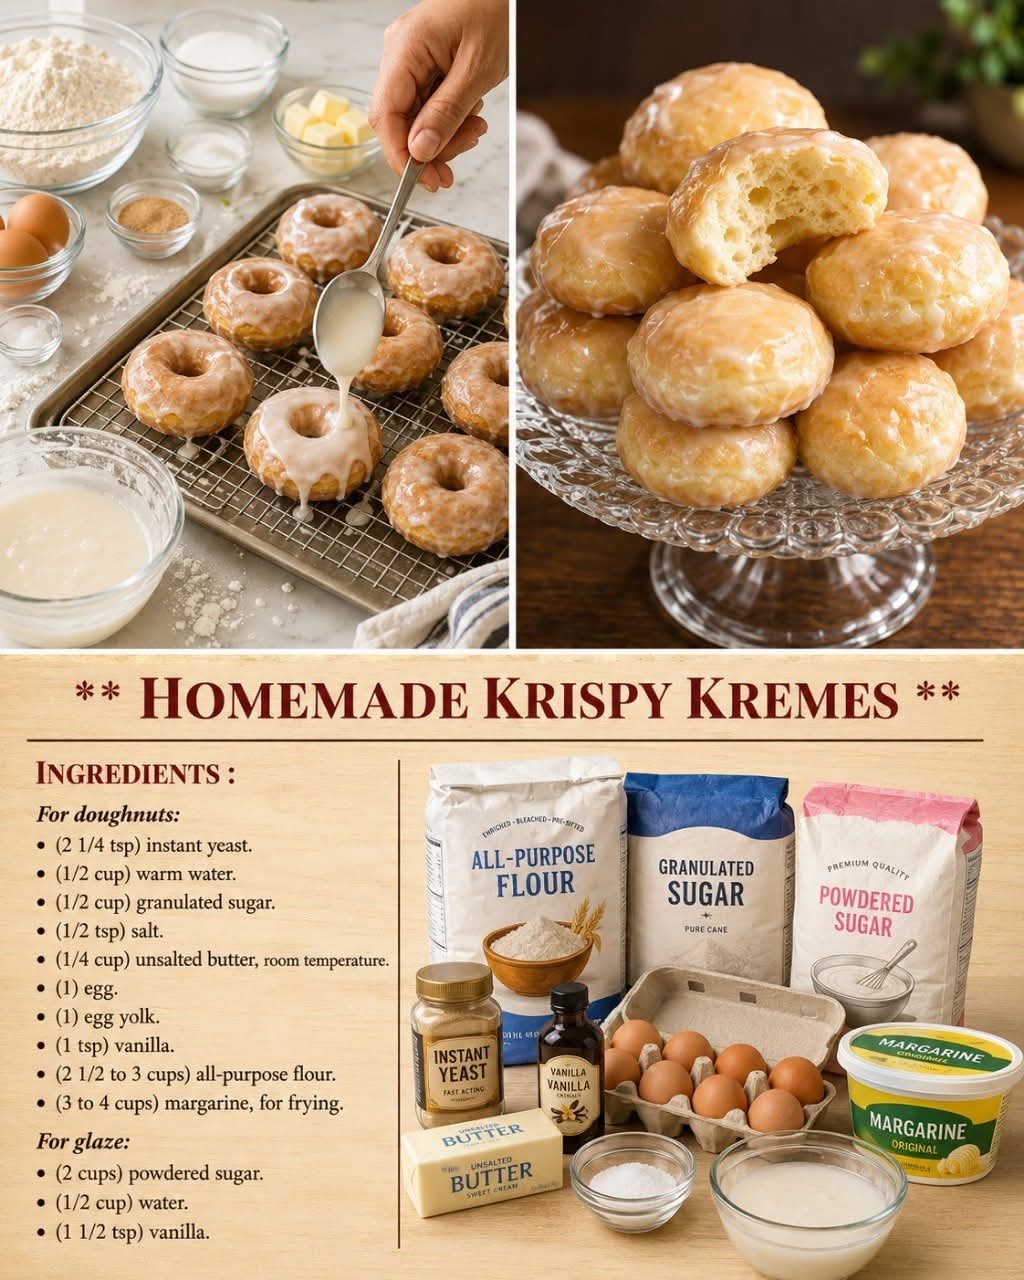
Homemade Krispy Kreme-Style Glazed Doughnuts
Introduction
Few homemade treats are as irresistible as a freshly fried, yeast-raised glazed doughnut. These Krispy Kreme-style doughnuts are light, soft, fluffy, and finished with a smooth vanilla glaze that melts slightly over the warm surface.
This recipe is inspired by the classic American glazed doughnut style. It is designed for home kitchens and produces tender doughnuts with a delicate interior and a crisp, golden exterior. The secret is allowing the yeast dough enough time to rise, handling it gently, and frying at the correct temperature.
Ingredients
For the Dough
- 3 tablespoons milk
- 1/2 cup warm water
- 2 1/4 teaspoons active dry yeast
- 1/4 cup granulated sugar
- 1 large egg
- 1 dash salt
- 1/3 cup unsalted butter, softened or melted and cooled
- 1 1/2 teaspoons vanilla extract
- 2 1/2 to 3 cups all-purpose flour
- Vegetable oil, for frying
For the Glaze
- 2 cups powdered sugar
- 1/4 cup milk
- 1/2 teaspoon vanilla extract
- 1 tablespoon melted butter
- 1 to 2 tablespoons warm water, if needed
Introduction to the Method
The dough is prepared by activating the yeast, combining it with the remaining ingredients, kneading until smooth, and allowing it to rise. After the first rise, the dough is rolled and cut into doughnut shapes.
A second rise gives the doughnuts their characteristic light texture. They are then carefully fried until golden and immediately coated with the sweet glaze.
Instructions
Step 1: Activate the Yeast
Place the warm water and milk in a large mixing bowl.
The liquid should feel warm but not hot. Add the yeast and approximately 1 tablespoon of the sugar.
Stir gently and let the mixture stand for 5 to 10 minutes.
The yeast should become slightly foamy. This indicates that the yeast is active.
If there is no sign of activity, the yeast may be inactive or the liquid may have been too hot or too cold. It is better to correct this before continuing with the recipe.
Step 2: Prepare the Wet Ingredients
Add the egg, remaining sugar, salt, vanilla, and butter to the yeast mixture.
Whisk until everything is well combined.
If using melted butter, make sure it has cooled before adding it so that it does not damage the yeast.
Step 3: Add the Flour
Begin adding the flour gradually, mixing after each addition.
You may need anywhere from 2 1/2 to 3 cups, depending on the flour and humidity.
The dough should become soft and slightly tacky but should not be extremely sticky.
Avoid adding excessive flour. Too much flour can produce heavy, dense doughnuts instead of the light texture you want.
Step 4: Knead the Dough
Transfer the dough to a lightly floured work surface.
Knead for approximately 6 to 8 minutes until the dough becomes smooth and elastic.
You can also use a stand mixer fitted with a dough hook and knead on low to medium speed until the dough is smooth and elastic.
The finished dough should feel soft and spring back gently when pressed.
Step 5: First Rise
Place the dough in a lightly greased bowl.
Turn it once so the surface is lightly coated.
Cover the bowl with a clean kitchen towel or plastic wrap.
Place it somewhere warm and allow the dough to rise for approximately 1 to 1 1/2 hours, or until it has roughly doubled in size.
The exact rising time will depend on the temperature of your kitchen.
Step 6: Roll the Dough
Once the dough has doubled, gently press it down to release excess air.
Transfer it to a lightly floured surface.
Roll the dough to approximately 1/2 inch thick.
Do not roll it too thin. The dough needs enough thickness to rise properly and create a fluffy interior.
Step 7: Cut the Doughnuts
Use a doughnut cutter or two round cutters to cut the dough into doughnut shapes.
Place the doughnuts on lightly floured parchment paper or a baking sheet.
Keep the doughnut holes because they can also be fried and glazed.
Gather any remaining dough, gently reroll it, and cut additional doughnuts.
Avoid repeatedly working the dough because excessive handling can make the finished doughnuts tougher.
Step 8: Second Rise
Cover the shaped doughnuts loosely with a clean towel.
Allow them to rise for approximately 30 to 45 minutes.
They should look noticeably puffed and light.
This second rise is essential because it gives the doughnuts their airy texture.
Step 9: Heat the Oil
Pour enough vegetable oil into a deep, heavy-bottomed pot to provide plenty of room for the doughnuts to float.
Heat the oil to approximately 350°F to 360°F (175°C to 182°C).
Use a reliable kitchen thermometer to monitor the temperature.
If the oil is too hot, the outside can brown before the inside cooks. If it is too cool, the doughnuts can absorb excessive oil and become greasy.
Step 10: Fry the Doughnuts
Carefully lower a few doughnuts into the hot oil.
Do not overcrowd the pot.
Fry each doughnut for approximately 1 to 2 minutes per side, turning once, until golden brown.
The exact cooking time will depend on the size and thickness of the doughnuts.
Remove them with a slotted spoon or spider strainer and place them on a wire rack positioned over a baking sheet.
Allow excess oil to drain.
Continue until all the doughnuts have been fried.
Step 11: Prepare the Glaze
Place the powdered sugar in a bowl.
Add the milk, melted butter, and vanilla extract.
Whisk until smooth.
If the glaze is too thick, add warm water a teaspoon at a time.
If it is too thin, add a little more powdered sugar.
The glaze should be smooth and fluid enough to coat the doughnuts while remaining thick enough to leave a visible layer.
Step 12: Glaze the Doughnuts
While the doughnuts are still warm, dip the top of each one into the glaze.
Lift it out and allow the excess glaze to drip back into the bowl.
Place the glazed doughnuts on a wire rack and allow the glaze to set for several minutes.
For a thicker glaze, dip each doughnut a second time after the first layer has partially set.
Formation and Texture
The ideal doughnut should have a lightly crisp exterior immediately after frying and a soft, airy interior.
The dough develops its structure through kneading and fermentation. Yeast produces carbon dioxide during the rising process, creating small pockets of air throughout the dough.
When the dough enters the hot oil, those air pockets expand rapidly, helping produce the characteristic light and fluffy texture.
The glaze then provides the final element: a thin, sweet coating that complements the buttery dough without overwhelming it.
The History Behind Glazed Doughnuts
Doughnuts have a long history, with fried dough traditions appearing in many cultures around the world. The modern ring-shaped doughnut became particularly popular in the United States during the nineteenth and twentieth centuries.
Krispy Kreme was founded in the United States in 1937 and became particularly famous for its yeast-raised glazed doughnuts. The company’s Original Glazed doughnut became one of its signature products.
The popularity of glazed yeast doughnuts inspired countless home bakers to develop their own versions. Homemade recipes generally follow the same fundamental principles: a yeast-raised dough, careful fermentation, frying in hot oil, and a sweet glaze.
Important Methods for Success
Measure the Flour Carefully
Do not automatically add all of the flour at once. Start with less and add more gradually until the dough reaches the correct consistency.
Keep the Dough Soft
A slightly soft dough produces lighter doughnuts. Adding too much flour is one of the easiest ways to create dense doughnuts.
Give the Dough Enough Time to Rise
The first and second rises are essential. Rushing fermentation can result in heavy doughnuts.
Monitor the Oil Temperature
Maintaining approximately 350°F to 360°F is one of the most important steps. A thermometer makes this much easier.
Avoid Overcrowding
Frying too many doughnuts at once can cause the oil temperature to drop significantly.
Glaze While Warm
Warm doughnuts allow the glaze to settle beautifully over the surface and create the classic glazed finish.
Storage
These doughnuts are best enjoyed fresh on the day they are made.
Store leftover doughnuts in an airtight container at room temperature for up to 2 days.
If you want to refresh them, warm them very briefly in the microwave. Be careful not to overheat them because the glaze can become excessively melted.
For longer storage, the unglazed fried doughnuts can be frozen in an airtight container. Thaw them completely and glaze them before serving.
Serving Suggestions
Serve the doughnuts with freshly brewed coffee, tea, or cold milk.
They are especially delicious while still slightly warm and freshly glazed.
For a special breakfast or brunch, arrange them on a large serving platter and offer several toppings such as cinnamon sugar, chocolate glaze, chopped nuts, or sprinkles.
The classic vanilla glaze, however, remains one of the best choices because it allows the soft, buttery dough to remain the star of the recipe.
Conclusion
Homemade Krispy Kreme-style glazed doughnuts require a little patience, but the result is well worth the effort. The combination of yeast-raised dough, careful fermentation, properly heated oil, and a smooth vanilla glaze creates a doughnut that is soft, airy, golden, and wonderfully sweet.
The most important lessons are simple: keep the dough soft, give it enough time to rise, maintain the correct frying temperature, and glaze the doughnuts while they are warm.
Once you master this basic doughnut method, you can use it as the foundation for many variations, from filled doughnuts to chocolate-glazed, cinnamon-coated, or fruit-topped creations.
For Doughnut Lovers
There is something particularly satisfying about making doughnuts from scratch. The process begins with a simple yeast dough and ends with a platter of warm, golden treats covered in sweet glaze.
For many people, the smell of freshly fried doughnuts brings back memories of bakeries, weekend breakfasts, family gatherings, and special occasions. Homemade doughnuts have that same comforting quality, with the added satisfaction of knowing that every step was done in your own kitchen.
This is a recipe worth keeping because once you learn the method, you can return to it whenever you want a fresh batch of soft, glazed doughnuts.