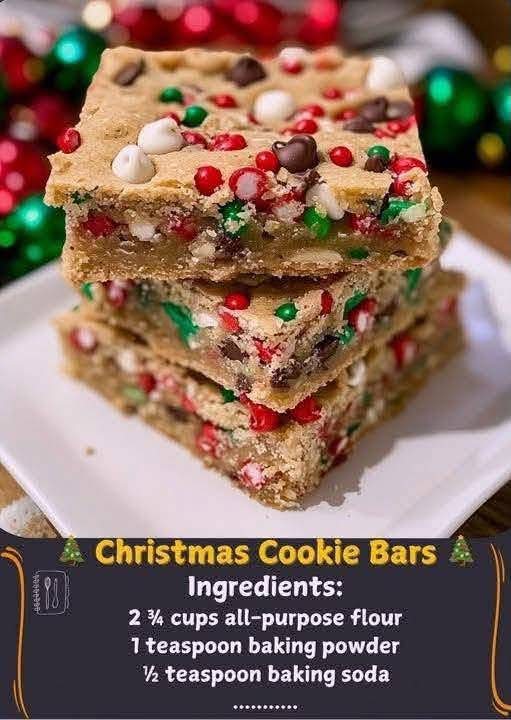
🎄 Christmas Cookie Bars 🎄
These Christmas Cookie Bars are the perfect festive treat when you want all the deliciousness of homemade cookies without scooping and baking dozens of individual cookies. They’re buttery, soft, chewy, loaded with chocolate chips, and packed with colorful holiday sprinkles.
They make a wonderful addition to a Christmas cookie platter, holiday party, family gathering, bake sale, or cozy afternoon with a cup of coffee or hot chocolate. ❤️🎄
🍪 Ingredients
For the Cookie Bars
- 2¾ cups all-purpose flour
- 1 teaspoon baking powder
- ½ teaspoon baking soda
- ½ teaspoon salt
- 1 cup unsalted butter, softened
- 1 cup granulated sugar
- ½ cup packed brown sugar
- 2 large eggs, preferably room temperature
- 1 teaspoon vanilla extract
- 1 cup red and green holiday sprinkles
- 1 cup white chocolate chips
- 1 cup semi-sweet chocolate chips
Optional Decoration
- ½ cup white chocolate, melted
- Extra Christmas sprinkles
- Mini chocolate chips
- Crushed peppermint candy, optional
🎄 Preparation
Prep time: 15 minutes
Bake time: 20–25 minutes
Cooling time: 15–30 minutes
Total time: About 40–55 minutes
Yield: 24 bars
Oven: 350°F (175°C)
👩🍳 Method & Instructions
1. Prepare the Oven and Pan
Preheat your oven to 350°F (175°C).
Line a 9 × 13-inch baking pan with parchment paper, leaving some parchment hanging over the sides. This makes it much easier to remove the finished cookie slab.
Lightly grease the parchment if desired.
2. Mix the Dry Ingredients
In a medium bowl, whisk together:
- Flour
- Baking powder
- Baking soda
- Salt
Whisk for about 30 seconds so everything is evenly distributed.
Set the bowl aside.
3. Cream the Butter and Sugars
Place the softened butter, granulated sugar, and brown sugar in a large mixing bowl.
Beat for approximately 2–3 minutes, until the mixture becomes lighter, creamy, and fluffy.
This step helps create the soft texture that makes these bars so irresistible.
4. Add the Eggs and Vanilla
Beat in the eggs one at a time, mixing well after each addition.
Add the vanilla extract and mix until combined.
Scrape down the sides of the bowl so everything is incorporated evenly.
5. Combine the Wet and Dry Ingredients
Gradually add the flour mixture to the butter mixture.
Mix on low speed, or stir by hand, just until the flour disappears.
Do not overmix. Overmixing can develop too much gluten and make the cookie bars tougher instead of soft and chewy.
6. Add the Christmas Goodies 🎅
Fold in:
- Holiday sprinkles
- White chocolate chips
- Semi-sweet chocolate chips
Gently mix until they are distributed throughout the dough.
For the prettiest appearance, reserve a small handful of chocolate chips and sprinkles to press onto the top before baking.
7. Form the Cookie Bars
Transfer the dough into the prepared 9 × 13-inch pan.
Using a spatula, your hands, or the bottom of a measuring cup, gently press the dough into an even layer.
Don’t pack it down too aggressively.
Sprinkle the reserved chocolate chips and Christmas sprinkles over the surface.
8. Bake
Place the pan in the preheated oven.
Bake for approximately 20–25 minutes.
The edges should be lightly golden, while the center should look set but still soft.
Important: Don’t overbake them. The bars will continue to firm up as they cool.
For especially soft and chewy cookie bars, start checking around 20 minutes.
9. Cool Completely
Remove the pan from the oven and place it on a cooling rack.
Allow the bars to cool in the pan for at least 15 minutes before lifting them out using the parchment paper.
For the cleanest slices, allow them to cool completely.
✨ Festive Chocolate Drizzle
For an extra-special Christmas presentation, melt about ½ cup white chocolate.
Drizzle it over the cooled cookie bars using a spoon or piping bag.
Immediately sprinkle additional red and green sprinkles over the chocolate before it sets.
Allow the chocolate to firm up, then slice into squares or rectangles.
🎁 Formation & Presentation
For beautiful Christmas cookie bars:
- Cut the large slab into 24 equal pieces.
- Place each bar in a small holiday cupcake liner.
- Arrange them on a Christmas serving platter.
- Add a few extra sprinkles for color.
- Dust very lightly with powdered sugar if desired.
- Serve alongside hot chocolate, coffee, tea, or milk.
For a cookie exchange, wrap individual bars in clear treat bags and tie them with festive ribbon. 🎀
❤️ The History & Tradition
Cookie bars are essentially a delicious combination of two beloved baking traditions: the classic American cookie and the easy-to-share sheet-pan dessert.
Instead of portioning individual cookies onto baking sheets, the dough is spread into one pan and baked together. Once cooled, the large cookie is cut into individual portions.
This method became especially popular because it is simple, efficient, and perfect for gatherings. Holiday versions naturally evolved with colorful sprinkles, chocolate, nuts, peppermint, and other seasonal flavors.
Christmas baking itself has a long tradition of bringing families together. Cookies and bars are especially popular during the holidays because they can be prepared ahead of time, shared with guests, packaged as gifts, and displayed beautifully on dessert tables.
These Christmas Cookie Bars continue that tradition in an easy modern form. 🎄🍪
👩🍳 Baker’s Secrets for Perfect Bars
❤️ Use softened butter
The butter should be soft enough to mix easily but not melted.
❤️ Don’t overmix
Once the flour is incorporated, stop mixing.
❤️ Don’t overbake
The center should remain slightly soft when the pan comes out of the oven.
❤️ Cool before cutting
Warm cookie bars can be fragile. Cooling allows them to set and gives you cleaner slices.
❤️ Use quality chocolate
Good white and semi-sweet chocolate chips make a noticeable difference.
❤️ Keep the sprinkles festive
Red, green, white, and gold sprinkles give these bars a beautiful Christmas appearance.
🎄 Storage
Store completely cooled cookie bars in an airtight container at room temperature for approximately 3–4 days.
For longer storage, refrigerate them in an airtight container.
You can also freeze the bars. Wrap them individually or place parchment between layers in a freezer-safe container. Thaw at room temperature before serving.
🍫 Delicious Variations
Peppermint Christmas Bars
Add crushed peppermint candies or peppermint-flavored baking pieces.
Triple Chocolate Bars
Use white, milk, and semi-sweet chocolate chips.
M&M Christmas Bars
Replace some of the chocolate chips with red and green chocolate candies.
Nutty Christmas Bars
Fold in chopped pecans or walnuts.
Cranberry White Chocolate Bars
Add dried cranberries alongside the white chocolate chips for a sweet-tart combination.
Chocolate Christmas Bars
Replace a small portion of the flour with unsweetened cocoa powder for a chocolate cookie-bar version.
🎅 Conclusion
These Christmas Cookie Bars are everything you want in a holiday dessert: soft, chewy, buttery, chocolatey, colorful, easy to prepare, and absolutely festive.
The best part is that you don’t have to spend your afternoon scooping dozens of cookies. Mix the dough, spread it into one pan, bake, cool, decorate, and slice.
Whether you’re making them for your family, a Christmas party, a cookie exchange, a holiday bake sale, or simply because you deserve a sweet treat, these bars are sure to disappear quickly. ❤️🎄🍪
One pan + plenty of chocolate + Christmas sprinkles = pure holiday happiness! 🎅✨
🎄 A Little Christmas Love
Bake them with the people you love, put on some Christmas music, make a cup of something warm, and enjoy the simple happiness that comes from homemade treats. After all, the best holiday recipes aren’t only about the ingredients—they’re about the memories made around the table. ❤️