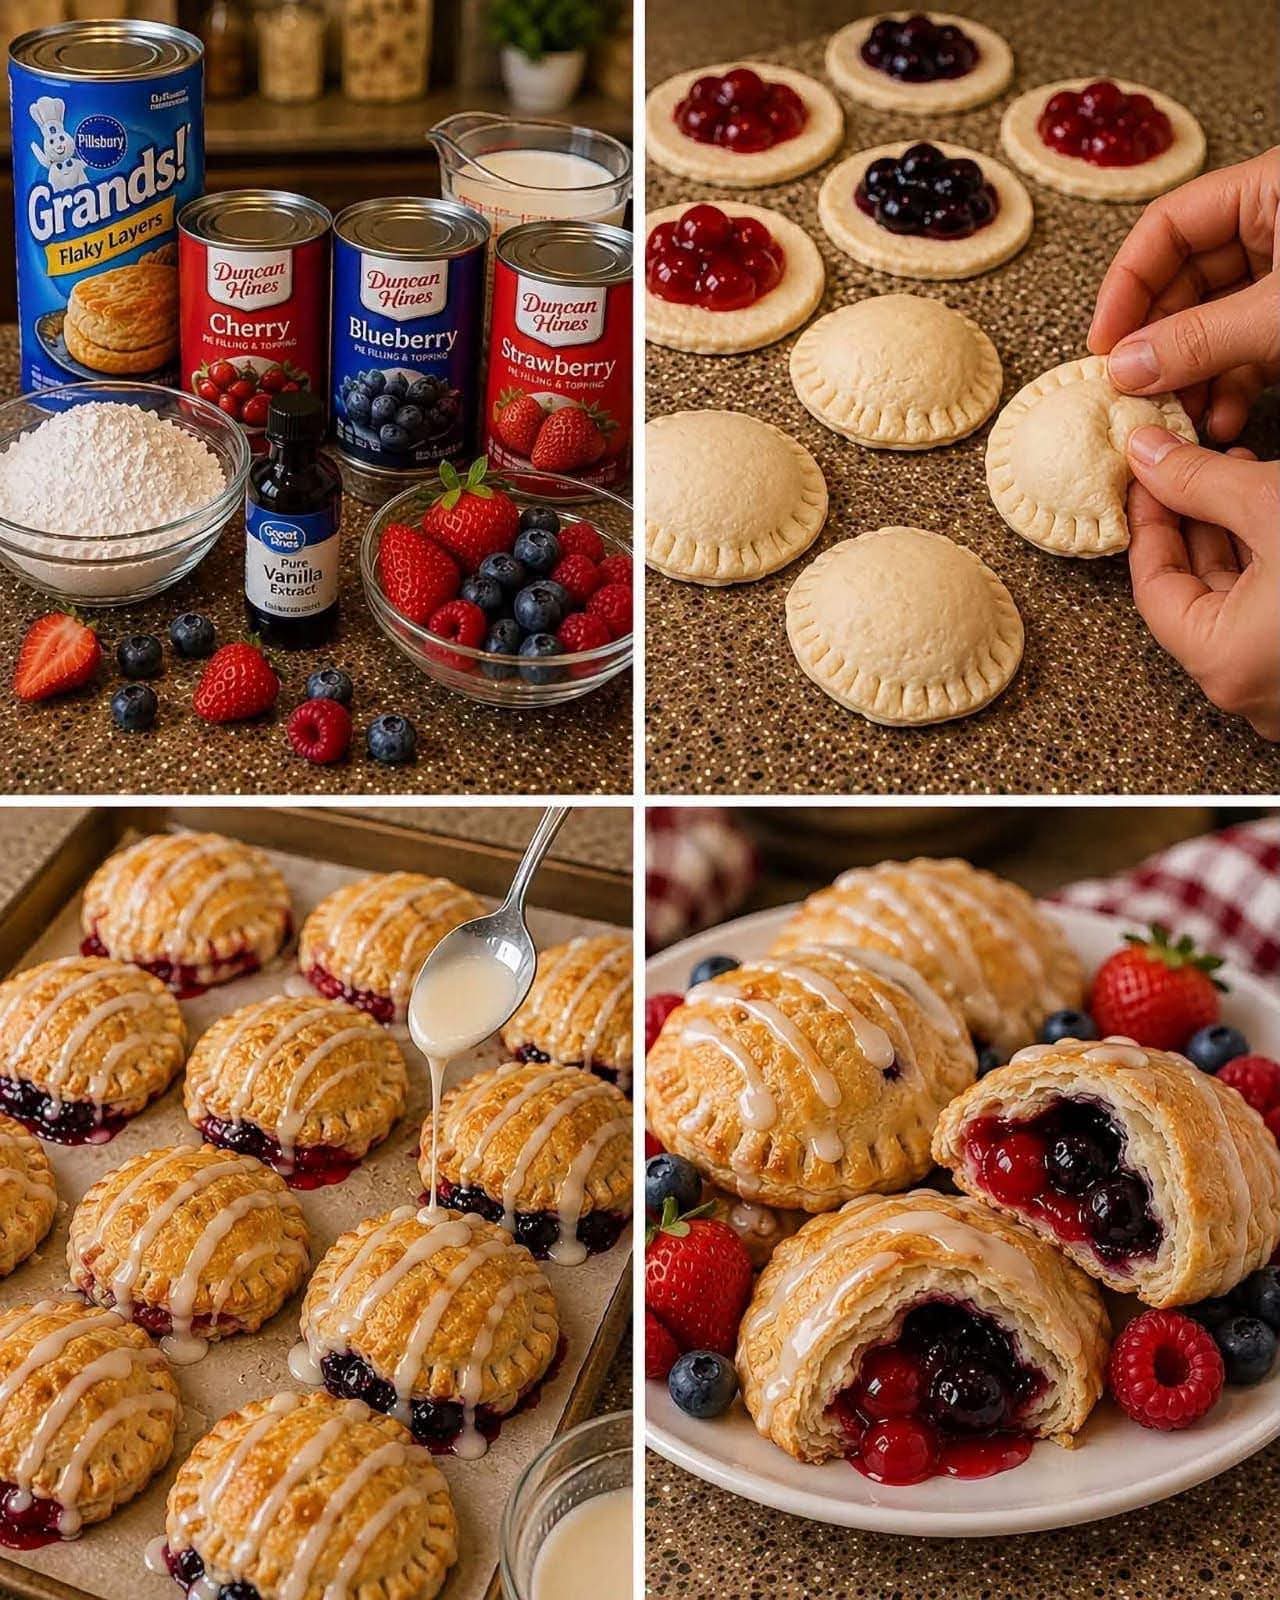
🥧🍓 Mixed Berry Glazed Hand Pies
Flaky, Golden Mini Pies with Cherry, Blueberry & Strawberry Filling and Vanilla Glaze
🌸 Introduction
There is something wonderfully comforting about a warm fruit pie—but when that pie is small enough to hold in your hand, filled with three delicious berry flavors, baked until golden and finished with a sweet vanilla glaze, it becomes an irresistible treat!
These Mixed Berry Glazed Hand Pies combine flaky, buttery layers with luscious cherry, blueberry, and strawberry pie fillings. Each little pie is crisp and golden on the outside while remaining sweet, fruity, and tender inside. A simple vanilla glaze drizzled over the top adds the perfect finishing touch.
Best of all, this recipe uses refrigerated flaky biscuits instead of making pastry dough from scratch, making it an easy dessert for busy days, holiday gatherings, bake sales, parties, brunches, or an afternoon treat with coffee or tea.
🥧 Recipe at a Glance
Recipe: Mixed Berry Glazed Hand Pies
Yield: About 8–10 hand pies
Prep Time: 20 minutes
Bake Time: 15–20 minutes
Total Time: About 40 minutes
Difficulty: Easy
Best For: Parties, holidays, brunches, bake sales, family desserts, afternoon treats
🛒 Ingredients
For the Hand Pies
- 1 can Pillsbury Grands Flaky Layers Biscuits
- 1 can cherry pie filling
- 1 can blueberry pie filling
- 1 can strawberry pie filling
- 1 large egg, beaten, optional for brushing
- Fresh strawberries, blueberries, or raspberries for serving
For the Vanilla Glaze
- 1 cup powdered sugar
- 2–3 tablespoons milk
- 1 teaspoon pure vanilla extract
Optional Extras
For an even more beautiful presentation, you can also have:
- Fresh mixed berries
- A light dusting of powdered sugar
- Coarse sparkling sugar
- Lemon zest
- A tiny pinch of cinnamon
- Whipped cream or vanilla ice cream for serving
🍓 A Little History of Hand Pies
Hand pies have a long history because they were designed around one wonderfully practical idea: make a pie portable!
Small filled pastries have appeared in many food traditions around the world. Fruit-filled pastries became particularly popular because they allowed people to enjoy seasonal fruits inside a convenient pastry shell.
In American cooking, small fruit pies became especially associated with home baking, picnics, packed lunches, fairs, and family gatherings. They could be made with apples, cherries, berries, peaches, or other fruits and eaten without needing plates and forks.
The modern hand pie is still loved for exactly the same reason—it is pie you can hold in your hand!
This recipe gives that classic idea an easy shortcut by using flaky refrigerated biscuits rather than traditional pie pastry.
👩🍳 Preparation
Before beginning, preheat your oven to 375°F (190°C).
Line a large baking sheet with parchment paper.
Open the biscuit container carefully and separate the biscuits.
Because the biscuits are thick and layered, gently flatten each one with your fingers or a rolling pin until it becomes a thinner round, approximately 4–5 inches wide.
Don’t make them paper-thin. You want enough pastry to hold the delicious filling without tearing.
🍒 Step 1: Prepare the Fillings
Open the cherry, blueberry, and strawberry pie fillings.
The canned fillings are already sweetened and ready to use.
If the fruit pieces are particularly large, you can gently chop them into smaller pieces. This makes the hand pies easier to seal and eat.
Place the three fillings in separate small bowls.
You now have three beautiful flavors ready to go:
🍒 Cherry
🫐 Blueberry
🍓 Strawberry
🥧 Step 2: Form the Pie Bases
Take one flattened biscuit and place it on your work surface.
Spoon approximately 1–2 tablespoons of fruit filling into the center.
Be careful not to overfill.
The filling should remain comfortably inside the middle of the dough with enough empty space around the edges for sealing.
🍓 Step 3: Create Your Mixed-Berry Combinations
You can make every hand pie different!
Cherry & Blueberry
Add a small spoonful of cherry filling and blueberry filling together.
Strawberry & Blueberry
Combine strawberry and blueberry for a beautiful sweet-tart berry flavor.
Cherry & Strawberry
Use cherry and strawberry together for a bright, fruity combination.
Triple Berry
For the ultimate mixed berry pie, add a small amount of all three fillings.
The key is to keep the amount of filling moderate so the pastry can close securely.
✨ Step 4: Fold and Seal
Fold the biscuit dough over the filling to create a half-moon shape.
Gently press the edges together with your fingertips.
Then use the tines of a fork to crimp around the entire edge.
This serves two purposes:
- It seals the pie.
- It gives your hand pies that classic homemade appearance.
If any filling squeezes toward the edges, wipe it away before sealing.
A clean edge gives you a much better seal.
🥚 Step 5: Brush with Egg Wash
Place the finished hand pies onto your parchment-lined baking sheet.
Beat one egg in a small bowl.
Using a pastry brush, lightly brush the tops of the hand pies with beaten egg.
The egg wash is optional, but it gives the pastries a gorgeous golden-brown, shiny finish.
For extra sparkle, sprinkle a little coarse sugar over the egg wash if desired.
🔪 Step 6: Add Small Vents
Use a sharp knife to make one or two tiny cuts on the top of each hand pie.
These little vents allow steam to escape while the pies bake.
Don’t make the cuts too large.
🔥 Step 7: Bake
Place the baking sheet in the preheated oven.
Bake for approximately 15–20 minutes, or until the hand pies are puffed and beautifully golden brown.
Keep an eye on them during the final few minutes because ovens can vary.
The pastries should look crisp and golden rather than pale.
❄️ Step 8: Cool
Remove the hand pies from the oven.
Allow them to cool on the baking sheet for approximately 5–10 minutes.
Then carefully transfer them to a wire rack.
It is important to let them cool before adding the glaze.
If the pastries are extremely hot, the glaze will melt immediately and become too thin.
🍦 Step 9: Make the Vanilla Glaze
While the pies are cooling, prepare your glaze.
Add:
- 1 cup powdered sugar
- 2 tablespoons milk
- 1 teaspoon vanilla extract
to a small bowl.
Whisk until smooth.
If the glaze is too thick, add another teaspoon of milk at a time.
If it becomes too thin, add a little more powdered sugar.
You want a glaze that is thick enough to drizzle but thin enough to flow beautifully over the pastries.
🍰 Step 10: Glaze the Hand Pies
Once the hand pies have cooled slightly, drizzle the vanilla glaze over the tops.
You can use:
- A spoon
- A small piping bag
- A zip-top bag with a tiny corner snipped off
For a bakery-style look, drizzle the glaze back and forth across each pastry.
Let the glaze sit for several minutes so it can begin to set.
🍓 Step 11: Garnish and Serve
Arrange the hand pies on a beautiful serving platter.
Scatter fresh strawberries, blueberries, and raspberries around them.
For an extra pretty presentation, add a light dusting of powdered sugar.
You can serve them:
- Warm
- At room temperature
- With whipped cream
- With vanilla ice cream
- With fresh berries
- Alongside coffee
- With tea
- As part of a holiday dessert table
❤️ Why Pie Lovers Will Love This Recipe
These hand pies have everything a pie lover wants:
Flaky pastry: The refrigerated biscuits create delicious layers without the work of homemade pastry.
Fruity filling: Cherry, blueberry, and strawberry provide three different flavors in one recipe.
Sweet vanilla glaze: The glaze adds another layer of sweetness and a beautiful finish.
Portable: No forks or plates are required!
Easy: There is no complicated pie crust technique.
Beautiful: Golden pastry, colorful fruit, and white vanilla glaze make these perfect for entertaining.
Customizable: You can change the fillings according to the season or your favorite fruit.
👩🍳 Helpful Tips for Perfect Hand Pies
1. Don’t overfill the pastry
It may be tempting to add lots of fruit filling, but too much filling can cause the pies to burst during baking.
A modest amount gives you the best results.
2. Seal the edges well
Press the edges firmly and finish with a fork crimp.
If necessary, lightly moisten the edge with a tiny amount of water before sealing.
3. Don’t skip the vents
Small vents allow steam to escape and help prevent the pies from opening during baking.
4. Give them space
Leave some room between each hand pie on the baking sheet so the heat can circulate evenly.
5. Cool before glazing
This is one of the most important steps.
Let the pastries cool slightly before drizzling with glaze so you get attractive white ribbons instead of glaze that completely disappears.
6. Watch the baking time
The exact baking time depends on your oven and the thickness of your pastry.
Look for a rich golden-brown color.
🍒 Delicious Variations
🍎 Apple Cinnamon Hand Pies
Replace the berry fillings with apple pie filling and add a little cinnamon.
Finish with vanilla glaze.
🍑 Peach Hand Pies
Use peach pie filling and add a small pinch of cinnamon or nutmeg.
🫐 Blueberry Lemon
Use blueberry filling and add a little fresh lemon zest to the glaze.
🍓 Strawberry Cream
Add strawberry filling and serve the finished pies with whipped cream.
🍫 Chocolate Berry
Add a few miniature chocolate chips alongside the berry filling before sealing.
Chocolate and berries make an irresistible combination.
🎄 Holiday Serving Idea
These hand pies are especially beautiful for holiday gatherings.
Make a large platter and arrange the pies in rows, alternating the shapes and fillings.
Add fresh berries around the edges and lightly dust everything with powdered sugar.
For Christmas, you can even decorate the glaze with red and green sprinkles.
For Valentine’s Day, cut the pastry into heart shapes if your dough allows it.
For summer parties, serve them with fresh berries and a scoop of vanilla ice cream.
🧊 Storage
Allow the hand pies to cool completely before storing.
Place them in an airtight container and keep them at room temperature for a short period, or refrigerate them if you prefer.
For the best texture, warm them gently before serving.
If storing for several days, keep the glaze separate when possible and drizzle it over the pastries shortly before serving.
❄️ Freezing
You can also freeze unbaked assembled hand pies.
Arrange them on a parchment-lined baking sheet and freeze until firm.
Then transfer them to a freezer-safe container or bag.
When ready to bake, place them on a lined baking sheet and bake according to your oven’s requirements, allowing additional time as needed.
Always make sure the center is thoroughly heated before serving.
👨👩👧👦 Perfect for Family Baking
This is also a wonderful recipe for baking with children.
Kids can help:
- Flatten the biscuit dough
- Spoon in the fillings
- Fold the pies
- Crimp the edges
- Mix the glaze
- Add sprinkles
- Arrange fresh berries
It turns a simple dessert into a fun family baking activity.
🌟 The Secret to Great Hand Pies
The secret isn’t complicated.
Don’t overfill. Seal carefully. Vent the tops. Bake until golden. Glaze after cooling.
Those five simple steps will give you beautiful little fruit pies with flaky pastry and a delicious sweet finish.
🥧 Conclusion
These Mixed Berry Glazed Hand Pies are proof that an impressive dessert doesn’t have to be complicated.
With flaky biscuit layers, luscious cherry, blueberry, and strawberry fillings, and a silky vanilla glaze, every bite brings together buttery pastry, sweet fruit, and creamy vanilla flavor.
They’re perfect for holidays, birthdays, bake sales, picnics, family gatherings, brunches, or simply those moments when you want something homemade and delicious without spending hours in the kitchen.
Whether you enjoy them warm from the oven, topped with fresh berries, or served with a scoop of vanilla ice cream, these little pies are guaranteed to make fruit-pie lovers smile.
One pie may be enough for dessert—but once you taste these, you may find yourself reaching for another! ❤️🍓🫐🍒