🎨 Stained Glass Glue Window Art
🌈 Introduction
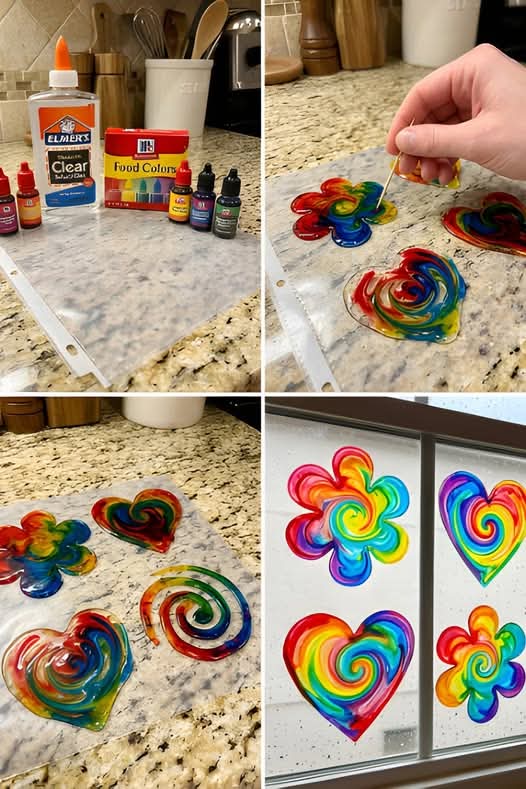
Stained Glass Glue Window Art is a fun, creative craft that transforms simple household materials into beautiful, light-catching designs. Inspired by the look of traditional stained glass windows found in churches and historic buildings, this kid-friendly version uses glue and color to mimic that glowing effect—without the need for glass cutting or special tools.
It’s perfect for rainy days, family bonding, or classroom activities. The magic happens when sunlight shines through your finished piece, creating a colorful display that feels truly special.
🧾 Ingredients & Materials
- Plastic sheet protector or clear plastic lid
- Clear school glue
- White school glue (optional, for outlines)
- Food coloring or liquid watercolors
- Black permanent marker
- Paintbrush or toothpicks
- Small mixing containers (cups or bowls)
- Tape (optional, to secure your design)
- Printed design template (optional)
🛠️ Preparation (Formation)
- Choose a simple design (flowers, hearts, animals, or geometric shapes).
- Place the design under your plastic sheet protector or lid.
- Trace the design using a black marker on the plastic (or outline with white glue for a raised effect).
- Let the outline dry completely before adding colors.
🎨 Methods (Creative Approaches)
Method 1: Classic Glue & Color
- Mix clear glue with a few drops of food coloring in small cups.
- Fill each section of your outlined design carefully with colored glue.
- Use a toothpick to spread evenly and pop bubbles.
Method 2: Layered Glass Effect
- Add one color, let it slightly set, then layer another color on top.
- This creates a blended, stained-glass look.
Method 3: Textured Art
- Sprinkle glitter, tiny beads, or salt into the glue before it dries for texture.
👩🍳 Instructions
- Prepare your workspace – Cover your table with paper or plastic (it can get messy!).
- Create the outline – Trace or draw your design onto the plastic surface.
- Mix your colors – Combine glue and coloring until you get vibrant shades.
- Fill the design – Carefully add colored glue inside each section.
- Remove air bubbles – Use a toothpick to smooth the surface.
- Dry completely – Let your artwork dry for 24–48 hours until firm and peelable.
- Peel and display – Gently peel it off and stick it to a window or glass surface.
🏛️ History & Inspiration
This craft is inspired by stained glass art, which dates back to ancient times and became especially famous in medieval Europe. Large stained glass windows decorated churches, telling stories through colorful imagery. While traditional stained glass uses cut glass and lead strips, this modern version captures the same beauty using safe, everyday materials.
💡 Tips for Best Results
- Keep glue layers thick enough so they don’t tear when peeled.
- Avoid over-mixing colors to prevent muddy tones.
- Work slowly to stay within outlines.
- Let kids experiment—imperfection adds charm!
❤️ Why Kids (and Adults) Love It
- It’s colorful and satisfying to create
- Feels like painting but with a unique twist
- The final result looks magical in sunlight
- Great for creativity and patience
- Makes a beautiful handmade decoration
🌟 Conclusion
Stained Glass Glue Window Art is more than just a craft—it’s a creative experience that brings color, imagination, and joy into your home. Whether you’re making simple shapes or detailed designs, each piece becomes a little work of art that shines beautifully in the light.
Perfect for kids, relaxing for adults, and always fun—this is one activity you’ll want to repeat again and again! ✨