Here is a complete, comprehensive recipe for Mini Cherry Cheese Danishes, expanded with all the elements you requested—from history to nutrition—so you can save, share, and enjoy this delightful treat.
—
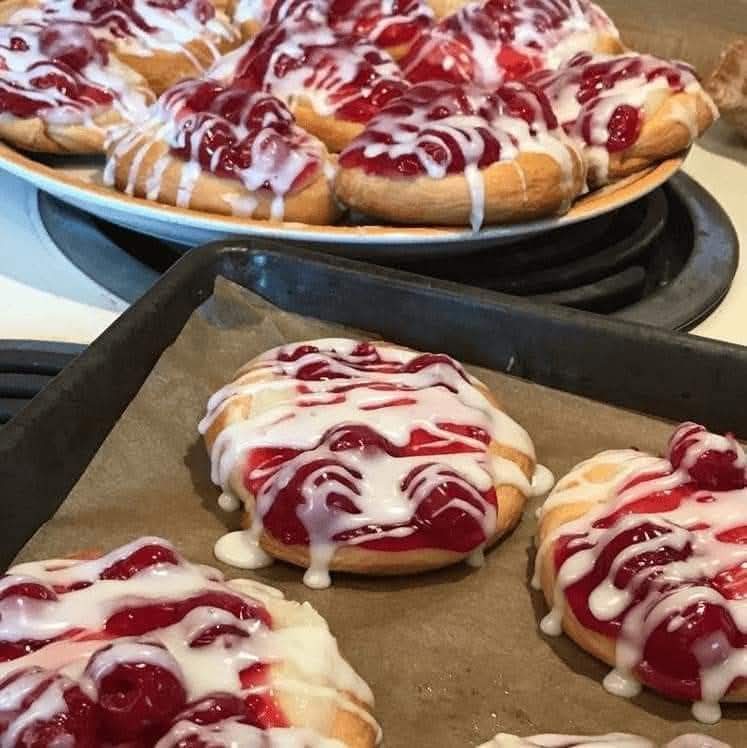
💞 Mini Cherry Cheese Danishes 💞
A Bite-Sized Bliss of Creamy Cheese and Sweet Cherry Goodness
—
📖 Introduction
There is something undeniably charming about a miniature pastry. It promises all the indulgence of a full-sized treat but in a delicate, poppable form. These Mini Cherry Cheese Danishes are the perfect embodiment of that charm. Combining the buttery, flaky layers of crescent roll dough with a lusciously smooth cream cheese filling and a sweet, tart cherry topping, they offer a bakery-quality experience from your own kitchen.
Inspired by the classic Danish pastry, this recipe uses a beloved shortcut—Pillsbury crescent rolls—to cut down on hours of laminating dough without sacrificing flavor or texture. Whether you’re hosting a bridal shower, looking for a special holiday breakfast, or simply craving a sweet treat with your afternoon coffee, these mini danishes are elegant, effortless, and utterly irresistible.
—
🛒 Ingredients
For the Pastry:
· 1 roll (8 oz) Pillsbury Crescent Rolls (the sheet style works best, but the perforated version works too)
· All-purpose flour, just for dusting (to prevent sticking)
For the Cream Cheese Filling:
· 4 ounces cream cheese, softened to room temperature (full-fat is best for a rich texture)
· 2 tablespoons granulated sugar
· ½ teaspoon vanilla extract
· 1 tablespoon sour cream or plain Greek yogurt (adds tang and smoothness)
For the Topping:
· ½ cup cherry pie filling (canned or homemade; roughly chop any large cherries for even distribution)
· 1 large egg, beaten (for egg wash)
For the Glaze (Optional but Recommended):
· ½ cup powdered sugar
· 1–2 teaspoons milk (or heavy cream)
· ¼ teaspoon vanilla extract
—
👩🍳 Instructions & Methods
1. Prepare the Oven and Workspace
Preheat your oven to 375°F (190°C) . Line a large baking sheet with parchment paper. Lightly dust your countertop or cutting board with flour to prevent the dough from sticking.
2. Create the Cream Cheese Filling
In a small mixing bowl, combine the softened cream cheese, granulated sugar, vanilla extract, and sour cream. Using a hand mixer or a sturdy spatula, beat until the mixture is completely smooth, creamy, and lump-free. Set aside.
3. Prepare the Dough
If using perforated crescent rolls, carefully unroll the dough and press the perforated seams together to form a solid rectangle. If you have a crescent roll sheet, simply unroll it onto the floured surface. Gently pat the dough to ensure any seams are sealed. Using a sharp knife or pizza cutter, cut the dough into 12 equal squares.
4. Assemble the Danishes
Place the dough squares onto the prepared baking sheet about 2 inches apart.
· For classic shape: Spoon about 1 teaspoon of the cream cheese mixture into the center of each square. Top with 2–3 cherry halves or a small spoonful of cherry pie filling.
· For pinwheel shape: Make a 1-inch cut from each corner toward the center. Spoon the filling into the center, then fold every other corner tip over the filling, pressing lightly to seal.
5. Egg Wash and Bake
Lightly brush the exposed edges of each pastry with the beaten egg. This will give them a beautiful golden-brown finish. Bake for 10–12 minutes, or until the edges are puffed, deeply golden, and the filling is set. Let them cool on the baking sheet for 5 minutes, then transfer to a wire rack.
6. Glaze and Serve
While the danishes cool, whisk together the powdered sugar, milk, and vanilla until smooth. Drizzle the glaze generously over the warm pastries. Allow the glaze to set for 5–10 minutes before serving.
—
📜 History of the Danish Pastry
The Danish pastry, known as Wienerbrød (“Viennese bread”) in Denmark, actually originated in Vienna, Austria. In the 1850s, Austrian bakers introduced their laminated dough techniques to Denmark, where it was adapted and evolved into the lighter, sweeter version we know today. Danish dough is distinguished by its many layers of butter, creating a flaky, crisp texture.
While traditional Danish pastries involve a labor-intensive process of rolling and folding butter into yeast dough, this recipe honors the spirit of that tradition using a modern shortcut. The combination of cream cheese and fruit—particularly cherry—became popular in mid-20th century America as a quicker, home-friendly take on the European classic.
—
🌟 Benefits of This Recipe
· Quick and Accessible: Uses refrigerated dough to skip the lengthy proofing and laminating process.
· Perfectly Portioned: Mini size means built-in portion control, great for parties or freezing leftovers.
· Customizable: Easily swap cherry pie filling for blueberry, raspberry, apple, or even lemon curd.
· Kid-Friendly: A wonderful baking project for children—easy to assemble and fun to decorate.
· Freezer-Friendly: Assemble and freeze before baking for fresh pastries anytime.
—
🧁 Formation & Assembly Tips
The beauty of these danishes lies in their versatility of formation:
· Classic Square: Simply top the square with filling. Rustic and charming.
· Pinwheel: Cut slits from the corners and fold them in for a classic Danish look.
· Cup Shape: Press dough squares into mini muffin tins for structured, cup-shaped danishes.
Pro Tip: For a professional bakery look, use a fork to crimp the edges of the dough slightly after filling to create a rustic border that holds the filling beautifully.
—
🍽️ Nutrition (Per Danish, Approximate)
Makes 12 danishes
· Calories: 165
· Fat: 8g
· Saturated Fat: 4g
· Carbohydrates: 20g
· Sugar: 10g
· Protein: 3g
· Sodium: 180mg
Note: Nutrition is estimated and will vary based on specific ingredients and glaze usage.
—
🧡 For the Lovers
This recipe is for the lovers of simple elegance. It’s for those who love the art of baking but cherish their time. It’s for the lover of contrasts—the tangy cream cheese paired with sweet, jammy cherries, the buttery flakiness against the smooth glaze. Whether you’re making them for a loved one’s birthday breakfast, a thoughtful homemade gift, or just because Tuesday deserves something special, these danishes are made with love and meant to be shared.
It’s also for the lovers of tradition meets convenience—a recipe that honors the spirit of classic pastries while fitting seamlessly into a modern lifestyle.
—
🔪 More Methods & Variations
· Air Fryer Method: Cook at 325°F for 6–8 minutes, checking frequently, until golden and puffed.
· Make-Ahead Method: Assemble the danishes on a parchment-lined baking sheet and freeze until solid. Transfer to a freezer bag. Bake from frozen, adding 3–5 minutes to the bake time.
· Savory Variation: Omit the sugar in the cream cheese filling and top with sharp cheddar, crumbled bacon, and a sprinkle of chives for a savory brunch treat.
—
🎯 Conclusion
Mini Cherry Cheese Danishes are a testament to the fact that you don’t need to be a professional pastry chef to create something truly special. With just a handful of ingredients and minimal effort, you can produce a batch of elegant, flaky, and decadent pastries that taste like they came from a high-end bakery.
The creamy, slightly tangy cheese filling, the sweet pop of cherry, and the buttery layers of golden pastry—all finished with a delicate vanilla glaze—come together in perfect harmony. Whether served as a holiday centerpiece, a weekend brunch highlight, or a simple afternoon indulgence, these danishes are guaranteed to impress. So roll up your sleeves, preheat that oven, and get ready to fall in love with the easiest, most delightful little pastry you’ll ever make.
—
💬 Thank you for keeping this recipe active! If you try it, don’t forget to share your creations and tag your baking masterpiece. Enjoy! 💞