Here is a big, comprehensive guide to making a homemade caramel cake, complete with the history, instructions, and details you requested.
The Ultimate Homemade Caramel Cake: A Slice of Southern Comfort
Introduction
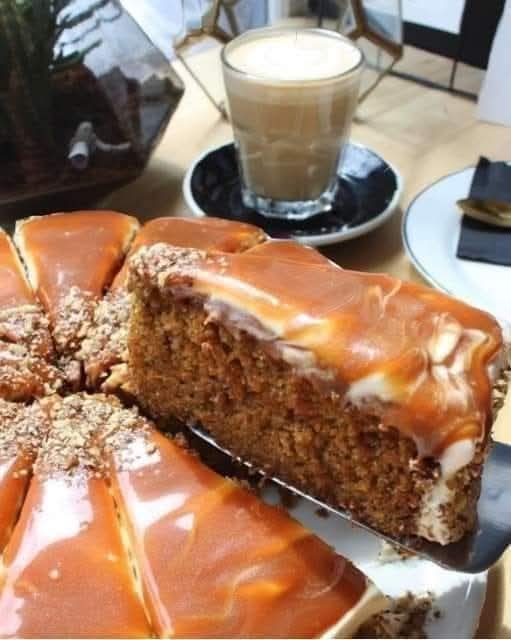
THIS CARAMEL CAKE RECIPE IS PERFECT FOR THAT DIE-HARD CARAMEL FAN IN YOUR LIFE. If you know someone who believes that life is better with a little extra butter and sugar, this cake is their ultimate dream. It’s a triple threat of caramel deliciousness: homemade caramel sauce is used in the cake layers, the frosting, and the decadent drip! This isn’t just a cake; it’s an experience. It’s a moist, tender vanilla cake, elevated by the deep, complex flavor of caramelized sugar. The magic truly lies in the frosting—a soft, melt-in-your-mouth caramel icing that is the hallmark of a true Southern dessert .
This recipe is a labor of love, but the reward is a stunning, show-stopping dessert that tastes as incredible as it looks. Whether for a birthday, a holiday, or just because, this caramel cake is guaranteed to impress and satisfy the deepest caramel cravings. Get ready to create a masterpiece!
The Rich History of Caramel Cake
The story of caramel cake is a journey through time, tracing the path of sugar itself. The word “caramel” stems from the Latin word “calamus,” meaning sugar cane. It’s believed that the Arabs invented the process of caramelizing sugar around 1,000 A.D. to create candy . However, the soft, creamy caramel we know and love today is thought to be an accidental American invention from the mid-1800s, when a cook added cream to plain sugar caramel .
The multi-layered cake we recognize as caramel cake is a descendant of the Hungarian-Austrian Dobostorte, a multi-layered sponge cake with a caramel glaze. This idea of layered cakes traveled across Europe and eventually came to America with settlers, evolving into regional favorites .
In the sugar-rich American South, the caramel cake found its true home. From the late 1800s until the 1950s, it became a beloved icon . One of the first printed recipes appeared in 1883 in “The Dixie Cook-Book,” and since then, it has been passed down through generations . It became a symbol of celebration, served at birthdays, holidays, and community gatherings. As one baker put it, when you eat this cake, you are “preserving a slice of the past” . Today, it remains a cherished Southern tradition, a “badge of honor” for bakers who master its notoriously finicky but rewarding caramel icing .
The Benefits of Baking from Scratch
Why go through the effort of making a caramel cake completely from scratch? The benefits are immense:
· Unmatched Flavor: Homemade caramel sauce has a complexity and depth that you simply cannot get from a jar or candy. You control the level of “burnt” sugar, creating a rich, smoky, and buttery flavor that elevates the entire cake .
· Quality Control: You know exactly what is going into your cake. No preservatives, artificial flavors, or high-fructose corn syrup—just real butter, fresh eggs, and pure vanilla.
· A True Labor of Love: Baking this cake is an act of devotion. It’s a chance to slow down, connect with a time-honored tradition, and create something truly special for the people you care about. The time and attention you give it translates directly into the love you can taste in every bite.
· Customization: Making it yourself allows you to perfect it to your liking. Prefer a saltier caramel? Add a pinch more sea salt. Like a super moist cake? This recipe delivers.
Ingredient List
Here is everything you need to create this masterpiece. Make sure all your ingredients, especially butter and eggs, are at room temperature for the best results.
For the Homemade Caramel Sauce
This sauce is used in the cake layers and for the final drip.
· 100 g (½ cup) Cane Sugar (or granulated sugar)
· 1 tbsp Water
· 40 g (3 tbsp) Unsalted Butter, cubed and at room temperature
· 80 ml (⅓ cup) Heavy Whipping Cream, warmed
· ½ tsp Sea Salt (optional, for a salted caramel)
For the Vanilla Cake Layers
This recipe yields three moist, tender 8-inch layers.
· 355 ml (1½ cups) Whole Milk, room temperature
· 1 tbsp White Vinegar (or lemon juice)
· 30 g (2 tbsp) Plain Yogurt (or Greek yogurt)
· 200 g (1 cup) Cane Sugar
· 85 ml (⅓ cup) Vegetable Oil
· 3 tsp Pure Vanilla Extract
· 225 g (1¾ cups + 2 tbsp) All-Purpose Flour
· 15 g (2 tbsp) Cornstarch
· 1 tsp Baking Soda
· 2¼ tsp Baking Powder
· ¼ tsp Salt
For the Authentic Caramel Frosting
This is the heart and soul of a traditional caramel cake .
· 1½ cups Whole Milk
· 4 cups Granulated Sugar, divided
· 10 tbsp (1¼ sticks) Unsalted Butter
· 2 tsp Kosher Salt (or 1 tsp table salt)
· ¼ tsp Baking Soda
· 1 tbsp Pure Vanilla Extract
· Hot water (as needed for consistency)
Step-by-Step Instructions
Follow these steps carefully, and you’ll be well on your way to caramel cake perfection. Patience is your greatest tool here, especially with the frosting.
Part 1: Make the Caramel Sauce
1. Combine: In a medium, heavy-bottomed saucepan, combine the 100g of sugar and 1 tablespoon of water. Stir gently with a spatula until the sugar resembles wet sand.
2. Caramelize: Place the pan over medium heat. Let the sugar melt and cook, stirring occasionally, until it turns a deep golden amber color. Watch it closely, as it can go from perfect to burnt in seconds .
3. Add Butter: Remove the pan from the heat and whisk in the cubed butter a few pieces at a time. The mixture will bubble vigorously, so be careful. Stir until all the butter is melted and smooth.
4. Add Cream: Slowly pour in the warm heavy cream while whisking constantly. The mixture will steam and bubble up again. Continue to whisk until you have a smooth, homogeneous sauce.
5. Finish: Let it simmer for one more minute, then remove from heat. Stir in the sea salt if using. Transfer the sauce to a heatproof container and let it cool completely. It will thicken as it cools. This can be made days in advance and stored in the refrigerator.
Part 2: Make the Vanilla Cake
1. Preheat and Prepare: Preheat your oven to 350°F (175°C). Grease three 8-inch round cake pans, line the bottoms with parchment paper, and then grease and flour the parchment and sides. This ensures your cakes will release perfectly .
2. Create “Buttermilk”: In a large bowl or liquid measuring cup, combine the milk, vinegar, and yogurt. Stir and let it sit for 5-10 minutes to curdle. This creates a homemade buttermilk substitute that will make your cake incredibly tender.
3. Mix Wet Ingredients: To the curdled milk mixture, add the 200g of sugar, vegetable oil, and 3 teaspoons of vanilla extract. Whisk thoroughly until the sugar has mostly dissolved.
4. Combine Dry Ingredients: In a separate, large bowl, sift together the all-purpose flour, cornstarch, baking soda, baking powder, and ¼ teaspoon of salt. Sifting not only removes lumps but also aerates the flour for a lighter cake.
5. Make the Batter: Gradually add the dry ingredients to the wet ingredients. Mix with a spatula or whisk just until combined and smooth. Be careful not to overmix, as this can develop the gluten and make the cake tough .
6. Bake: Divide the batter evenly among the three prepared pans. Bake for 25-30 minutes, or until a toothpick inserted into the center comes out clean.
7. Cool: Let the cakes rest in their pans on a wire rack for 10-15 minutes. Then, carefully turn them out onto the rack, remove the parchment paper, and allow them to cool completely. The cakes must be completely cool before you frost them.
Part 3: Make the Legendary Caramel Frosting
This is the most critical step. Clear your schedule, put on some music, and prepare to stir. A rainy or humid day can affect the frosting, so a clear day is best .
1. Start the Base: In a large, deep, heavy-bottomed pot (a Dutch oven is perfect), combine the milk, 3 cups of the sugar, the 10 tablespoons of butter, and the kosher salt. Place it over medium-high heat, whisking occasionally, until the butter melts and the mixture just begins to simmer. Once it simmers, turn off the heat but leave the pot on the warm burner .
2. Caramelize the Remaining Sugar: Place the remaining 1 cup of sugar in a separate, clean saucepan over medium-high heat. Cook it, stirring often with a wooden spoon, as it begins to melt and clump. Eventually, it will turn into a deep amber-colored syrup. This should take 5-8 minutes. Watch it like a hawk !
3. Combine with Caution: Very carefully pour the hot, amber-colored caramelized sugar into the warm milk mixture. Stand back! It will bubble, sputter, and steam violently.
4. Cook to Soft-Ball Stage: Turn the heat under the large pot back to high. Whisk gently but constantly until all the caramelized sugar has dissolved into the milk. Continue to cook, without stirring, until the mixture reaches the soft-ball stage, which is 235°F to 240°F on a candy thermometer. This can take 8-12 minutes .
5. Cool and Beat: Remove the pot from the heat. Gently whisk in the vanilla extract and the ¼ teaspoon of baking soda (this helps smooth out the icing). Pour the mixture into the bowl of a stand mixer. Let it cool, beating on low speed with the paddle attachment. This cooling and beating process is crucial for achieving that perfect, creamy texture. It can take 15-30 minutes for the frosting to become thick and creamy (between 100°F and 105°F). It should fall from a spatula in a thick ribbon . If it becomes too thick to spread, you can beat in a teaspoon of hot water at a time to loosen it.
Part 4: Assemble the Cake
1. Prepare for Assembly: Place one cooled cake layer on your serving plate or a cake stand. If you have them, place strips of parchment paper under the edges of the cake to keep your plate clean while you frost.
2. First Layer: Using a spatula or a large spoon, spread a generous layer of the cooled caramel frosting over the first cake layer. Create a slight well in the center to hold the sauce . Drizzle about ¼ cup of your homemade caramel sauce over the frosting.
3. Second Layer: Gently place the second cake layer on top. Repeat the process, spreading more frosting and drizzling another ¼ cup of caramel sauce.
4. Final Layer: Top with the third cake layer. Apply a very thin layer of frosting all over the entire cake to seal in the crumbs. This is called a “crumb coat.” Place the cake in the refrigerator for at least 30 minutes to let this layer set .
5. Final Frosting: Once the crumb coat is firm, use the remaining frosting to cover the cake smoothly. You can create swirls or keep it rustic. Chill the cake for another 30 minutes.
6. The Final Drip: Pour the remaining homemade caramel sauce over the top of the chilled cake. Use the back of a spoon to gently push some of the sauce to the edge, allowing it to drip artistically down the sides .
7. Serve: Chill the cake until you’re ready to serve. For the cleanest slices and the best flavor, this cake is excellent when served slightly chilled . Sprinkle with a little flaky sea salt just before serving for a perfect finishing touch.
Pro Baker Tips for Success
· Use a Candy Thermometer: While experienced bakers can sometimes use the “cold water test” (dropping a bit of icing into cold water to see if it forms a soft ball), a thermometer is your best friend for consistent, foolproof results .
· Weather Matters: Caramel frosting is sensitive to humidity. Try to make this cake on a clear, dry day for the best texture .
· Be Patient with the Frosting: The cooling and beating process is non-negotiable. Don’t rush it. If you try to spread the frosting when it’s too warm, it will run right off the cake.
· Room Temperature Ingredients: For the cake, using room-temperature butter (if creaming) and eggs creates an emulsion that traps air, leading to a lighter, fluffier texture. Our recipe uses oil, which ensures moisture, but the eggs should still be room temp to blend smoothly.
· Prep Ahead: You can make the caramel sauce and even bake the cake layers a day or two in advance. Wrap the cooled layers tightly in plastic wrap and store them in the refrigerator. This makes assembly day much more manageable.
Nutritional Information
Please note that this is an estimate and will vary based on specific ingredients and serving sizes. A traditional caramel cake is a decadent treat meant for special occasions.
A typical serving of caramel cake (approximately 1/16th of a cake or 80-100g) contains approximately :
· Calories: 290 – 320 kcal
· Fat: 10 – 13g (Saturated Fat: 5 – 6g)
· Cholesterol: 25 – 55mg
· Sodium: 290 – 460mg
· Carbohydrates: 42 – 53g (Sugars: 35 – 45g)
· Protein: 2 – 4g
This cake is high in sugar and saturated fat and should be enjoyed as an occasional indulgence.
Conclusion: A Cake for True Caramel Lovers
This homemade caramel cake is more than just a recipe; it’s an heirloom in the making. It’s a dessert that commands attention and rewards patience. From the first hint of smoky caramel in the tender crumb to the creamy, melt-away frosting and the final glorious drip, every single bite is a testament to the beauty of simple ingredients, transformed by heat and time into something truly spectacular.
It is, without a doubt, the perfect cake for that die-hard caramel fan in your life—and for you, the baker, who gets to experience the joy of creating it. This cake is love, baked and layered and drizzled into edible form. So, preheat your oven, clear your schedule, and get ready to create a masterpiece that will be remembered long after the last crumb is gone.
For Caramel Lovers Everywhere
This cake is for you. It’s for the person who always orders the caramel latte, who picks the caramel-filled chocolate from the box, and who believes that caramel makes everything better. It’s for the grandmother who passed down a recipe, the friend who needs a little sweetness in their life, or simply for yourself, as a reward for a job well done. This is a cake built on a foundation of pure, unadulterated caramel love, and it’s waiting to be shared..