Here is a comprehensive and detailed guide to the legendary Slap Ya Momma Pound Cake, structured exactly as you requested.
—
Introduction: A Slice of Southern Soul
Welcome to the world of Southern baking, where desserts aren’t just food; they’re an experience, a tradition, and a statement. The “Slap Ya Momma” Pound Cake is a legendary confection that lives up to its audacious name. This isn’t a delicate, airy cake meant for dainty tea parties. This is a majestic, dense, and impossibly buttery cake with a crackly, golden-brown crust that shatters gently to reveal a tender, moist, and fine-grained crumb. The name is a piece of hyperbolic Southern humor, suggesting the cake is so unbelievably delicious that it might cause a family commotion at the dinner table. Every bite is a testament to the power of simple, high-quality ingredients transformed by time-honored techniques. It’s a taste of nostalgia, a centerpiece for family gatherings, and quite simply, the best pound cake you will ever eat.
History: The Evolution of a Classic
The story of the pound cake begins not in the American South, but across the Atlantic. The first published recipe for “Pound Cake” appeared in Hannah Glasse’s 1747 English cookbook, The Art of Cookery Made Plain and Easy. true to its name, the original recipe was a model of simplicity and proportion: one pound each of flour, butter, sugar, and eggs. This easy-to-remember formula was a staple for British and early American bakers.
As the recipe traveled to the American South, it was embraced and transformed. Generous cooks found the original loaf too plain and began to enrich it, adding flavorings like vanilla, almond, or lemon. The greatest innovation was the addition of more eggs, which gave the cake its signature velvety, dense-yet-tender texture and created that iconic, crackly top crust. This evolved recipe, passed down through generations, became a cornerstone of Southern hospitality. The specific “Slap Ya Momma” moniker is a more recent, colloquial addition, born from the playful exaggeration that defines Southern storytelling and a deep, abiding love for the food that brings families together.
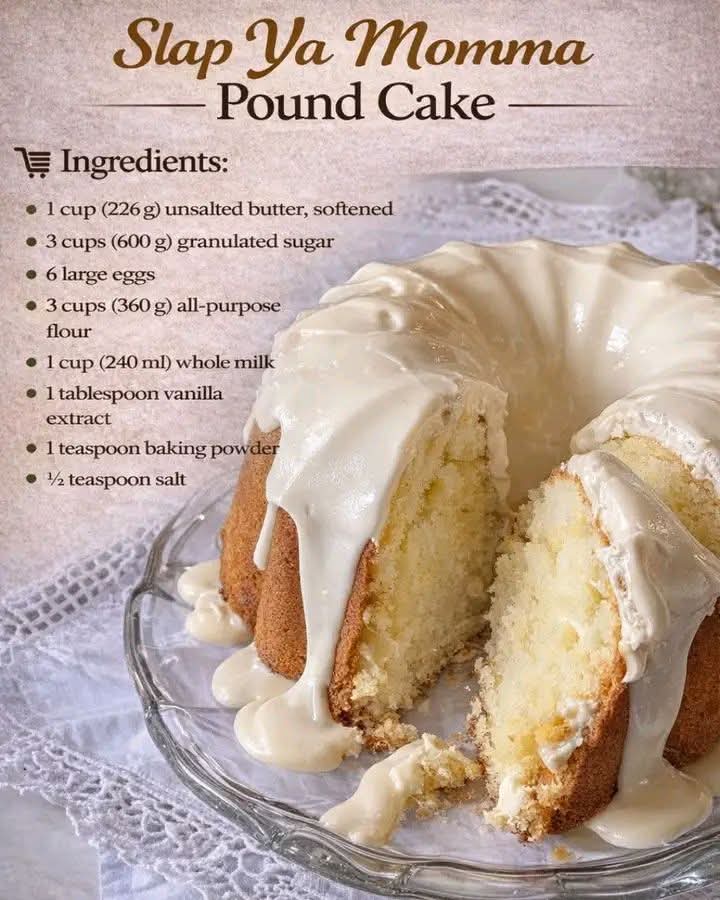
Ingredients: The Foundation of Flavor
The beauty of this cake lies in its simplicity. Using the best quality ingredients is paramount.
· 1 cup (226 g) Unsalted Butter, softened: The soul of the cake. Use high-quality, real butter. Unsalted allows you to control the salt level. The softening process is critical; it should be at cool room temperature, yielding to gentle pressure but not greasy or melted.
· 3 cups (600 g) Granulated Sugar: More than just a sweetener, sugar, when creamed with butter, creates air pockets that leaven the cake. It also contributes to the tender crumb and the beautifully browned crust.
· 6 Large Eggs: The structure builder. They must be at room temperature to emulsify properly into the batter, creating a smooth, unified mixture that bakes up evenly. The high number of eggs is the secret to the cake’s dense, rich texture.
· 3 cups (360 g) All-Purpose Flour: The backbone. Standard all-purpose flour provides the perfect amount of structure. It’s crucial to measure it correctly—spoon it into your measuring cup and level it off with a knife to avoid packing it down, which would result in a dry, heavy cake.
· 1 cup (240 ml) Whole Milk, room temperature: Adds moisture and helps create a smooth batter. The fat in whole milk contributes to a richer crumb.
· 2 teaspoons Vanilla Extract: The essential flavor base. Use pure vanilla extract for the deepest, most authentic flavor.
· 1/2 teaspoon Salt: Balances the sweetness and enhances the flavors of the butter and vanilla.
· (Optional Flavor Variations):
· Butter-Vanilla: 1 teaspoon of butter extract in addition to the vanilla.
· Lemon: 2 tablespoons of fresh lemon zest and 1 teaspoon of lemon extract.
· Almond: 1 teaspoon of almond extract in place of 1 teaspoon of vanilla.
Instructions & Methods: A Step-by-Step Guide to Perfection
Patience and proper technique are the keys to success. Read through the entire recipe before beginning.
1. Preparation (Mise en Place):
· Formation: Preheat your oven to 325°F (160°C) . This moderate temperature ensures the thick batter bakes through without burning the crust.
· Formation: Generously grease and flour a 10-inch (12-cup) tube pan or Bundt pan. Do not skip this step. Use butter or shortening and a dusting of flour, ensuring every nook and cranny is coated. Tap out the excess flour. This creates the perfect non-stick formation for the cake to release cleanly.
2. The Creaming Method (Building Structure):
· In the bowl of a stand mixer fitted with the paddle attachment (or using a large bowl and a hand mixer), beat the softened butter on medium speed until it is smooth and creamy, about 1 minute.
· Gradually add the sugar, about 1/2 cup at a time, beating well after each addition. Once all the sugar is added, increase the speed to medium-high and beat for 5 to 7 minutes. This is non-negotiable. The mixture should become very light in color (almost white), fluffy, and increase significantly in volume. This process mechanically incorporates air, which is the cake’s primary leavening.
3. Incorporating the Eggs (Creating Emulsion):
· Add the eggs, one at a time, beating well (about 30 seconds each) and scraping down the sides of the bowl after each addition. The batter might look slightly curdled after the first few eggs, but it should become smooth and glossy by the last one. The eggs must be at room temperature to prevent the batter from separating.
4. Alternating Dry and Wet (Maintaining Emulsion):
· In a separate bowl, whisk the flour and salt together.
· With the mixer on low speed, add the flour mixture to the butter mixture in three additions, alternating with the milk in two additions (begin and end with the flour). So: 1/3 flour, 1/2 milk, 1/3 flour, 1/2 milk, final 1/3 flour. Mix each addition just until combined. Overmixing at this stage will develop the gluten, resulting in a tough, chewy cake.
· Add the vanilla extract (and any other flavorings) and mix on low for just 10 seconds to combine.
· Final Formation: Remove the bowl from the mixer and use a rubber spatula to give the batter a few final folds. This ensures everything is perfectly incorporated, scraping the bottom of the bowl where the paddle might have missed.
5. Baking (The Transformation):
· Pour the thick, velvety batter into the prepared pan and spread it into an even layer.
· Bake on the center rack for 1 hour and 15 minutes to 1 hour and 30 minutes. Baking times vary, so rely on visual cues. The cake is done when:
1. The top is a deep golden brown and has a beautiful, crackly crust.
2. The edges of the cake begin to pull away from the sides of the pan.
3. A long wooden skewer or thin knife inserted into the center comes out clean or with just a few moist crumbs clinging to it (not wet batter).
6. Cooling (The Hardest Part):
· Place the pan on a wire rack and let the cake cool in the pan for 15-20 minutes. This allows the structure to firm up.
· Inversion: After 20 minutes, carefully invert the pan onto the wire rack. Lift the pan off gently. If it sticks, let it sit upside down for a few more minutes; the steam will often help release it.
· Let the cake cool completely on the wire rack before slicing. Slicing it warm will cause it to crumble.
Benefits: More Than Just a Dessert
While not a health food, this cake offers benefits beyond simple nutrition:
· Soul Food: It provides a powerful connection to tradition, family, and cultural heritage. Baking and sharing this cake is an act of love and hospitality.
· Comfort & Mood: The aroma of butter and vanilla baking is inherently comforting. Sharing a slice with loved ones fosters connection and creates joyful memories.
· Simplicity & Satisfaction: There is a profound satisfaction in creating something so perfect from just a handful of simple ingredients. It’s a rewarding project for bakers of all levels.
· Versatility: It’s a perfect blank canvas. Serve it plain, with fresh berries and whipped cream, a dusting of powdered sugar, a drizzle of chocolate or caramel sauce, or lightly toasted for breakfast.
Nutrition (Approximate per serving, based on 16 servings)
Please note: This is an estimate and will vary based on specific ingredients used.
· Calories: ~520
· Fat: ~24g
· Saturated Fat: ~14g
· Cholesterol: ~150mg
· Sodium: ~180mg
· Carbohydrates: ~70g
· Sugar: ~45g
· Protein: ~7g
For the Lovers
This cake is for the lovers of:
· Tradition: Those who cherish recipes passed down through generations.
· Texture: Those who appreciate a dense, moist, and finely-crumbed cake over a light, airy one.
· Simplicity: Those who know that perfection doesn’t require fancy ingredients or complicated techniques.
· Southern Hospitality: Anyone who believes that sharing good food is the best way to welcome people into your home and heart.
· The Perfect Slice: Those who understand that the crust is a prized possession, to be fought over lovingly.
Conclusion: A Legacy in Every Crumb
The Slap Ya Momma Pound Cake is far more than the sum of its parts. It is a testament to the magic that happens when simple ingredients are treated with respect and patience. It’s a buttery, vanilla-scented vessel of memory and love. From its humble origins in a pound of each ingredient to its celebrated place on the Southern dessert table, this cake has earned its bold name. It’s a promise of comfort, a symbol of celebration, and a guarantee of deliciousness. So, preheat your oven, take your time, and create a masterpiece. It might just cause a stir in your own kitchen. Enjoy!