Here is a detailed guide to making the famous KFC Original Recipe fried chicken at home, complete with its fascinating history, a step-by-step cooking method, and nutritional information.
🍗 The Legend of KFC Original Recipe Chicken
The KFC Original Recipe is more than just a meal; it’s a piece of American culinary history wrapped in a crispy, flavorful shell. The story begins with Harland Sanders, a man who, like many during the Great Depression, faced hardship but saw it as an opportunity . In 1930, Sanders began serving meals to travelers from his gas station in Corbin, Kentucky. His fried chicken, seasoned with a unique blend of herbs and spices, quickly became a local favorite .
Sanders was a perfectionist in the kitchen. He wasn’t satisfied with the 30 minutes it took to pan-fry his chicken or the dry results of deep-frying . His eureka moment came in 1939 when he modified a commercial pressure cooker, creating the first pressure fryer. This innovation allowed him to cook chicken that was both juicy and fast, ready in just eight or nine minutes . By July 1940, he had perfected his secret recipe of 11 herbs and spices, laying the foundation for a global empire .
The recipe’s secrecy became its greatest marketing tool. Sanders claimed the ingredients “stand on everybody’s shelf,” but their exact combination was a closely guarded secret . In 1964, Sanders sold his company for $2 million, but his face and his famous recipe remained the heart of the brand . Today, a signed copy of the recipe is locked in a 770-pound safe, surrounded by concrete and motion sensors at KFC’s headquarters in Louisville, Kentucky .
For decades, food detectives and fans have tried to crack the code. In 2016, a potential breakthrough occurred when the Chicago Tribune reported that Joe Ledington, a nephew of Colonel Sanders, had found a handwritten recipe in a family scrapbook. After some trial and error, the Tribune team declared they could produce chicken “indistinguishable” from KFC’s . The recipe you’ll find below is based on that find, bringing the legendary flavor to your own kitchen .
✨ Ingredient List
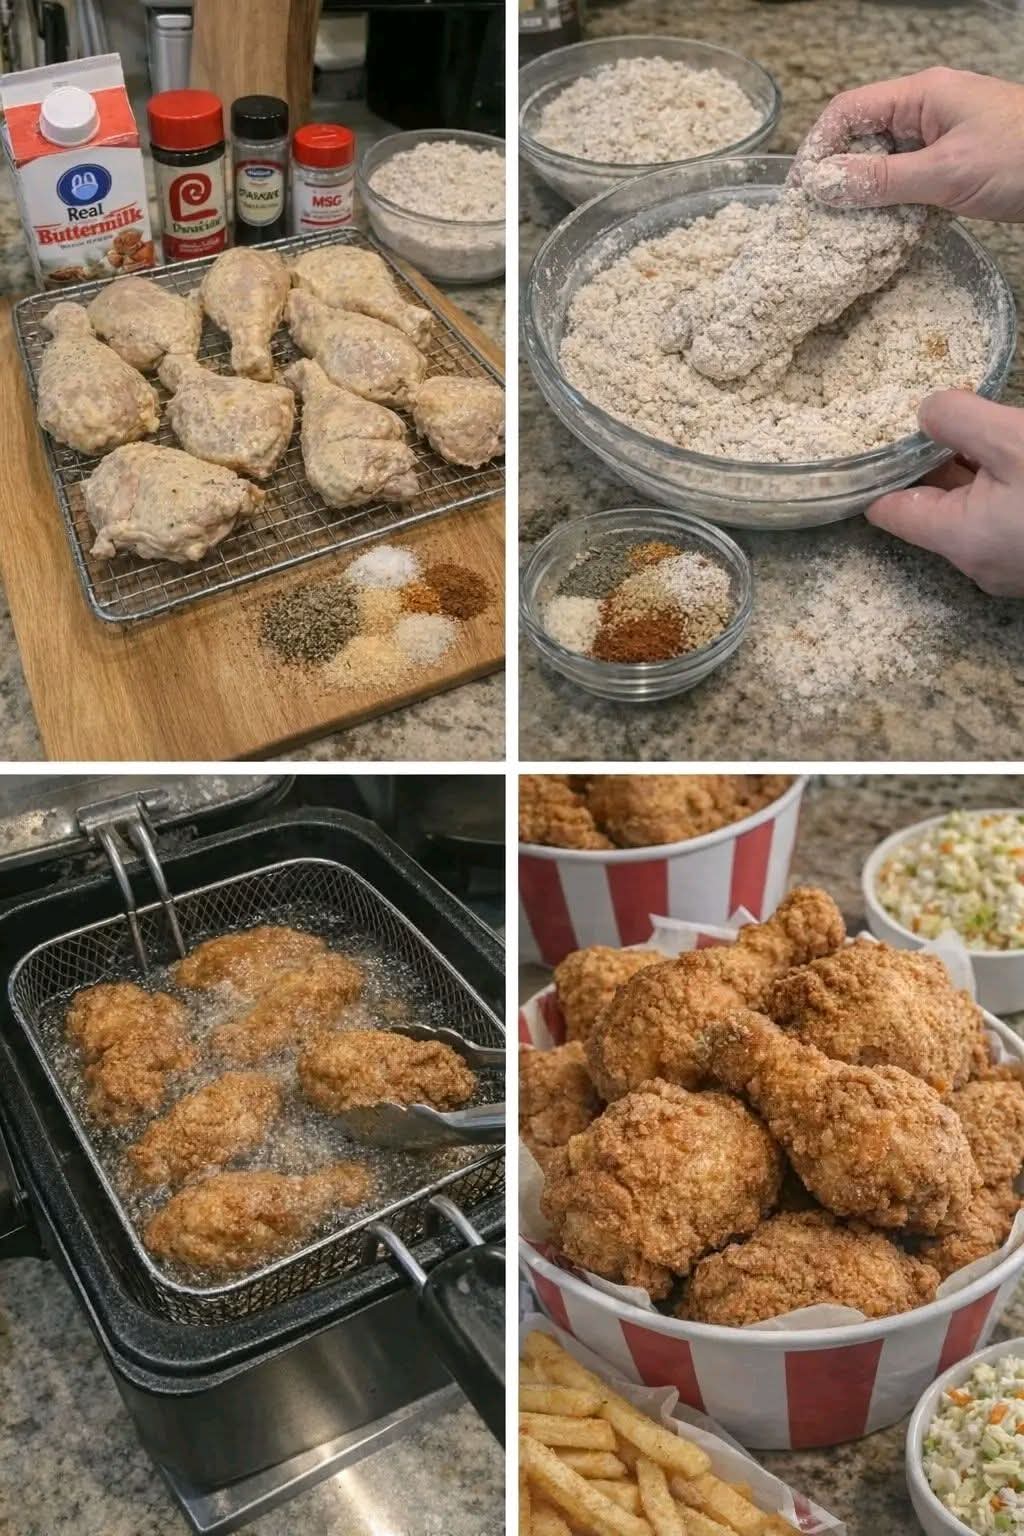
The magic lies in the blend. Here is the breakdown of the coating and the wash .
For the Coating (The “11 Herbs and Spices” Mix)
· 2 cups all-purpose flour
· 2/3 tablespoon salt
· 1/2 tablespoon dried thyme leaves
· 1/2 tablespoon dried basil leaves
· 1/3 tablespoon dried oregano leaves
· 1 tablespoon celery salt
· 1 tablespoon ground black pepper
· 1 tablespoon dried mustard
· 3 tablespoons paprika (Note: The original recipe calls for 4 tablespoons, but many copycat versions use 3 for a more balanced color and flavor)
· 2 tablespoons garlic salt
· 1 tablespoon ground ginger
· 3 tablespoons ground white pepper
· 2 teaspoons Accent seasoning (MSG), optional but recommended for that authentic savory depth
For the Chicken and Wash
· 1 whole chicken (about 3-4 lbs), cut into 10 pieces (2 wings, 2 legs, 2 thighs, and 2 breasts cut in half to make 4 breast pieces)
· 1 cup buttermilk
· 1 large egg
· Vegetable oil, for frying (enough to have about 2-3 inches in your pot or to fill your deep fryer)
A Note on Preparation: For the most authentic result, some recipes suggest pulsing the dried herbs (thyme, basil, oregano) in a small food processor until they are a uniform, fine size, so they integrate more smoothly into the flour .
📝 Step-by-Step Instructions
Follow these steps carefully to achieve that perfect, KFC-style crunch and flavor.
1. Preparation
In a large bowl, whisk together the flour and all the herbs and spices (from salt to white pepper, and MSG if using) until evenly combined. Set aside.
In a separate, larger bowl, whisk together the buttermilk and the egg until well combined.
2. The First Dip: The Wet Wash
Add the chicken pieces to the buttermilk mixture. Turn to coat them all. Cover and refrigerate for at least 20-30 minutes, or up to an hour. This soak tenderizes the chicken and helps the first layer of coating adhere.
3. The First Coat: Dredging
Remove a piece of chicken from the buttermilk, letting any excess drip off. Place it into the bowl of seasoned flour. Turn to coat thoroughly, pressing the flour mixture onto the chicken to ensure it sticks. Shake off the excess and place the coated piece on a wire rack. Repeat with all the chicken pieces.
4. The Crucial Rest
This is a vital step for achieving a crust that stays on during frying. Let the dredged chicken rest on the wire rack for 20-30 minutes. This allows the coating to adhere to the chicken and become a bit pasty, which is exactly what you want.
5. Frying to Perfection
While the chicken rests, pour oil into a deep, heavy-bottomed pot or deep fryer to a depth of at least 2-3 inches. Heat the oil to 350°F (175°C) . Use a deep-fry thermometer to monitor the temperature.
Working in batches to avoid overcrowding (which lowers the oil temperature), carefully place the chicken pieces in the hot oil.
Fry for about 15-18 minutes, turning occasionally, until the chicken is golden brown, crispy, and cooked through (an internal temperature of 165°F (74°C) in the thickest part). Dark meat may take a couple of minutes longer than white meat .
6. Draining and Serving
Using tongs, remove the fried chicken and place it on a clean wire rack set over a baking sheet. Do not drain on paper towels, as this will trap steam and make the bottom crust soggy . Let it rest for a few minutes before serving to allow the juices to settle. Serve warm and enjoy!
💡 Tips for Success: The KFC Method
Beyond the ingredients, KFC’s consistent quality comes from a specific technique, especially in their restaurants. While we don’t have a commercial pressure fryer at home, we can mimic their preparation style .
1. The Water Dip: In KFC restaurants, the chicken is first dipped in water, not egg or buttermilk, before being coated in the flour mix. This simple step is what makes the breading stick. For our home recipe, the buttermilk wash serves a similar, albeit richer, purpose.
2. The “Breading” Motion: KFC teaches its cooks a specific “bread” the chicken. It’s a two-part motion: first, a sweeping outwards motion from the top center, around and over, and then a scooping motion in the opposite direction. This is repeated about seven times to ensure every nook and cranny is covered without overworking the coating .
3. The Seven-Shake Rule: After coating, the chicken is placed in a metal basket and shaken vigorously—often about seven times—to remove any excess breading. This ensures the signature thin, crisp, and craggy crust, not a thick, doughy one .
📊 Nutritional Information
The nutritional content can vary based on the size of the chicken pieces and the amount of oil absorbed during frying. The following estimates are for a standard serving of KFC’s Original Recipe Chicken.
Nutrient Per Serving (approx. 4 servings) Per Piece (Chicken Breast)
Calories 729 kcal 320 kcal
Protein 46g 36g
Fat 33g 14g
Carbohydrates 59g 13g
Sodium 6613mg 1130mg
Note: The homemade version’s sodium content can be high due to the seasoned flour. You can adjust the salt in the spice blend to your taste.
❤️ Why This Recipe is a Keeper
Recreating this dish at home is more than just cooking; it’s an experience. It connects you to the legacy of Colonel Sanders, a testament to American entrepreneurship and the pursuit of a perfect recipe. The “secret” blend of herbs and spices creates a symphony of flavors that is both familiar and exciting, savory, peppery, and slightly sweet.
For chicken lovers, this recipe is the holy grail. It allows you to enjoy that iconic taste anytime, with the satisfaction of having made it yourself. Whether it’s for a special family dinner, a game-day feast, or just because you’re craving that “finger lickin’ good” comfort food, this KFC Original Recipe Chicken is guaranteed to be a crowd-pleaser. It’s a delicious piece of history you can literally sink your teeth into.