Here is a comprehensive guide to Amish White Bread, crafted into a big, detailed recipe as you requested.
—
The Loaf of Love: Mastering the Art of Amish White Bread
Introduction
There is something magical about the process of baking bread. It is a sensory experience—the warm, yeasty aroma that fills the kitchen, the soft, pliable dough under your hands, and the unparalleled satisfaction of pulling a golden-brown loaf from the oven. Among the vast world of bread recipes, Amish White Bread stands as a timeless classic, a testament to the beauty of simplicity.
This isn’t just a bread recipe; it’s a foundation. With its soft, tender crumb and slightly sweet, buttery flavor, this loaf is the epitome of comfort. It’s the bread of childhood memories, perfect for a morning slice of toast, the foundation of a hearty lunchtime sandwich, or a warm, comforting side to a bowl of soup on a chilly evening. Known for its reliability and incredibly soft texture, mastering this recipe will fill your home with love and your table with the kind of simple, wholesome food that feeds both body and soul. Let’s embark on this baking journey together.
The History & Heritage
While the recipe is famously dubbed “Amish,” it represents a broader tradition of simple, homestead baking practiced by Amish and Mennonite communities in Pennsylvania and the American Midwest. These communities are known for their self-sufficiency and from-scratch cooking, using simple, pantry-staple ingredients to create nourishing meals for their families.
This white bread is a classic example of “survival baking”—it requires no milk, eggs, or fancy equipment. The use of simple ingredients like water, flour, yeast, sugar, salt, and oil made it an economical and reliable staple. The addition of a small amount of sugar not only feeds the yeast for a good rise but also adds a characteristic subtle sweetness. The final brush of melted butter gives the crust its signature soft, tender finish, distinguishing it from crustier European-style loaves. It’s a bread born from practicality, yet it delivers a richness of flavor and texture that has made it a beloved favorite far beyond its origins.
The Benefits of Baking (and Eating) This Bread
· Therapeutic Process: Kneading bread dough is a wonderful stress reliever. The rhythmic action is meditative, and the focus required pulls you away from the distractions of the day.
· Pure Ingredients: You control what goes into your food. No preservatives, dough conditioners, or high-fructose corn syrup—just honest, simple ingredients.
· Incredible Value: For pennies worth of ingredients, you can produce a loaf far superior in taste and texture to most store-bought bread.
· Versatility: This bread is a blank canvas. It’s perfect for sandwiches, French toast, breadcrumbs, or simply enjoyed warm with a pat of butter.
· The Joy of Sharing: Food made with love is meant to be shared. Gifting a warm loaf to a neighbor or friend is a timeless gesture of kindness.
—
Ingredients
· For the Dough:
· 1 cup warm water (approximately 110°F / 43°C)
· 1 packet (2 ¼ teaspoons) active dry yeast
· 1 tablespoon granulated sugar
· 1 teaspoon salt
· 2 tablespoons vegetable oil (or canola/olive oil)
· 3 cups all-purpose flour, plus more for dusting
· For the Finish:
· 1 tablespoon butter, melted
—
Instructions & Methods
Yields: 1 standard 9×5-inch loaf
Prep time: 20 minutes
Rise time: 1 hour 30 minutes
Bake time: 25-30 minutes
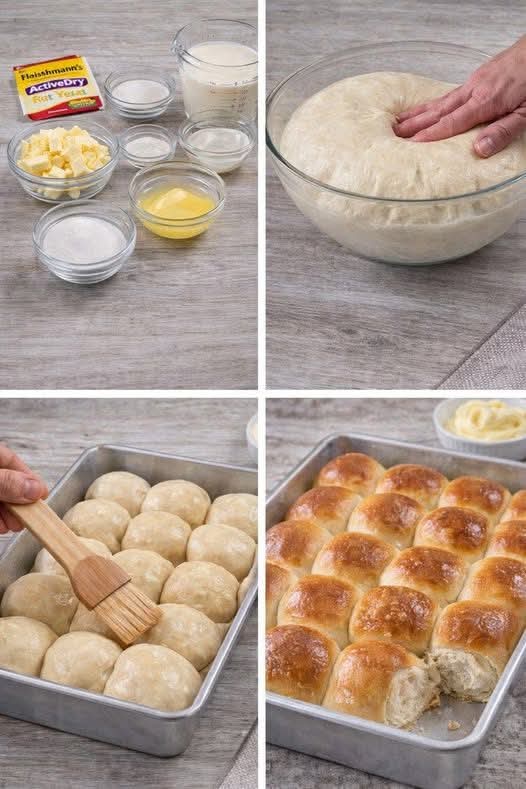
Step 1: Proof the Yeast
In a large mixing bowl (or the bowl of a stand mixer), combine the warm water, sugar, and yeast. Give it a gentle stir and let it sit for 5-10 minutes. The mixture should become frothy and bubbly. This “proofing” step ensures your yeast is alive and active. If it doesn’t froth, your yeast is dead, and you’ll need to start over.
Step 2: Form the Dough
Add the salt and vegetable oil to the yeast mixture. Stir to combine. Add 2 ½ cups of the flour, one cup at a time, mixing well after each addition. The dough will start to come together. If using a stand mixer, use the dough hook attachment.
Step 3: Knead
Sprinkle some of the remaining ½ cup of flour onto a clean countertop. Turn the dough out onto the floured surface. Knead the dough for 6-8 minutes, incorporating the remaining flour as needed to prevent sticking. The dough is ready when it is smooth, elastic, and springs back when you poke it gently with a finger. (If using a stand mixer, knead with the dough hook on medium-low speed for about 5-7 minutes).
Step 4: First Rise
Lightly oil a large, clean bowl. Place the dough in the bowl, turning it to coat all sides with oil. This prevents it from drying out. Cover the bowl with a clean kitchen towel or plastic wrap. Place it in a warm, draft-free spot (like a slightly warmed oven with the light on) and let it rise until it has doubled in size, about 1 hour.
Step 5: Shape the Loaf
Punch down the risen dough to release the air. Turn it out onto a lightly floured surface. Using your hands, flatten the dough into a rectangle about 8×12 inches. Starting from the short end, tightly roll the dough up like a jelly roll. Pinch the seam firmly to seal. Fold the ends under and pinch to seal as well. Place the shaped loaf seam-side down into a greased 9×5-inch loaf pan.
Step 6: Second Rise
Cover the loaf pan loosely with the towel and let it rise again in a warm place until the dough has risen about 1 inch above the rim of the pan, about 30 minutes. About 10 minutes before it’s ready, preheat your oven to 350°F (175°C).
Step 7: Bake
Bake the bread on the center rack for 25-30 minutes. The loaf is done when it is golden brown on top and sounds hollow when you tap it on the bottom. If the top is browning too quickly, you can tent it loosely with aluminum foil during the last 10 minutes of baking.
Step 8: The Butter Finish & Cooling
As soon as you remove the bread from the oven, brush the hot crust with the melted butter. This step is key to achieving that wonderfully soft, flavorful crust. Let the bread cool in the pan for about 5-10 minutes, then carefully turn it out onto a wire rack to cool completely before slicing. This is the hardest part, as the aroma will be incredible, but slicing into a hot loaf will result in a gummy texture.
—
Nutrition (Per Slice, based on 12 slices)
Note: This is an estimate and will vary based on specific ingredients used.
· Calories: ~160
· Fat: ~3.5g
· Carbohydrates: ~28g
· Protein: ~4g
· Fiber: ~1g
· Sugar: ~1g
—
For the Bread Lovers
This recipe is for the lovers of:
· Simple Pleasures: Those who find joy in the basics.
· Comfort Food: Anyone seeking a taste of home and nostalgia.
· Homemade Goodness: Bakers who appreciate the superiority of from-scratch cooking.
· Versatility: Cooks who want one reliable recipe that can be used for toast, sandwiches, and more.
· The Aroma: Let’s be honest, it’s for anyone who wants their house to smell like heaven.
Conclusion
Mastering Amish White Bread is a rite of passage for any home baker. It’s forgiving, reliable, and produces a loaf that is so much more than the sum of its parts. It’s a lesson in patience, a sensory delight, and a gift of love. The soft crumb, the tender butter-brushed crust, and the wholesome flavor are a reminder that the best things in life are often the simplest.
So, preheat your oven, dust off your countertop, and give this recipe a try. We promise, the moment you pull that beautiful, golden loaf from the oven and take that first warm, buttery bite, you’ll be a baker for life. Happy baking