Here is a comprehensive, detailed guide to making Homemade Mars Candy Bars, complete with all the sections you requested.
The Allure of Homemade Mars Candy Bars
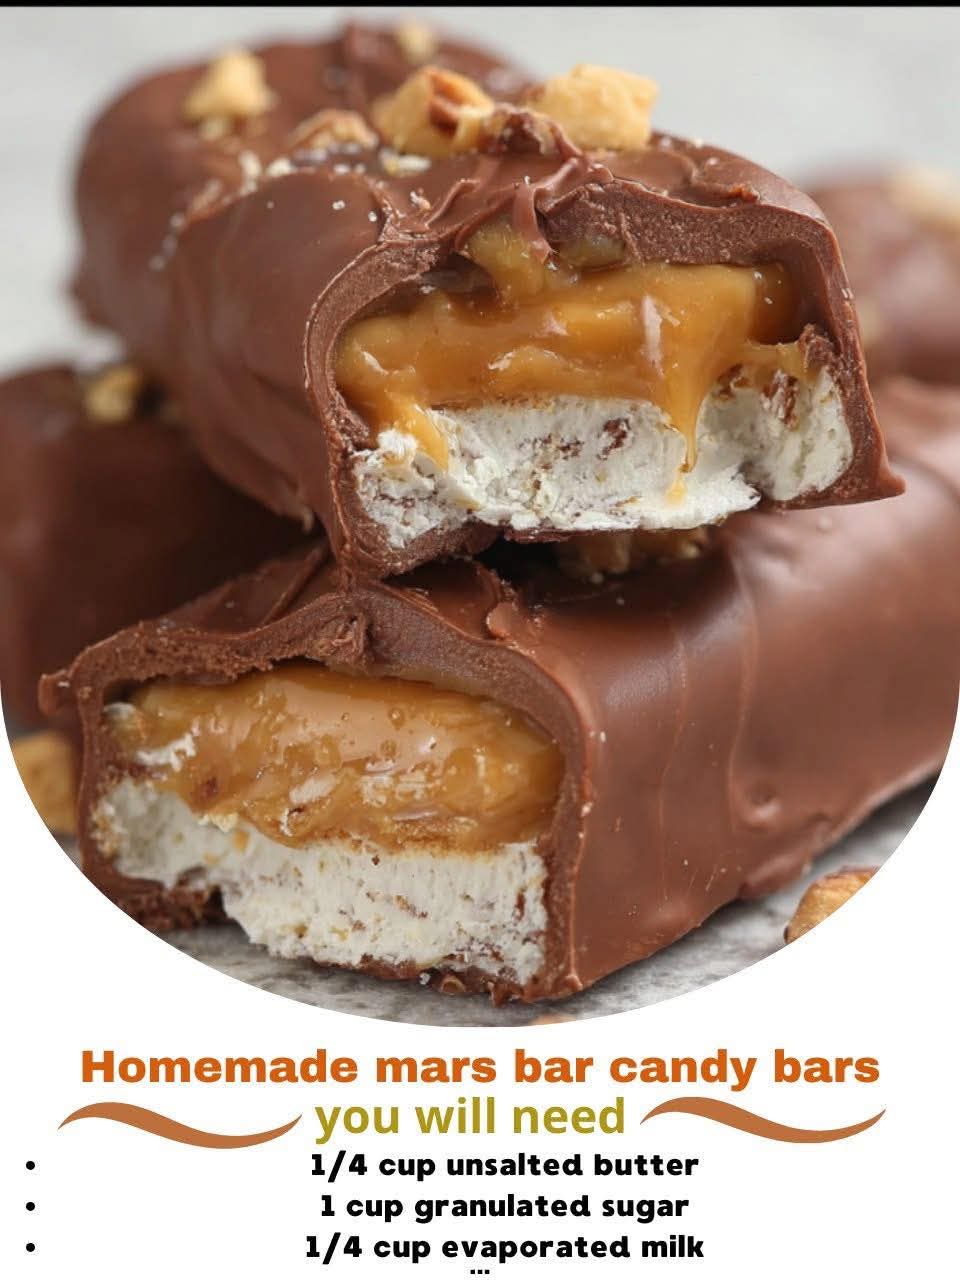
There is something truly magical about replicating a classic store-bought treat in your own kitchen. The Mars bar, with its perfect trinity of textures—a soft, vanilla nougat, a creamy caramel layer, and a rich chocolate coating—has been a global favorite for nearly a century. While unwrapping a store-bought bar is satisfying, creating them at home elevates the experience to an art form. You gain control over the quality of ingredients, can adjust the sweetness to your liking, and get the incomparable satisfaction of saying, “I made these myself.” This recipe is a labor of love for candy lovers who appreciate the craft behind their favorite sweets. Prepare to impress your friends, family, and your own taste buds with this decadent, from-scratch version of a timeless classic.
—
A Bite of History: The Story of the Mars Bar
The story of the Mars bar begins in Tacoma, Washington, in 1911. A confectioner named Frank C. Mars created and sold the first Mar-O-Bar, a combination of chocolate, nuts, and nougat. However, it was the Milky Way bar, launched in 1923, that became his first massive success. The Milky Way was inspired by the malted milkshakes of the day, featuring a chocolate malt-flavored nougat topped with caramel and coated in milk chocolate. The Mars bar, as we know it today, was introduced by the company in 1932. Created by Frank’s son, Forrest Mars, in the United Kingdom, it was originally a thicker, maltier version of the Milky Way. Over the years and across different countries, the recipe evolved. In the United States, the Mars bar we remember from decades past (discontinued in the early 2000s and later replaced by the similar “Snickers Almond”) was a trio of nougat, caramel, and almonds. The most globally recognized version today, and the one this recipe pays homage to, is the UK-style Mars bar, which features a lighter, airier vanilla nougat, a soft caramel layer, and a milk chocolate coating. It’s a testament to the Mars company’s ability to adapt and perfect a beloved treat for audiences worldwide.
—
Ingredients: Your Shopping List for Perfection
This recipe is broken down by layer to make the process clear and organized. High-quality ingredients will yield the best results.
For the Nougat Layer (The Soft, Vanilla Heart):
· 1/4 cup (55g) unsalted butter
· 1 cup (200g) granulated sugar
· 1/4 cup (60ml) evaporated milk (not sweetened condensed milk)
· 1 1/2 cups (170g) powdered sugar (confectioners’ sugar), sifted
· 1 (7-ounce) jar (approx. 200g) marshmallow creme (like Fluff)
· 1/4 cup (35g) finely chopped almonds or hazelnuts (optional, for texture, but classic nougat has none)
· 1 teaspoon vanilla extract
· A pinch of salt
For the Caramel Layer (The Chewy, Sweet Center):
· 1 (14-ounce) can (400g) sweetened condensed milk
· 1 cup (200g) light brown sugar, packed
· 1/2 cup (120ml) light corn syrup (or golden syrup)
· 1/2 cup (115g) unsalted butter, cut into pieces
· 1 teaspoon vanilla extract
· A pinch of salt
For the Chocolate Coating (The Rich Finish):
· 1.5 lbs (about 680g) high-quality milk chocolate, finely chopped (or high-quality milk chocolate chips)
· 2 tablespoons coconut oil or vegetable shortening (optional, for thinning and shine)
—
Essential Equipment
· 8×8-inch (20×20 cm) square baking pan
· Parchment paper
· Heavy-bottomed saucepan
· Candy thermometer (highly recommended for perfect texture)
· Large mixing bowls (heat-safe)
· Electric mixer (stand or hand-held)
· Sharp knife
· Baking sheet lined with wax paper (for setting the coated bars)
—
Methods: Step-by-Step Instructions
Phase 1: Prepare the Pan and Mise en Place
1. Line your 8×8 pan with parchment paper, leaving an overhang on two opposite sides. These will act as “handles” to lift the finished candy out later. Lightly grease the parchment with butter or non-stick spray.
Phase 2: Crafting the Nougat Layer
1. In a heavy-bottomed saucepan, combine the 1/4 cup butter, granulated sugar, and evaporated milk. Cook over medium heat, stirring constantly, until the butter is melted and the sugar is dissolved.
2. Once the mixture is bubbling, stop stirring and attach your candy thermometer. Continue to cook until the mixture reaches the soft ball stage (235-240°F or 113-116°C) . This is crucial for the right texture.
3. While the sugar mixture cooks, place the sifted powdered sugar and marshmallow creme in the bowl of your electric mixer.
4. As soon as the hot sugar mixture reaches the correct temperature, carefully pour it over the marshmallow creme and powdered sugar. Be careful—the mixture is extremely hot!
5. Add the vanilla extract and a pinch of salt.
6. Using the paddle attachment, beat on low speed until the ingredients are combined, then increase to medium-high and beat for about 5-7 minutes. The mixture will become thick, glossy, and fluffy. If using nuts, fold them in now.
7. Immediately pour the nougat into your prepared pan. Use an offset spatula (lightly greased) to spread it into an even layer. Set aside to cool completely at room temperature while you make the caramel. Do not refrigerate yet.
Phase 3: Creating the Luscious Caramel Layer
1. In the same heavy-bottomed saucepan (cleaned), combine the sweetened condensed milk, brown sugar, corn syrup, and butter.
2. Cook over medium heat, stirring constantly with a wooden spoon or heatproof spatula, until the butter is melted and the sugar is dissolved.
3. Continue cooking, stirring constantly to prevent scorching, until the mixture thickens and darkens slightly. For the perfect firm-but-chewy caramel, cook until it reaches the firm ball stage (245-248°F or 118-120°C) . This can take 10-15 minutes. The color should be a deep golden brown.
4. Remove from heat and immediately stir in the vanilla extract and a pinch of salt. Be careful, as it may bubble up.
5. Pour the hot caramel over the cooled nougat layer. Tilt the pan gently to ensure it spreads into an even layer.
6. Allow the caramel to cool and set completely at room temperature. This can take a few hours. Once fully set, you can place the pan in the refrigerator to firm up for about 1-2 hours before cutting. This makes slicing much easier.
Phase 4: Slicing and Enrobing in Chocolate
1. Once the layered block is completely firm, use the parchment overhang to lift it out of the pan and place it on a cutting board.
2. Using a large, sharp knife, cut the block into bars of your desired size. Classic Mars bars are about 1.5 inches wide and 3 inches long. For clean cuts, wipe the knife clean and run it under hot water between slices.
3. Place the cut bars on a parchment-lined baking sheet and freeze them for at least 30 minutes. This is the secret to a smooth, professional-looking chocolate coating. The frozen bars will cause the chocolate to set almost instantly.
4. While the bars are freezing, prepare your chocolate. Place about 3/4 of your chopped chocolate in a microwave-safe or heatproof bowl. Melt it gently using 30-second bursts in the microwave, stirring well after each, or over a double boiler (a bowl set over a pot of simmering water, not touching the water). Heat until it reaches about 115°F (46°C).
5. Once melted, add the remaining 1/4 of your chopped chocolate and stir constantly until it’s completely melted and the temperature drops to about 88-90°F (31-32°C). This is called “tempering” and gives the chocolate a beautiful snap and shine. If using coconut oil or shortening (which bypasses the need for true tempering), simply stir it into the fully melted chocolate until smooth.
6. Working quickly, remove a few bars from the freezer. Using a fork or dipping tools, submerge one bar at a time into the melted chocolate. Lift it out, allowing the excess chocolate to drip back into the bowl.
7. Place the coated bar back on the parchment-lined baking sheet. If you want a decorative swirl, you can drag a fork across the top.
8. Repeat with the remaining bars. If the chocolate in the bowl starts to thicken, gently re-warm it.
9. Allow the coated bars to set completely at room temperature or in the refrigerator.
—
The Sweet Rewards: Benefits of Making Your Own
1. Ingredient Control: You choose the quality. No artificial flavors, preservatives, or low-quality oils. You can use organic dairy, fair-trade chocolate, and pure vanilla extract.
2. Customization: This recipe is a canvas. Add a pinch of sea salt to the caramel. Use dark chocolate for the coating. Add toasted nuts to the nougat. The possibilities are endless.
3. The “Wow” Factor: These homemade bars are a showstopping gift or a potluck dessert that will have everyone asking for the recipe.
4. The Joy of Creation: There’s a unique pride and satisfaction in creating something this complex and delicious from scratch. It’s a fun and rewarding culinary project.
5. Perfect Flavor: Many enthusiasts argue that the fresh, homemade version tastes even better than the original, with a more pronounced vanilla and caramel flavor.
—
The Formation: Anatomy of a Mars Bar
The genius of the Mars bar lies in its structural and textural formation. It’s a masterclass in contrast.
· The Base (Nougat): This provides the light, airy foundation. Made by whipping air into a sugar and marshmallow mixture, it creates a soft, slightly chewy platform that isn’t too dense.
· The Core (Caramel): The layer of caramel is the chewy, sticky heart. It adds moisture, a deep buttery sweetness, and a completely different mouthfeel from the nougat.
· The Shell (Chocolate): The tempered milk chocolate coating is the crisp, snappy shell that holds everything together. It provides the first burst of flavor and a satisfying snap when you bite into it, contrasting perfectly with the soft interior. Each layer is carefully formed and set before the next is added to ensure distinct, clean layers in the final bar.
—
Nutrition Information (Approximate, per standard-sized bar)
Please note: This is an estimate and will vary based on the specific ingredients and size of your bars. This recipe makes approximately 12-16 bars.
· Calories: 350-450
· Fat: 15-22g
· Saturated Fat: 9-14g
· Carbohydrates: 55-65g
· Sugar: 48-58g
· Protein: 3-5g
—
For the Lovers: A Final Word
This recipe is for the true confectionery enthusiast—the lover of chocolate, the seeker of texture, the person who understands that a candy bar can be more than just a snack; it can be a crafted experience. Whether you’re making these for a nostalgic trip down memory lane, as a unique homemade gift for a loved one, or simply to conquer a new challenge in the kitchen, these Homemade Mars Candy Bars are sure to delight.
The process is an act of love, and the final product is a testament to your effort. So gather your ingredients, embrace the sweet science of candy-making, and prepare to fall in love with the most decadent candy bar you’ll ever make.
Conclusion
Making Mars bars at home is a rewarding journey into the heart of confectionery. While it requires patience and attention to detail, the result is a batch of superior, personalized candy bars that far surpass anything you can buy at the store. From the soft, vanilla-kissed nougat to the chewy caramel and the crisp chocolate shell, every bite is a harmonious blend of flavors and textures. So go ahead, take on this delicious challenge. Your kitchen will smell like a candy shop, and your reward will be a platter of beautiful, utterly irresistible homemade candy bars. Enjoy