Absolutely! Let’s turn your Upside-Down Strawberry Cake into a full, rich recipe experience—complete with history, methods, and a sweet conclusion for strawberry lovers. 🍓
🍰 Upside-Down Strawberry Cake
Introduction
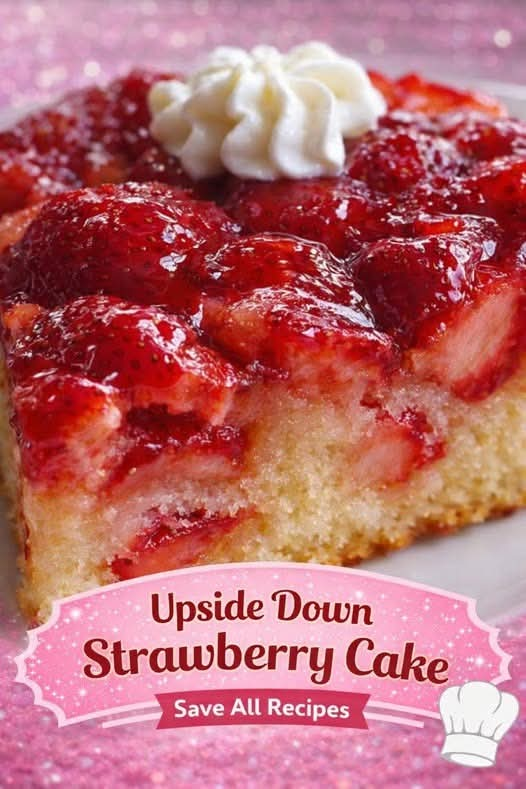
Upside-down cakes have a charming history, originating in the early 20th century as a clever way to caramelize fruit while keeping the cake moist and tender. While pineapple was the star of classic upside-down cakes, strawberries bring a bright, juicy, and slightly tangy twist that makes this dessert irresistible. Perfect for summer gatherings, birthdays, or an indulgent weekend treat, the Upside-Down Strawberry Cake combines the natural sweetness of fresh strawberries with the light, airy texture of a white or yellow cake. Its glossy, caramelized fruit topping turns any occasion into a feast for both the eyes and the taste buds.
Ingredients
Topping
- 1/2 cup (1 stick) unsalted butter, melted
- 3/4 cup packed light brown sugar
- 1 1/2 cups fresh strawberries, hulled and halved
Cake
- 1 box (15.25 oz) white or yellow cake mix
- 3 large eggs
- 1/2 cup vegetable oil
- 1 cup water
- 1 teaspoon vanilla extract (optional, for extra aroma)
Instructions
1. Prepare the Oven and Pan
- Preheat your oven to 350°F (175°C).
- Grease a 9-inch round or square cake pan thoroughly with butter, then lightly dust with flour, or line with parchment paper.
2. Make the Strawberry Topping
- In a small bowl, mix melted butter and brown sugar until smooth.
- Pour this mixture evenly into the prepared pan.
- Arrange the halved strawberries on top of the butter-sugar mixture, cut-side down for a beautiful caramelized presentation.
3. Prepare the Cake Batter
- In a large mixing bowl, combine the cake mix, eggs, vegetable oil, water, and vanilla extract.
- Beat on medium speed for 2–3 minutes until smooth and well combined.
4. Assemble the Cake
- Gently pour the cake batter over the arranged strawberries, spreading evenly with a spatula to cover all the fruit.
5. Bake
- Bake in the preheated oven for 40–50 minutes, or until a toothpick inserted into the center comes out clean.
- Remove from oven and let it cool for 10–15 minutes in the pan.
6. Flip the Cake
- Carefully place a serving plate or cake stand over the pan.
- Invert the pan to release the cake, letting the caramelized strawberries rest on top.
Methods & Tips
- Caramelization Magic: Use brown sugar and butter for a richer, deeper flavor that complements the strawberries.
- Even Distribution: Arrange strawberries in a single layer to ensure every slice has fruit on top.
- Cake Mix Shortcut: Using a boxed cake mix keeps this recipe easy, but you can also use a homemade white cake batter for a more artisanal approach.
- Optional Flavors: Add a teaspoon of almond extract for a subtle nutty note or a pinch of cinnamon to deepen the caramel flavor.
History & Formation
Upside-down cakes date back to the early 1900s, often made with fruits like pineapple, cherries, or peaches. The technique originated as a way to caramelize fruit and create a dramatic presentation without fancy decoration. The strawberry variation evolved as bakers experimented with seasonal fruits, offering a lighter, fresher alternative to the classic pineapple. The cake itself forms by pouring the batter over the fruit, and baking it upside-down allows the sugars and juices to meld into a luscious topping.
Conclusion
The Upside-Down Strawberry Cake is more than just a dessert—it’s a celebration of fruit, butter, and sweet nostalgia. Each slice is crowned with juicy, caramelized strawberries that glisten like jewels, while the cake beneath remains soft, moist, and comforting. Whether served warm with a dollop of whipped cream or cooled for a summer afternoon, this cake is a showstopper for family gatherings or a romantic treat for two.
Strawberry Lovers’ Notes
- Perfect for fresh strawberry season, but frozen berries can be substituted if needed (thawed and drained).
- Pair it with vanilla ice cream, whipped cream, or a drizzle of chocolate for the ultimate indulgence.
- Strawberry jam can be lightly brushed on top after flipping for extra shine.
If you want, I can also create a step-by-step visual method guide for this cake so even beginners can nail the caramelized strawberry layer perfectly. It would look like a professional bakery cake!
Do you want me to make that visual guide?