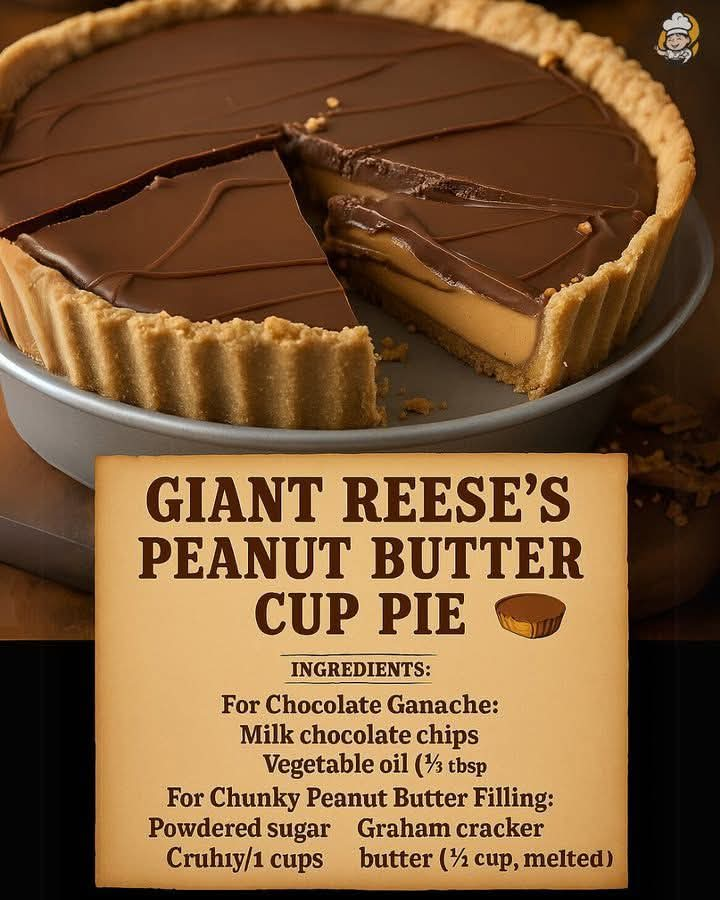
🥜🍫 Peanut Butter Chocolate Dream Bars
Thick. Smooth. Salty-sweet. Slice-it-cold perfection.
✨ Introduction
This one feels like sneaking a candy bar from the pantry — but better.
Thick peanut butter. Smooth chocolate. That perfect salty-sweet bite that melts slowly on your tongue.
When you slice it cold and those clean, beautiful layers hold together like magic? That’s the moment. It’s rich, nostalgic, and dangerously easy to love.
If you adore peanut butter desserts (I know you’re always baking something amazing!), this one might become a twice-a-week favorite like your Cloud Cake. 😉
🛒 Ingredients
For the Buttery Peanut Base
- 2 cups graham cracker crumbs (or crushed digestive biscuits)
- 1 cup creamy peanut butter
- ½ cup unsalted butter, melted
- 1 cup powdered sugar
- ½ teaspoon salt (optional, enhances flavor)
For the Peanut Butter Filling Layer
- 1 cup creamy peanut butter
- ¼ cup powdered sugar
- 2 tablespoons heavy cream (for smoothness)
- ½ teaspoon vanilla extract
For the Chocolate Topping
- 1½ cups semi-sweet chocolate chips
- 2 tablespoons peanut butter (for softer sliceable chocolate)
- 1 tablespoon butter (optional, for shine)
🥣 Instructions
Step 1: Prepare the Base
- In a large bowl, mix graham cracker crumbs, melted butter, peanut butter, powdered sugar, and salt.
- Stir until fully combined and thick like cookie dough.
- Press firmly into a lined 9×9-inch pan.
- Refrigerate for 20–30 minutes to set.
Step 2: Make the Creamy Peanut Layer
- In a separate bowl, mix peanut butter, powdered sugar, heavy cream, and vanilla.
- Beat until smooth and fluffy.
- Spread evenly over the chilled base.
- Return to fridge while preparing the chocolate.
Step 3: Create the Chocolate Top
- Melt chocolate chips with peanut butter (and butter if using) in the microwave in 30-second intervals, stirring between each.
- Pour over the peanut layer.
- Gently tilt pan to spread evenly.
Step 4: Chill to Perfection
Refrigerate at least 2–3 hours or until fully firm.
Slice cold with a sharp knife (wipe between cuts for clean edges).
🔥 Methods You Can Use
1️⃣ No-Bake Method (Classic & Easy)
Perfect for quick prep and pantry desserts.
2️⃣ Freezer-Set Method
Need it fast? Chill in freezer for 45–60 minutes.
3️⃣ Salted Candy Bar Style
Sprinkle flaky sea salt on top before chocolate sets for a gourmet touch.
4️⃣ Crunch Lovers Version
Add chopped peanuts or Rice Krispies to the base for texture.
📖 A Little History
Peanut butter and chocolate became iconic in the early 1900s when candy makers discovered how beautifully they complement each other. Think Reese’s Cups — that balance of sweet chocolate and salty peanut butter is pure American dessert magic.
Layered peanut butter bars became popular as a homemade version of candy bars — easier, bigger, and even more indulgent.
🧱 Formation (Why the Layers Work)
- Bottom Layer: Dense and slightly crumbly for structure.
- Middle Layer: Creamy, smooth, melt-in-your-mouth peanut richness.
- Top Layer: Firm chocolate shell that snaps gently when sliced cold.
Each layer balances sweetness, saltiness, and texture. That’s the magic.
💛 Why People Love This Dessert
- No baking required
- Only simple pantry ingredients
- Perfect for holidays & potlucks
- Tastes like a giant homemade candy bar
- Freezer-friendly
Peanut butter lovers? Obsessed.
Chocolate lovers? Hooked.
Sweet-and-salty fans? Completely done for.
🏁 Conclusion
This dessert doesn’t try to be fancy. It just shows up bold, rich, and irresistible.
Slice it cold. Watch the layers hold. Take that first bite.
It’s nostalgic. It’s indulgent. It’s the kind of treat you “accidentally” cut a second piece of.
Dangerously easy to love — and even easier to make. 🥜🍫
If you’d like, I can also give you a Death-by-Chocolate Peanut Butter version next time — extra thick, extra dramatic.