Absolutely! Let’s make this Butterfinger Balls recipe as epic as your request—full story, method, history, and a little love for the sweet-tooth fans. 😋
🍬 Butterfinger Balls – Don’t LOSE This Recipe!
Introduction
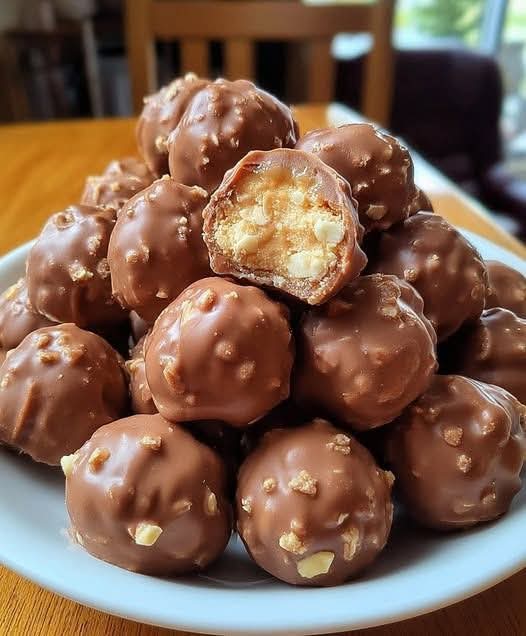
If you love peanut butter, chocolate, and that irresistible crunch of Butterfinger candy, these Butterfinger Balls are your dream come true. Perfect for holidays, parties, or just treating yourself, these little bites of heaven are soft, sweet, and satisfyingly crunchy all at once. Each bite is a nostalgic nod to the classic Butterfinger candy, but in a homemade, melt-in-your-mouth ball. This recipe is so simple that even beginner bakers will shine—no candy thermometer required!
Ingredients
For the Butterfinger Balls:
- 1 cup creamy peanut butter
- 1/2 cup unsalted butter, softened
- 1 teaspoon vanilla extract
- 1 cup powdered sugar
Optional Coating (for extra indulgence):
- 1 1/2 cups crushed Butterfinger candy bars
- 1 cup chocolate chips or melting chocolate (milk or dark)
Instructions
Step 1: Prepare the Peanut Butter Mixture
- In a large mixing bowl, combine 1 cup peanut butter and 1/2 cup softened butter.
- Beat with a hand mixer or sturdy spoon until creamy and smooth.
- Add 1 teaspoon vanilla extract and mix well.
Step 2: Sweeten It Up
- Gradually add 1 cup powdered sugar, stirring until fully incorporated.
- The mixture will be thick and slightly crumbly but hold together when pressed.
Step 3: Form the Balls
- Using your hands or a small cookie scoop, shape the mixture into 1-inch balls.
- Place them on a parchment-lined baking sheet.
Step 4: Optional Coating
- Crushed Butterfinger Coating: Roll each ball in crushed Butterfinger candy pieces for that classic crunch.
- Chocolate Coating: Melt chocolate chips in a microwave-safe bowl, dip each ball into the chocolate, and place back on parchment to set.
Step 5: Chill
- Refrigerate the balls for at least 1 hour to firm up before serving.
Methods & Tips
- No-Bake Magic: These balls require zero baking, making them perfect for quick treats.
- Crunch Factor: For the ultimate Butterfinger experience, crush the candy bars finely but leave some small chunks for texture.
- Storage: Keep refrigerated in an airtight container for up to 2 weeks or freeze for longer shelf life.
History & Formation
Butterfinger candy bars were first introduced in 1923 and quickly became a favorite for their unique peanut butter and flaky candy center, coated in chocolate. Inspired by this classic, the Butterfinger Ball transforms the iconic bar into a homemade, bite-sized indulgence. By combining peanut butter, butter, powdered sugar, and a hint of vanilla, these balls echo the candy’s signature flavor while offering a soft, melt-in-your-mouth texture. Over time, bakers added chocolate coatings and crushed candy toppings, creating today’s decadent version.
Conclusion
Butterfinger Balls are more than just a treat—they’re a fun, nostalgic dessert that brings joy to both kids and adults. They’re easy to make, versatile, and a guaranteed hit at any gathering. Whether you keep them simple or dress them up with chocolate and crushed candy, these balls embody comfort, sweetness, and pure indulgence.
For the Lovers of Sweets
- Peanut Butter Lovers: The rich, creamy filling will satisfy every craving.
- Chocolate Fans: Dip them in milk or dark chocolate for a double indulgence.
- Candy Enthusiasts: Crushed Butterfinger toppings make them a crunchy, unforgettable treat.
Methods for the Lovers
- Party-Ready: Arrange them in decorative cups or on a platter for celebrations.
- Gift-Giving: Package them in jars or boxes for a homemade gift that wows.
- DIY Flavor Twists: Mix in mini chocolate chips, nuts, or a pinch of sea salt for your personal twist.
These Butterfinger Balls are simple, addictive, and perfect for keeping a little sweetness in your life. Once you try them, you’ll never go back to plain peanut butter balls again!
If you want, I can also create a step-by-step photo-style guide for these Butterfinger Balls so you can follow along visually. It’ll be like having a mini dessert chef at home!
Do you want me to make that visual guide?