Creamy Milk Cake: A Simple, Timeless Delight
Introduction
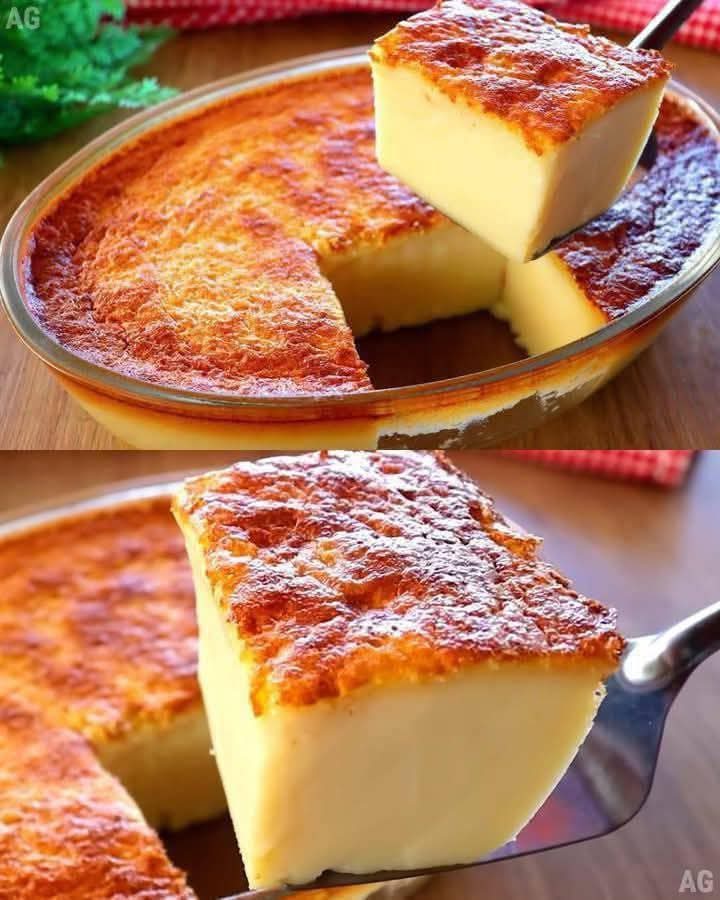
Creamy Milk Cake, often known as “Milk Cake” or “Kalakand,” is a beloved dessert that embodies the essence of comfort and simplicity. Originating from the Indian subcontinent, this sweet treat requires no oven, no complex techniques, and just a handful of pantry staples. It is a celebration of milk’s pure, rich flavor, transformed into a moist, grainy, and delightfully sweet cake that melts in your mouth. Perfect for festivals, tea-time snacks, or a homemade dessert, this recipe is a testament to how minimal ingredients can create maximum joy. I’m delighted to share this recipe with you—pass it on to spread the sweetness!
—
History & Cultural Significance
Milk Cake has deep roots in Indian culinary tradition, particularly in the northern regions. It is believed to have been invented in the state of Uttar Pradesh, with the city of Alwar being famously associated with its creation. Traditionally prepared during festivals like Diwali, Holi, and Raksha Bandhan, it symbolizes celebration and hospitality. The method of curdling milk with an acid (like lemon juice or vinegar) and then simmering it with sugar is an ancient technique used across many cultures to preserve milk and create sweets. Over time, this humble dessert has gained international popularity for its effortless preparation and addictive taste.
—
Benefits & Nutritional Profile
· Rich in Calcium: As a milk-based dessert, it is a good source of calcium, promoting bone health.
· Protein-Packed: Provides a moderate amount of protein from milk and paneer (if used).
· Energy Booster: The carbohydrates from sugar offer a quick energy lift.
· No Preservatives: Homemade means no artificial additives, making it a cleaner indulgence.
· Gluten-Free: Naturally gluten-free, suitable for those with gluten sensitivities.
Note: Due to its sugar content, it should be enjoyed in moderation as part of a balanced diet.
—
Formation & Science Behind the Dish
The Creamy Milk Cake forms through a simple scientific process:
1. Coagulation: Adding an acid (like lemon juice) to hot milk causes the casein proteins in milk to denature and coagulate, separating into curds (solids) and whey (liquid).
2. Moisture Reduction: Slow cooking the curds evaporates excess moisture, concentrating the milk solids.
3. Crystallization: Adding sugar and continuing to cook allows the sugar to dissolve and recrystallize slightly upon cooling, giving the cake its characteristic grainy yet creamy texture.
4. Setting: Allowing it to cool and set in a tray helps it firm up into sliceable pieces while retaining moisture.
—
Ingredients
(Makes a 8×8 inch cake, about 16 pieces)
· Full-fat milk – 2 liters / 8.5 cups
· Fresh lemon juice – 3-4 tablespoons (or white vinegar)
· Granulated sugar – 1 cup (adjust to taste)
· Ghee (clarified butter) or unsalted butter – 2 tablespoons
· Cardamom powder – 1 teaspoon (optional, for fragrance)
· Chopped nuts (pistachios, almonds) – for garnish
Optional add-ins:
· Saffron strands (a pinch, soaked in 1 tbsp warm milk)
· Rose water – 1 teaspoon
—
Equipment Needed
· Heavy-bottomed large pot or kadai
· Wooden spatula
· Sieve or muslin cloth
· 8×8 inch square tray or plate
· Parchment paper (optional)
—
Step-by-Step Instructions & Methods
Method 1: Traditional Stovetop Method (Most Common)
Step 1 – Curdling the Milk:
1. Pour the milk into a heavy-bottomed pot. Bring it to a boil over medium-high heat, stirring occasionally to prevent burning.
2. Once boiling, reduce heat to medium. Add lemon juice gradually, stirring gently. The milk will start to curdle, separating into white curds and greenish whey.
3. If it doesn’t separate completely, add a bit more lemon juice. Turn off the heat.
Step 2 – Draining the Curds:
1. Line a sieve with muslin cloth or a fine cheesecloth. Pour the curdled milk through it to separate the curds (chenna/paneer) from the whey.
2. Rinse the curds under cold water to remove any lemony taste. Gently squeeze out excess water—the curds should be moist but not dripping.
Step 3 – Cooking the Cake:
1. In the same pot, combine the drained curds and sugar. Cook over low heat, stirring continuously with a wooden spatula to avoid sticking.
2. Add ghee and cardamom powder (and saffron milk if using). The mixture will gradually thicken and start to leave the sides of the pot (about 15-20 minutes).
3. It’s ready when it forms a soft, cohesive mass and a slight sheen appears.
Step 4 – Setting & Garnishing:
1. Grease a tray with ghee or line it with parchment paper.
2. Transfer the hot mixture to the tray. Flatten evenly with a spatula or the back of a spoon.
3. Garnish generously with chopped nuts, pressing them lightly into the surface.
4. Allow it to cool completely at room temperature (about 2 hours), then refrigerate for 1-2 hours until firm.
Step 5 – Serving:
Cut into squares or diamonds.Serve chilled or at room temperature.
—
Method 2: Microwave Shortcut (Quick Version)
1. Use 500g of ready-made paneer (Indian cottage cheese), crumbled finely.
2. In a large microwave-safe bowl, mix crumbled paneer, 1 cup sugar, and 1/4 cup milk.
3. Microwave on high for 5 minutes, stir well. Repeat in 3-minute intervals, stirring each time, until the mixture thickens (about 12-15 minutes total).
4. Add cardamom and ghee, mix. Transfer to a tray, garnish, and cool.
—
Nutritional Information (Per Serving, approx. 1 piece)
· Calories: ~180 kcal
· Carbohydrates: 20g
· Protein: 6g
· Fat: 8g
· Calcium: 15% of Daily Value
· Sugar: 18g
—
For the Lovers of this Dessert…
If you adore creamy, milky sweets like fudge, cheesecake, or tres leches cake, this Milk Cake will steal your heart. Its texture is uniquely grainy yet smooth, rich yet not overly heavy. It pairs wonderfully with:
· A hot cup of masala chai or coffee.
· As a festive gift—wrap pieces in colorful foil.
· Topped with a scoop of vanilla ice cream for an indulgent twist.
· Served alongside fresh fruits like mango or berries for contrast.
—
Conclusion
Creamy Milk Cake is more than just a dessert; it’s a heartfelt expression of simplicity and tradition. With just six basic ingredients and a little patience, you can create a treat that delights the senses and brings people together. Whether you’re a novice cook or a seasoned chef, this recipe promises success and satisfaction. So, whip up a batch, share it with loved ones, and keep the chain of sweetness going. After all, the best things in life are simple, creamy, and made with love.
“I sent this recipe to you, and now you send it to another. Spread the joy, one creamy bite at a time!” 🍬✨