🍋 Lemon Meringue Cheesecake Recipe
Introduction:
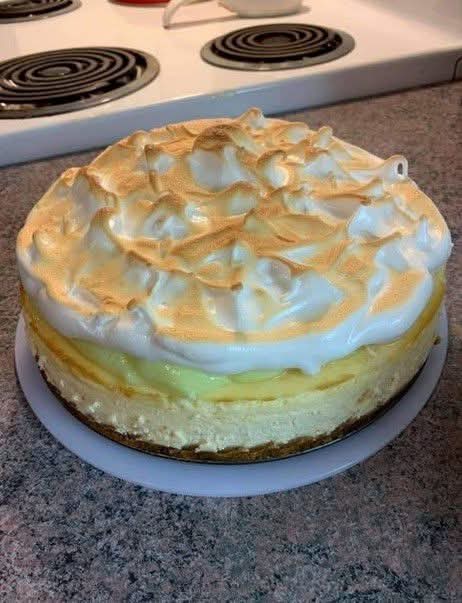
Lemon Meringue Cheesecake is a delightful fusion of two beloved desserts: the tart, zesty lemon meringue pie and the creamy, rich cheesecake. This decadent treat marries the refreshing zing of lemon with the silky texture of cheesecake and the airy, toasted meringue topping. With a buttery crust, creamy filling, and a delicate golden meringue crown, it’s the perfect showstopper for any occasion, from family dinners to festive gatherings. Whether you’re a fan of cheesecake or lemon meringue pie, this dessert will surely win your heart!
Ingredients:
For the Crust:
- 1 1/2 cups graham cracker crumbs
- 1/4 cup granulated sugar
- 1/2 teaspoon cinnamon (optional)
- 1/2 cup unsalted butter, melted
For the Cheesecake Filling:
- 3 packages (8 oz each) cream cheese, softened
- 1 cup granulated sugar
- 3 large eggs
- 1/2 cup sour cream
- 1 teaspoon vanilla extract
- 2 tablespoons all-purpose flour
- 1/2 cup lemon juice (freshly squeezed)
- Zest of 1 lemon
For the Lemon Curd:
- 1/2 cup fresh lemon juice
- 1 tablespoon lemon zest
- 1/4 cup unsalted butter
- 1/2 cup granulated sugar
- 2 large eggs
- 1 egg yolk
For the Meringue:
- 4 large egg whites
- 1/4 teaspoon cream of tartar
- 1/2 cup granulated sugar
Instructions:
Step 1: Prepare the Crust
- Preheat your oven to 325°F (165°C).
- In a medium bowl, combine the graham cracker crumbs, sugar, and cinnamon. Stir in the melted butter until everything is well combined and the crumbs are moistened.
- Press the mixture into the bottom of a 9-inch springform pan, ensuring the crust is evenly distributed. Use the back of a spoon to firmly pack it down.
- Bake for 8-10 minutes or until lightly golden. Remove from the oven and set aside to cool.
Step 2: Make the Cheesecake Filling
- In a large mixing bowl, beat the softened cream cheese until smooth and creamy.
- Add the sugar and beat until combined.
- Add the eggs one at a time, mixing after each addition. Scrape down the sides of the bowl to ensure everything is well incorporated.
- Add the sour cream, vanilla, flour, lemon juice, and lemon zest, and mix until smooth.
- Pour the cheesecake batter onto the cooled crust, spreading it evenly.
- Bake the cheesecake for 45-50 minutes at 325°F (165°C) or until the center is almost set but slightly jiggly.
- Turn off the oven and let the cheesecake cool for 1 hour. After that, refrigerate it for at least 4 hours or overnight.
Step 3: Make the Lemon Curd
- In a saucepan over medium heat, whisk together the lemon juice, zest, butter, and sugar until the butter melts and the sugar dissolves.
- In a separate bowl, whisk the eggs and egg yolk together.
- Slowly pour the lemon mixture into the egg mixture while whisking constantly to temper the eggs (this prevents curdling).
- Return the combined mixture to the saucepan and cook over medium-low heat, stirring constantly, until it thickens and coats the back of a spoon (about 5 minutes).
- Remove from heat, strain the curd through a fine-mesh sieve to remove any lumps, and let it cool to room temperature. Once cooled, spread the curd over the cheesecake layer.
Step 4: Make the Meringue
- In a clean bowl, beat the egg whites and cream of tartar on medium speed until soft peaks form.
- Gradually add the sugar, one tablespoon at a time, while continuing to beat until stiff peaks form.
- Spoon the meringue over the lemon curd, spreading it out evenly to cover the top of the cheesecake. Use a spatula to create little peaks and swirls.
Step 5: Toast the Meringue
- Preheat the broiler on your oven to high.
- Place the cheesecake under the broiler for 2-3 minutes or until the meringue is golden and toasted. Watch carefully, as it can burn quickly.
Step 6: Chill and Serve
- After the meringue is toasted, let the cheesecake cool at room temperature for 30 minutes, then refrigerate it for at least 2 hours before serving.
- Once chilled, remove the cheesecake from the springform pan, slice, and serve. Enjoy the perfect balance of tart lemon, creamy cheesecake, and fluffy meringue!
History of Lemon Meringue Cheesecake:
While Lemon Meringue Pie has been around since the late 18th century, the introduction of combining it with cheesecake is a more modern culinary creation. Cheesecake itself has ancient origins, dating back to Greece around 2,000 years ago, but its rich, dense, and creamy modern form took shape in New York in the early 20th century. By merging these two desserts—cheesecake and lemon meringue pie—home bakers and chefs have created a new twist on a classic. The result? A sophisticated dessert that appeals to fans of both tangy citrus and velvety creaminess, with a touch of whimsy from the meringue topping.
Formation and Lovers of the Lemon Meringue Cheesecake:
This Lemon Meringue Cheesecake will surely win the hearts of many—whether you’re a fan of tangy citrus or creamy desserts, there’s something for everyone in this dessert. The rich creaminess of the cheesecake balances perfectly with the tart lemon curd and the crispy, delicate meringue topping. It’s the perfect treat for anyone who loves layered, textured desserts that are both indulgent and refreshing.
Conclusion:
Lemon Meringue Cheesecake is the ultimate dessert for any special occasion—or simply when you’re craving a sweet treat that offers both decadence and a burst of citrus freshness. Its smooth cheesecake layer, tart lemon curd, and fluffy toasted meringue combine to create a masterpiece of flavor and texture. This dessert will impress both friends and family, and leave everyone coming back for seconds.
Lovers of this dessert will likely enjoy experimenting with different citrus fruits in place of lemon, such as lime or orange, to bring their unique twist to the classic. Whether you’re preparing it for a celebration or just because you love cheesecake, this recipe is sure to make you the star baker at your next gathering!
Let me know if you’d like any more details or tips on making it extra special!