Of course! Here is a comprehensive, in-depth look at the Old Fashioned Chocolate Pie with Golden Meringue, presented as a complete culinary guide.
—
Introduction: A Slice of American Comfort
The Old Fashioned Chocolate Pie is more than just a dessert; it is a edible heirloom, a testament to the comfort and warmth of home cooking. This pie, with its velvety, rich chocolate filling cradled in a flaky crust and crowned with a billowy, sun-kissed meringue, is a direct line to Sunday dinners, holiday gatherings, and grandmothers’ kitchens. It is unapologetically classic, relying not on complex techniques but on the pure, soul-satisfying harmony of its simple ingredients. This guide will not only provide you with the recipe to create this masterpiece but will also explore its history, its nuances, and the joy it brings to those who bake and eat it.
—
A Brief History: From Humble Pantry to Iconic Dessert
Chocolate pies have deep roots in the American South, where resourceful home cooks transformed basic pantry staples—flour, sugar, butter, eggs, and cocoa—into decadent treats. Before the widespread availability of baking chocolate, cocoa powder was the hero, offering a deep chocolate flavor that was both affordable and shelf-stable.
The “Old Fashioned” method refers to the cooked pudding-style filling, where ingredients are combined on the stovetop and thickened to a luscious custard. This technique dates back to a time when pies were a practical way to feed a family, with the meringue topping serving a dual purpose: it was a beautiful, impressive finish and a clever way to use up the egg whites left over from the yolk-based filling. The “Golden” color is the traditional goal, achieved by baking the meringue just until its peaks are toasted, a sign of a baker who knows their oven.
—
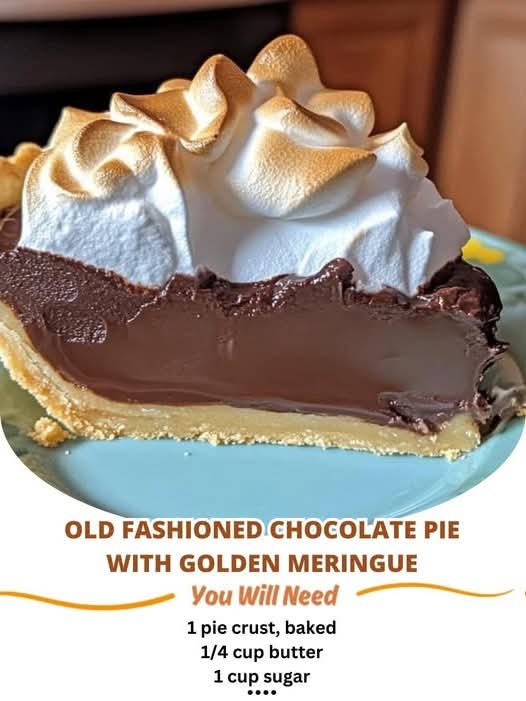
The Formation: Understanding the Components
A successful pie is built on the perfect balance of its three distinct components:
1. The Crust: The foundation. It must be sturdy enough to hold the filling, yet tender and flaky to provide a textural contrast.
2. The Filling: The heart. It should be smooth, intensely chocolatey, and set to a sliceable but creamy consistency.
3. The Meringue: The glory. It should be light, sweet, and ethereally soft, with beautifully browned peaks that offer a slight crunch.
Ingredients
For the Pie Crust (or use 1 store-bought, pre-baked 9-inch crust):
· 1 ¼ cups (150 g) all-purpose flour
· ½ teaspoon salt
· ½ cup (115 g) cold unsalted butter, cubed
· 3-4 tablespoons ice water
For the Old Fashioned Chocolate Filling:
· 1 ½ cups (300 g) granulated sugar
· ⅓ cup (35 g) cocoa powder, unsweetened (natural or Dutch-process)
· ¼ cup (30 g) all-purpose flour
· ¼ teaspoon salt
· 3 large egg yolks (save the whites for the meringue)
· 1 ½ cups (360 ml) whole milk
· 1 ½ cups (360 ml) evaporated milk (or use all whole milk for a slightly less rich filling)
· ¼ cup (60 g) unsalted butter, cut into pieces
· 1 teaspoon vanilla extract
For the Golden Meringue:
· 3 large egg whites, at room temperature
· ¼ teaspoon cream of tartar
· 6 tablespoons (75 g) granulated sugar
· ½ teaspoon vanilla extract
—
Instructions & Methods: A Labor of Love
Part 1: The Perfect Pie Crust
Method: Rubbing-In
1. Combine Dry Ingredients: In a large bowl, whisk together the flour and salt.
2. Cut in Butter: Add the cold, cubed butter. Using a pastry cutter, two forks, or your fingertips, work the butter into the flour until the mixture resembles coarse crumbs with some pea-sized pieces of butter remaining.
3. Add Water: Sprinkle the ice water, one tablespoon at a time, over the mixture. Gently mix with a fork until the dough just begins to clump together.
4. Form and Chill: Turn the dough out onto a lightly floured surface, gather it into a ball, and flatten into a disk. Wrap in plastic wrap and refrigerate for at least 30 minutes.
5. Roll and Bake: Preheat oven to 375°F (190°C). On a floured surface, roll the dough into a 12-inch circle. Carefully transfer to a 9-inch pie plate. Trim and crimp the edges. Prick the bottom and sides with a fork. Line with parchment paper or foil and fill with pie weights or dried beans.
6. Blind Bake: Bake for 15 minutes. Carefully remove the weights and parchment and bake for another 10-15 minutes, or until the crust is light golden brown and dry. Set aside to cool. Reduce oven temperature to 350°F (175°C) for the meringue.
Part 2: The Velvety Chocolate Filling
Method: Stovetop Custard
1. Whisk Dry Ingredients: In a medium saucepan, whisk together the sugar, cocoa powder, flour, and salt until no lumps remain.
2. Temper the Eggs: In a separate bowl, whisk the egg yolks. Gradually whisk in about ½ cup of the milk until smooth. This “tempers” the eggs, preventing them from scrambling when added to the hot mixture.
3. Combine and Cook: Pour the egg mixture, remaining milk, and evaporated milk into the saucepan with the dry ingredients. Whisk constantly over medium heat.
4. Thicken to Perfection: Continue cooking and whisking until the mixture comes to a low boil and thickens significantly, about 7-10 minutes. It should coat the back of a spoon.
5. Finish with Butter and Vanilla: Remove from heat. Whisk in the butter and vanilla extract until fully incorporated and the filling is smooth and glossy.
6. Assemble: Pour the hot filling directly into the pre-baked pie shell.
Part 3: The Billowy Golden Meringue
Method: French Meringue
1. Prepare Egg Whites: Ensure your bowl and beaters are impeccably clean and free of any grease. Place the room-temperature egg whites and cream of tartar in the bowl of a stand mixer (or a large metal bowl).
2. Whip to Soft Peaks: Beat on medium-high speed until soft peaks form—the peaks will curl over when the beaters are lifted.
3. Add Sugar Gradually: With the mixer running, add the sugar one tablespoon at a time. Continue beating until stiff, glossy peaks form and the sugar is dissolved (rub a bit between your fingers; it should not feel gritty). Beat in the vanilla.
4. Seal and Sculpt: Immediately pile the meringue onto the hot pie filling. Using a spatula, spread the meringue, making sure it touches the edges of the crust all around to prevent shrinking. Create decorative swirls and peaks with the back of a spoon.
5. Bake to Golden Brown: Bake at 350°F (175°C) for 10-15 minutes, or until the meringue peaks are a beautiful golden brown.
6. Cool Completely: This is crucial! Let the pie cool on a wire rack for at least 4 hours, or preferably overnight, to allow the filling to set properly before slicing.
—
Nutrition & Benefits: A Treat for the Soul
Let’s be clear: this is a celebratory dessert. Its primary benefits are for the spirit, not the physique.
· Nutritional Profile (Approximate per slice): High in carbohydrates and sugars, with moderate fat content. It provides a small amount of protein from the eggs and milk, and minerals like calcium and iron from the cocoa.
· The Benefit of Joy: The true “benefit” of this pie is the experience. The act of baking from scratch is a mindful, rewarding practice. Sharing this pie fosters connection, creates memories, and provides immense emotional satisfaction. It is a dessert to be savored on special occasions, reminding us of the simple, profound pleasure of a homemade treat.
—
For the Lovers of This Pie
This pie is not for the timid dessert-eater. It is for:
· The Nostalgic: Those who yearn for the taste of childhood and family traditions.
· The Chocolate Purist: Anyone who believes that chocolate’s depth needs no distraction—no nuts, no fruit, just pure, unadulterated cocoa bliss.
· The Texture Aficionado: Those who appreciate the divine contrast of a flaky crust, a silky filling, and a cloud-like meringue all in one bite.
· The Comfort Seeker: On a dreary day, a slice of this pie with a cup of black coffee is a warm, sweet hug in edible form.
Conclusion: An Enduring Classic
The Old Fashioned Chocolate Pie with Golden Meringue is a masterpiece of humble origins. It demands patience and care, but it rewards the baker with a creation that is far greater than the sum of its parts. It is a pie that tells a story with every slice—a story of tradition, of love, and of the timeless appeal of chocolate done right. So, preheat your oven, gather your ingredients, and prepare to create not just a dessert, but a memory.