Here is a BIG, BEAUTIFUL, FULL Ice Cream Sandwich Cake Recipe with introduction, history, ingredients, instructions, formation/methods, lovers, and conclusion.
Perfect for posting with “Full Recipe in Comment 💬👇”.
Copy and paste freely! 🍦🎂💕
🍨 Ice Cream Sandwich Cake
A Nostalgic Frozen Dessert — Full Story, Ingredients, Method & More
✨ Introduction
Ice cream sandwich cake is the kind of dessert that instantly takes you back to childhood—sticky fingers, backyard birthdays, and the pure joy of cold, creamy sweetness on a hot summer day. This no-bake treat is wonderfully simple yet indulgent, layering soft ice cream sandwiches with fluffy whipped topping and your favorite mix-ins.
Whether you’re hosting a celebration, craving a nostalgic dessert, or making something fun with the kids, this cake never fails to bring smiles and delicious memories.
📜 History of Ice Cream Sandwich Cake
The original ice cream sandwich dates back to the early 1900s, when street vendors sold slabs of ice cream between two wafers for just a penny. Over time, the treat evolved into the chocolate-cookie version we know today.
In the 1980s and 90s, creative home bakers began stacking store-bought sandwiches into “ice cream cakes,” adding whipped topping, chocolate drizzle, candies, and more. It became a legendary shortcut dessert—affordable, easy, and loved by kids and adults alike.
🍦 Ingredients
For the Cake Layers
- 12–16 ice cream sandwiches
- 1 large container whipped topping (Cool Whip or homemade)
- 1 cup chocolate syrup
- 1 cup caramel sauce (optional)
- 1 cup crushed Oreos or cookies
- ½ cup mini chocolate chips
- ½ cup sprinkles
- Optional flavor add-ins:
- chopped peanuts
- crushed candy bars
- toasted coconut
- sliced bananas or strawberries
For Homemade Whipped Cream (Optional)
- 2 cups heavy whipping cream
- ¼ cup powdered sugar
- 1 tsp vanilla extract
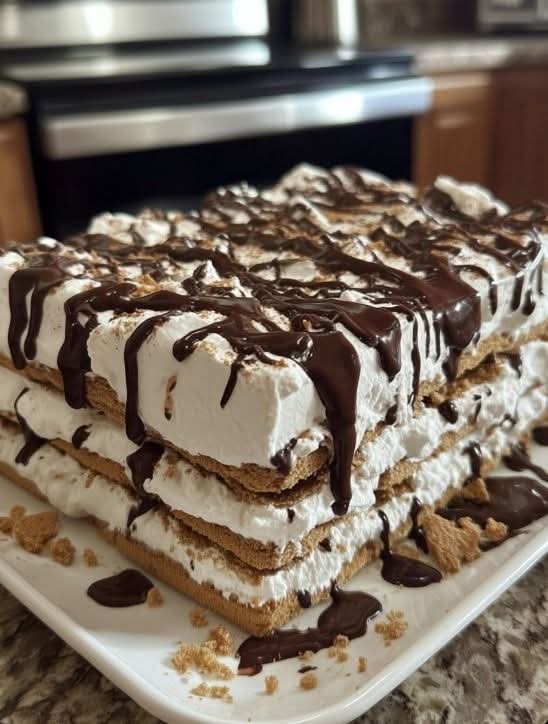
🔧 Formation / Prep Method
- Prepare a pan (9×13 works best).
- Layer ice cream sandwiches side by side to form base.
- Spread whipped topping over the sandwiches.
- Add mix-ins (cookies, chips, syrup).
- Repeat layers to build thickness.
- Freeze until firm before cutting.
- Decorate and serve chilled.
🍽️ Step-by-Step Instructions
➤ Step 1: Make Whipped Cream (Optional)
Beat heavy cream, sugar, and vanilla until stiff peaks form.
If using store-bought whipped topping, skip this step.
➤ Step 2: Build the Base Layer
Unwrap ice cream sandwiches and line them in your pan.
You may cut pieces to fill any gaps so the base is fully covered.
➤ Step 3: Add Whipped Layer
Spread a thick layer of whipped topping over the sandwiches.
➤ Step 4: Add Flavor Layers
Sprinkle crushed cookies, chocolate chips, or candies.
Drizzle chocolate syrup or caramel sauce across the top.
➤ Step 5: Add Second Layer of Sandwiches
Place another row of ice cream sandwiches over the toppings.
➤ Step 6: Top and Freeze
Cover with more whipped topping and a final drizzle of chocolate syrup.
Add sprinkles for a festive finish.
Freeze for at least 4 hours or overnight for best texture.
➤ Step 7: Serve
Cut into squares using a sharp knife.
Serve immediately and enjoy the nostalgia!
❤️ Lovers of This Dessert
This cake is adored by:
- Parents who made it for their kids
- Kids and teens who love cold, sweet treats
- Busy bakers who prefer no-bake desserts
- Birthday party hosts needing something fun and effortless
- Summer lovers who enjoy frozen recipes
- Sweet-tooth fans craving layers of flavor
- Nostalgia seekers who want a taste of childhood
🎉 Conclusion
This Ice Cream Sandwich Cake isn’t just a dessert—it’s a memory maker.
From backyard birthdays to summer celebrations, it brings sweetness, simplicity, and joy to every table. With no baking, no complicated steps, and endless customizable flavors, it’s a perfect treat for families, parties, and anyone looking for a delicious bite of nostalgia.
Serve it frozen, serve it smiling, and enjoy every creamy, dreamy bite. 🍦💛
If you want, I can also create:
✅ A short caption encouraging engagement
✅ A comment-ready “FULL RECIPE BELOW” version
✅ A version with emojis & viral style
Just tell me!