No-Bake Christmas Treats: A Festive Collection for the Holidays
The holidays are a magical time of year when kitchens fill with the delicious aromas of baking, and friends and family gather to enjoy sweet treats together. But what if you’re short on time, or don’t want to heat up the oven? No worries! No-bake Christmas treats are just as festive, fun to make, and equally delicious. These treats are perfect for holiday parties, gift-giving, or enjoying as a cozy snack by the fire.
In this post, I’m sharing a big collection of no-bake Christmas treats. They’re easy to whip up, require minimal ingredients, and will surely bring some festive cheer to your holiday season.
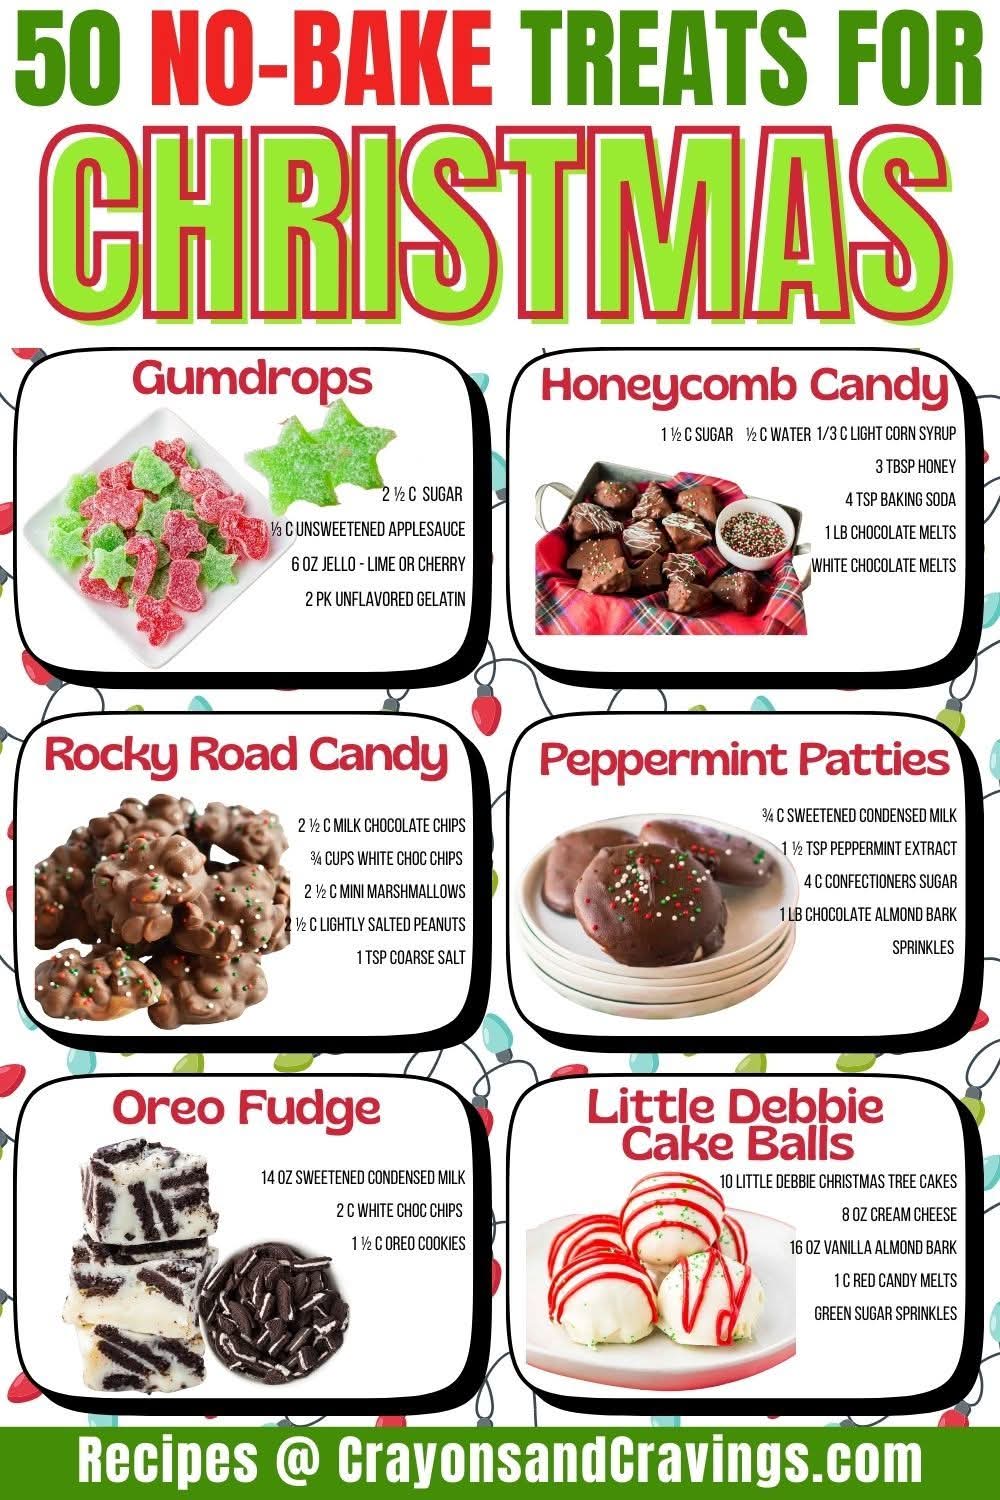
1. Gumdrops
Ingredients:
- 3 cups of sugar
- 2 cups of water
- 3 tablespoons of unflavored gelatin
- 1 teaspoon of citric acid (for a tart flavor, optional)
- Food coloring (red, green, yellow, orange)
- Powdered sugar for dusting
Instructions:
- Prepare the gelatin: In a small bowl, mix the gelatin with 1/2 cup of water. Set it aside to bloom for about 5 minutes.
- Make the sugar syrup: In a medium saucepan, combine 2 cups of water and 3 cups of sugar. Heat over medium heat, stirring until the sugar dissolves completely.
- Add gelatin: Once the sugar syrup is hot, add the bloomed gelatin and stir until fully dissolved.
- Add food coloring and citric acid: If using citric acid, add it now, along with your desired food coloring. You can make different colors in separate batches, or combine them for a rainbow effect.
- Set the gumdrops: Pour the syrup into a baking dish lined with parchment paper, and let it sit at room temperature for about 2 hours until it firms up.
- Cut and coat: Once the mixture is firm, cut it into small squares or use cookie cutters to form shapes. Dust with powdered sugar to prevent sticking.
History:
Gumdrops have been a holiday treat for generations, particularly in the early 1900s. They were often used in holiday centerpieces or as a colorful addition to baked goods, embodying the cheerful, festive spirit of Christmas.
Method Tip:
To make your gumdrops extra festive, you can dip them in melted chocolate for a rich, sweet contrast to the fruity flavor.
2. Honeycomb Candy
Ingredients:
- 1 cup of granulated sugar
- 1/4 cup of light corn syrup
- 1 teaspoon of baking soda
- 1 teaspoon of vanilla extract
- 1/4 cup of water
- 1/4 teaspoon of salt
Instructions:
- Prepare the pan: Line a baking sheet with parchment paper or silicone mat. Set it aside.
- Cook the sugar mixture: In a medium saucepan, combine sugar, corn syrup, water, and salt. Heat over medium heat, stirring until the sugar dissolves. Allow it to come to a boil, and cook for 3-4 minutes.
- Add baking soda: Remove the pan from heat and quickly stir in the baking soda. The mixture will bubble up.
- Cool the candy: Immediately pour the bubbling candy onto your prepared baking sheet. Let it sit for about 15-20 minutes until it hardens and cools completely.
- Break into pieces: Once cooled, break the honeycomb into chunks or use a hammer to crack it into smaller pieces.
History:
Honeycomb candy dates back to ancient times, when the process of caramelizing sugar with a leavening agent was first discovered. Over the years, it evolved into the crisp, airy treat we know today, and it’s often enjoyed during the holiday season in various forms.
Method Tip:
For a festive twist, dip the honeycomb pieces in melted chocolate and sprinkle with crushed peppermint or festive sprinkles.
3. Rocky Road Candy
Ingredients:
- 1 1/2 cups of semi-sweet chocolate chips
- 1/2 cup of peanut butter
- 1 cup of mini marshmallows
- 1/2 cup of chopped walnuts or almonds
- 1/4 cup of dried cranberries (optional)
Instructions:
- Melt the chocolate: In a microwave-safe bowl, melt the chocolate chips and peanut butter together in 30-second intervals, stirring until smooth.
- Add mix-ins: Stir in the mini marshmallows, nuts, and dried cranberries if using.
- Chill: Spread the mixture evenly onto a parchment-lined baking sheet. Refrigerate for 2-3 hours until set.
- Cut into squares: Once set, cut the rocky road candy into squares or bite-sized pieces.
History:
Rocky Road candy was created in the early 20th century, inspired by the idea of “rocky roads” or difficult journeys. Its origins are credited to the creation of rocky road ice cream by William Dreyer in 1929, who added marshmallows and nuts to chocolate ice cream. This inspired the creation of a similar candy treat.
Method Tip:
Feel free to add more seasonal mix-ins like pretzels, crushed peppermint, or even toffee bits for extra holiday flair.
4. Peppermint Patties
Ingredients:
- 1 1/2 cups of powdered sugar
- 1 tablespoon of corn syrup
- 1/2 teaspoon of peppermint extract
- 1 tablespoon of water
- 1 1/2 cups of dark chocolate chips
- 1 tablespoon of coconut oil
Instructions:
- Make the filling: In a bowl, mix together powdered sugar, corn syrup, peppermint extract, and water until smooth. Shape the mixture into small rounds and set them on parchment paper.
- Chill: Refrigerate the patties for 30 minutes to firm up.
- Coat with chocolate: In a microwave-safe bowl, melt the chocolate chips and coconut oil together in 30-second intervals until smooth. Dip each peppermint patty into the chocolate to coat it completely.
- Chill again: Place the coated patties back on the parchment and refrigerate until the chocolate hardens, about 1 hour.
History:
Peppermint patties were first popularized in the 1940s, with York Peppermint Patties becoming an iconic treat in the 1940s. These candies are a perfect combination of creamy peppermint filling and dark chocolate, which has remained a beloved flavor pairing for generations.
Method Tip:
To make them extra festive, sprinkle the patties with crushed candy canes before the chocolate sets.
5. Oreo Fudge
Ingredients:
- 2 cups of white chocolate chips
- 1/4 cup of sweetened condensed milk
- 1 cup of crushed Oreo cookies
- 1/4 teaspoon of vanilla extract
Instructions:
- Melt the white chocolate: In a microwave-safe bowl, melt the white chocolate chips and sweetened condensed milk together in 30-second intervals until smooth.
- Add Oreo cookies: Stir in the crushed Oreos and vanilla extract until combined.
- Chill: Pour the mixture into a lined 8×8-inch baking dish, spreading it evenly. Refrigerate for 2-3 hours until set.
- Cut into squares: Once the fudge is set, cut it into small squares and serve.
History:
Oreo cookies have been a staple in American homes since 1912, and they have become a popular addition to many dessert recipes. This no-bake fudge is a simple yet indulgent treat that brings the beloved flavor of Oreos into a holiday-friendly dessert.
Method Tip:
For added flavor and texture, mix in a handful of mini chocolate chips along with the Oreos.
6. Little Debbie Cake Balls
Ingredients:
- 1 box of Little Debbie Christmas Tree Cakes (or other snack cakes)
- 8 oz cream cheese, softened
- 2 cups of white chocolate chips
- Sprinkles or holiday-themed decor
Instructions:
- Prepare the cake balls: Crumble the Little Debbie cakes into a bowl, and add the softened cream cheese. Mix until smooth and well combined.
- Form into balls: Roll the mixture into small bite-sized balls and place them on a baking sheet lined with parchment paper. Chill for at least 1 hour.
- Coat with chocolate: Melt the white chocolate chips in a microwave-safe bowl in 30-second intervals. Dip each cake ball into the chocolate, covering it completely.
- Decorate: Place the cake balls back on the parchment and top with sprinkles or festive decor before the chocolate hardens.
History:
Little Debbie snacks have been a favorite of many for decades, and cake balls have become a fun and easy way to turn these iconic treats into something even more festive. This no-bake version is perfect for holiday gatherings.
Conclusion:
No-bake Christmas treats are a great way to get in the holiday spirit without spending too much time in the kitchen. Whether you’re making gumdrops, rocky road candy, or peppermint patties, these easy-to-make treats will bring smiles to the faces of friends and family. The beauty of these treats lies in their versatility—customize them with your favorite mix-ins and decorations, and they’ll be perfect for every occasion. These sweet delights are a great way to spread some holiday cheer, share with loved ones