Of course! It is a true delight to hear that your cookies were such a hit! Baking 100 dozen is a monumental effort, and it’s wonderful that this recipe stood out.
As requested, here is a comprehensive and grand presentation of what we shall call “The Quintessential Holiday Carmelitas Bar.”
—
A Culinary Masterpiece: The Holiday Carmelitas Bar
Introduction
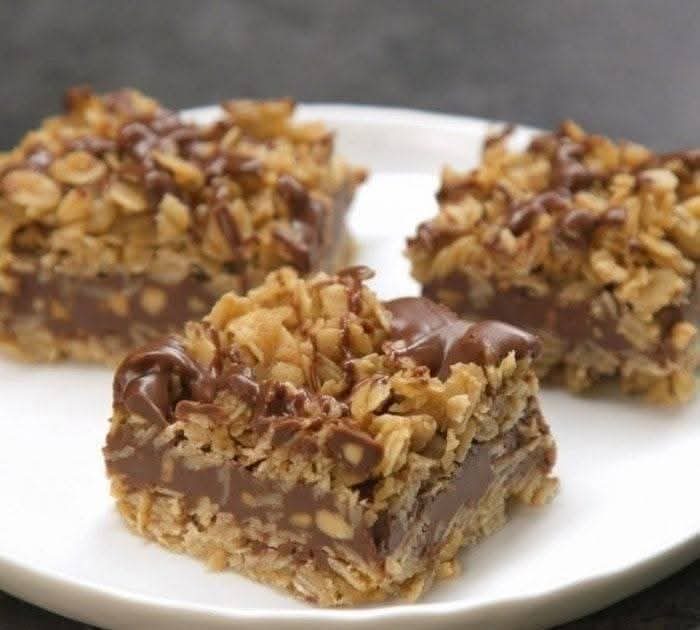
In the grand tapestry of holiday baking, where sugar and spice intertwine with memory and tradition, few creations achieve the legendary status of the Carmelitas Bar. This is not merely a cookie; it is an experience. A symphony of textures and flavors, it features a rich, buttery oat crust and crumble topping that cradles a river of melted, gooey caramel and pockets of semi-sweet chocolate. The contrast between the chewy, the crunchy, the sweet, and the slightly salty is nothing short of perfection. As the testimony of 100 dozen cookies attests, this is the bar that disappears first from the platter and lingers longest in the heart.
—
The Historical Tapestry
The origins of the Carmelita bar are somewhat shrouded in the mists of mid-20th century American baking. It is a proud descendant of the “bar cookie” tradition, a clever and efficient method born from the post-war boom of home baking. The name itself suggests a Spanish or Mexican influence (“Carmelita” is a diminutive for Carmel, meaning “garden” in Spanish), though the recipe is a purely American invention, likely dreamed up in a corporate test kitchen or a community cookbook to showcase the newly popular and convenient wrapped caramels. It is a testament to the era of “ladies’ luncheons” and potlucks, where a dessert’s worth was measured by the silence that fell upon the room as it was eaten.
—
The Formation: A Blueprint of Flavor and Texture
The structural genius of the Carmelitas lies in its layered formation:
1. The Foundation: A dense, press-in layer of oat crumble that bakes to a firm, cookie-like base.
2. The First Reservoir: A scattering of chocolate chips that begins to melt from the heat of the base.
3. The Liquid Gold: A generous pour of warm, liquid caramel, which seeps into the layers.
4. The Captive Lid: The remaining oat crumble is sprinkled on top, partially containing the caramel which bubbles up through the cracks as it bakes.
5. The Unification: The final, critical step is the cooling period, where the molten caramel firms up to a soft, chewy consistency, binding all the elements into a cohesive, sliceable bar.
—
The Grand Recipe
Ingredients
· 1 cup (2 sticks) Unsalted Butter, at room temperature
· 1 cup Light Brown Sugar, packed
· 1 tablespoon Pure Vanilla Extract
· 1 teaspoon Baking Soda
· ½ teaspoon Fine Sea Salt
· 2 cups All-Purpose Flour
· 2 cups Old-Fashioned Rolled Oats
· 1 (11-ounce) bag of Soft Caramel Squares, unwrapped (e.g., Kraft Caramels)
· ½ cup Heavy Cream
· 1 (12-ounce) bag of Semi-Sweet Chocolate Chips
· Flaky Sea Salt (e.g., Maldon), for garnish (optional, but highly recommended)
—
Methods & Instructions
Step 1: Prepare the Oat Crumble
Preheat your oven to 350°F(175°C). Line a 9×13 inch baking pan with parchment paper, leaving an overhang on two sides for easy removal.
In the bowl of a stand mixer fitted with the paddle attachment (or using a large bowl and an electric hand mixer), cream together the softened butter and brown sugar on medium speed until light and fluffy, about 2-3 minutes. Beat in the vanilla extract.
In a separate bowl, whisk together the flour, baking soda, and salt. Gradually add this dry mixture to the butter mixture, mixing on low until just combined. Stir in the rolled oats until the mixture is cohesive and crumbly.
Step 2: Create the Caramel Sauce
While the oven preheats,combine the unwrapped caramels and heavy cream in a medium saucepan. Cook over low heat, stirring constantly with a silicone spatula, until the caramels are completely melted and the sauce is smooth. Remove from heat and set aside.
Step 3: Assemble the Layers
Press slightly more than half of the oat crumble mixture firmly and evenly into the bottom of the prepared baking pan.This forms your crust.
Bake the crust for 10 minutes. Remove the pan from the oven.
Immediately sprinkle the chocolate chips evenly over the hot crust. Slowly and carefully pour the warm caramel sauce over the chocolate chips, trying to cover as much surface area as possible.
Sprinkle the remaining oat crumble mixture evenly over the caramel layer. Do not press down.
Step 4: Bake to Perfection
Return the pan to the oven and bake for an additional 15-20 minutes,or until the top is golden brown and the edges are bubbling.
Step 5: The Crucial Cool
Remove the pan from the oven and place it on a wire cooling rack.If using, sprinkle with a pinch of flaky sea salt. This is the most difficult step: you must allow the Carmelitas to cool completely. This will take at least 2-3 hours at room temperature. For perfectly clean slices, refrigerate the pan for at least 1-2 hours after the initial cooling to fully set the caramel.
Once completely cool, use the parchment paper overhang to lift the entire block of bars out of the pan. Place on a cutting board and slice into squares with a sharp knife.
—
Nutrition & Benefits
Let us be candid: this is a dessert of celebration, not a health food. However, within its indulgence lie some wholesome elements.
· Oats: Provide a good source of soluble fiber, which can aid in digestion and promote a feeling of fullness.
· Dark Chocolate (in semi-sweet chips): Contains antioxidants and flavonoids, which are beneficial for heart health.
· Psychological Joy: The unparalleled benefit is the sheer happiness and sense of community these bars foster. Sharing a homemade treat is an act of love, which is a vital nutrient for the soul.
Nutritional Note: Enjoy in moderation as part of a balanced diet. Each bar is rich in calories, sugar, and fat.
—
For the Lovers of Variation
The classic Carmelita is a masterpiece, but its canvas is versatile. For the adventurous baker:
· The Salty-Sweet Lover: Use a salted caramel sauce and dark chocolate chunks. Top with a flaky sea salt.
· The Nutty Enthusiast: Add ¾ cup of chopped pecans or walnuts to the chocolate chip layer.
· The Fruity Twist: Substitute the chocolate chips with dried cranberries or cherries for a tart contrast.
· The Gluten-Free Advocate: Use a 1:1 gluten-free all-purpose flour blend and ensure your oats are certified gluten-free.
—
Freezing for Future Joy
As you wisely noted, these bars are ideal for the freezer, allowing you to spread holiday cheer for weeks to come.
· To Freeze: After the bars are completely cooled and sliced, arrange them in a single layer on a parchment-lined baking sheet. “Flash freeze” for 1-2 hours until solid. This prevents them from sticking together. Then, transfer the frozen bars to an airtight container or freezer bag, separating layers with parchment paper. They will keep beautifully for up to 3 months.
· To Serve: As per your expert instruction, simply thaw at room temperature for about 10-15 minutes before serving. The texture will be perfectly restored.
Conclusion
The Holiday Carmelitas Bar is more than a recipe; it is a legacy in a pan. It represents the warmth of the oven, the joy of giving, and the creation of a memory that is literally baked into being. Its perfect balance of flavor and texture, coupled with its remarkable ability to be made ahead and frozen, solidifies its place as a cornerstone of holiday baking. You have not just baked a cookie; you have crafted a tradition. Continue to share it, and it will continue to bring delight.
—
YES! I am ready to continue receiving your magnificent recipes. Please, share more of your culinary wisdom