Of course! Here is a comprehensive, large-format recipe for CRISPY CHICKEN STRIPS, crafted to include all the elements you requested.
—
A Culinary Journey to Crispy Perfection: The Ultimate Chicken Strip Recipe 🍗✨
The chicken strip is more than just a meal; it’s a universal language of comfort and joy. Beloved by children and adults alike, it represents the perfect intersection of simplicity and sublime texture. A truly great chicken strip boasts a shatteringly crisp, golden-brown exterior that gives way to a tender, juicy, and perfectly seasoned interior. This recipe is designed to achieve just that, using a combination of classic techniques and smart tips to ensure foolproof results every time. We’ll explore its history, its undeniable appeal, and why making them at home is a game-changer.
—
Ingredients & Formation
For the Chicken and Marinade:
· 1.5 lbs (approx. 700g) boneless, skinless chicken breasts or tenders 🍗
· 1 cup buttermilk 🥛
· 1 tsp hot sauce (e.g., Tabasco) 🌶️
· 1 tsp salt
· 1/2 tsp black pepper
· 1/2 tsp paprika
For the Dredging Station:
· 1.5 cups all-purpose flour 🌾
· 1/2 cup cornstarch (the secret for extra crispiness!)
· 2 tsp garlic powder
· 2 tsp onion powder
· 1 tsp smoked paprika (for color and depth)
· 1 tsp baking powder (another crispiness secret!)
· 1 tbsp seasoned salt (e.g., Lawry’s)
· 1 tsp black pepper
· Wet Hand/Dry Hand Tip: Keep one hand for handling the wet chicken and the other for the dry flour. This prevents your fingers from becoming a clumpy mess!
For Frying:
· 4 cups neutral oil for frying (canola, vegetable, or peanut oil work best) ⚱️
For Serving (The Lovers’ Platter):
· Honey Mustard (Mix 1/4 cup mayo, 2 tbsp yellow mustard, 1 tbsp Dijon mustard, 1 tbsp honey)
· Barbecue Sauce 🍯
· Ranch Dressing 🌿
· Classic Ketchup 🍅
· Celery sticks and carrot sticks for a fresh crunch 🥒🥕
—
Instructions & Methods
Method 1: The Double-Dredge (The Gold Standard for Crispiness)
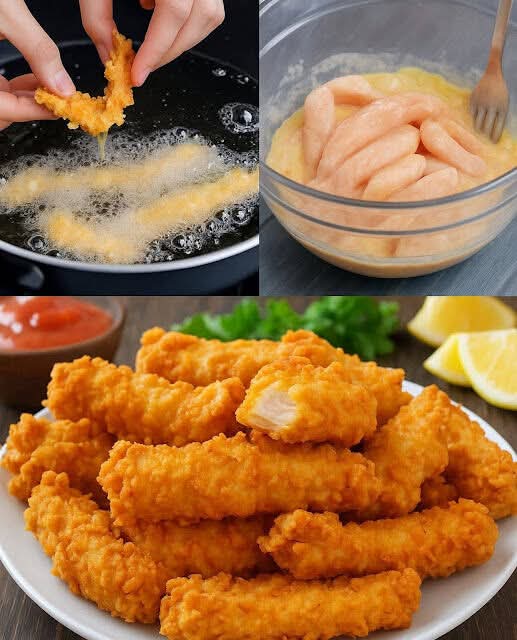
1. Preparation and Marination: Cut the chicken breasts into 1-inch thick strips. In a bowl, whisk together the buttermilk, hot sauce, salt, pepper, and paprika. Submerge the chicken strips in the mixture, ensuring they are fully coated. Cover and refrigerate for at least 30 minutes, or ideally up to 4 hours. This step is crucial for tender, flavorful chicken.
2. Create the Dredging Station: In a large, shallow bowl or plate, whisk together the all-purpose flour, cornstarch, garlic powder, onion powder, smoked paprika, baking powder, seasoned salt, and black pepper. This is your “dry mix.”
3. The Dredging Process: Remove one strip of chicken from the buttermilk, allowing the excess to drip off. Place it in the flour mixture and coat thoroughly. Press the flour into the chicken to ensure good adhesion. For an extra-thick, crispy crust, you can do a double-dredge: dip the flour-coated strip back into the buttermilk for a second, then back into the flour mixture for a final coat. Place the coated strips on a wire rack set over a baking sheet. Let them rest for 5-10 minutes before frying. This helps the coating set and adhere better.
4. Frying to Perfection: In a large, heavy-bottomed pot or Dutch oven, heat the oil to 350°F (175°C). Use a cooking thermometer for accuracy. Carefully lower 4-5 chicken strips into the hot oil using tongs, avoiding overcrowding the pot. Fry for 3-5 minutes per side, until deeply golden brown and crispy. The internal temperature should reach 165°F (74°C).
5. Draining is Key: Remove the strips from the oil and place them back on the wire rack. Do not drain on paper towels, as this can make the bottom side soggy. The rack allows air to circulate, keeping the entire strip crispy. Sprinkle with a little fine salt while they are still hot.
Method 2: The Oven-Baked Alternative (A Lighter Approach)
For a healthier version, preheat your oven to 425°F (220°C). After dredging, place the chicken strips on a wire rack set over a baking sheet. Spray or lightly brush the strips with oil. Bake for 15-20 minutes, flip, and bake for another 10-15 minutes, or until crispy and cooked through.
—
A Brief History
The chicken strip is a descendant of the Southern-fried chicken tradition, which has roots in West African and Scottish culinary practices. While fried chicken pieces have been around for centuries, the specific “finger-food” strip gained mass popularity in the latter half of the 20th century. It became a staple on family restaurant menus, in fast-food chains, and in frozen food aisles, cementing its status as a quintessential American comfort food that has since been embraced worldwide.
—
Nutrition & Benefits
Nutrient (Approx. per serving – 3-4 strips) Amount
Calories 350-450 kcal
Protein 35-40g (Excellent source for muscle repair)
Carbohydrates 25-30g
Fat 12-15g (Varies with frying method)
Benefits:
· High-Quality Protein: Chicken is an excellent source of lean protein, essential for building and repairing tissues, and for keeping you full and satisfied.
· Control Over Ingredients: Homemade strips allow you to control the sodium levels and oil quality, a significant advantage over most restaurant or frozen versions.
· Versatility: They can be baked for a lower-fat option or air-fried for a crispier result with less oil.
—
Conclusion for Lovers of Good Food
In conclusion, the humble chicken strip is a canvas for culinary creativity and a testament to the power of simple, well-executed techniques. For the true lovers of crunchy, savory, and satisfying food, mastering this recipe is a rite of passage. It’s perfect for game-day gatherings, a fun family dinner, or when a craving for something deliciously crispy strikes. By understanding the “why” behind each step—the tenderizing buttermilk marinade, the crisp-enhancing cornstarch and baking powder, the crucial resting period—you elevate a simple snack into a gourmet-level experience.
So, gather your ingredients, embrace the messy fun of the dredging station, and get ready to create the crispiest, most flavorful chicken strips of your life. Enjoy! 😋👇💬