Absolutely! Let’s create a full, detailed, “big” doughnut recipe for you, with all the elements you requested. Here’s an expanded version:
Homemade Soft and Fluffy Doughnuts 🍩
Introduction
There’s nothing quite like the smell of fresh doughnuts wafting through your kitchen. Soft, fluffy, and lightly sweet, homemade doughnuts are a treat that bring back memories of childhood breakfasts and festive celebrations. Whether dipped in chocolate, coated in sugar, or left plain, these doughnuts are perfect for sharing with family and friends—or indulging all by yourself! This recipe is simple enough for beginners but delicious enough to impress seasoned bakers.
Ingredients
- 3 cups all-purpose flour
- 2 tablespoons unsalted butter, softened
- 7 grams (1 packet) baker’s yeast
- 5 tablespoons granulated sugar
- 1 cup warm milk (around 110°F / 45°C)
- 1 large egg
- ½ teaspoon salt
- Oil for frying (vegetable or canola)
- Optional toppings: powdered sugar, cinnamon sugar, melted chocolate, sprinkles
Instructions
Step 1: Activate the Yeast
- Warm the milk slightly (should be warm, not hot).
- In a small bowl, mix the milk with 1 tablespoon of sugar and the yeast. Let it sit for 5–10 minutes until frothy.
Step 2: Prepare the Dough
- In a large mixing bowl, combine the flour, remaining sugar, and salt.
- Add the egg, softened butter, and the activated yeast mixture.
- Mix until a sticky dough forms, then knead on a floured surface for 8–10 minutes until smooth and elastic.
Step 3: First Rise
- Place the dough in a lightly greased bowl and cover with a clean kitchen towel.
- Let it rise in a warm place for 1–2 hours, or until doubled in size.
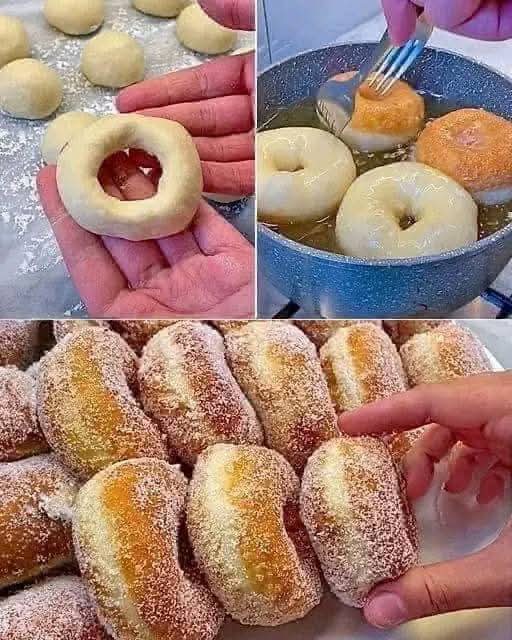
Step 4: Shape the Doughnuts
- Punch down the dough gently to release air.
- Roll it out to about ½ inch thickness.
- Use a doughnut cutter (or two round cutters, one large and one small) to shape your doughnuts.
- Place them on a lightly floured tray, cover, and let rise for another 30–40 minutes.
Step 5: Fry the Doughnuts
- Heat oil in a deep fryer or large pot to 350°F (175°C).
- Fry doughnuts a few at a time, 1–2 minutes per side, until golden brown.
- Remove with a slotted spoon and drain on paper towels.
Step 6: Add Toppings
- Roll in sugar or cinnamon sugar while still warm, or drizzle with melted chocolate and add sprinkles.
History
Doughnuts trace their origins back to early Dutch settlers in America, who made “olykoeks,” or oily cakes. Over time, the classic ring shape with a hole in the middle emerged, becoming the iconic doughnut we love today. Originally a simple fried treat, doughnuts have evolved into countless varieties, from jelly-filled to glazed and everything in between.
Benefits
While doughnuts are considered a treat, making them at home allows you to:
- Control ingredients (less preservatives than store-bought)
- Customize toppings and flavors
- Share a fun cooking activity with family and friends
Formation
- Mixing the dough well ensures a smooth, elastic texture.
- Letting the dough rise properly creates the soft, fluffy interior.
- Frying at the right temperature ensures a golden exterior without being greasy.
Nutrition (Approximate per doughnut, plain, 70g)
- Calories: 200–220 kcal
- Carbohydrates: 28g
- Protein: 4g
- Fat: 8g
- Sugar: 7g
- Fiber: 1g
Conclusion
Homemade doughnuts are a labor of love that reward your patience with golden, pillowy perfection. They’re perfect for breakfast, dessert, or anytime you want a little sweet indulgence.
Lovers’ Tip
- Pair warm doughnuts with coffee, hot chocolate, or a glass of cold milk.
- Experiment with fillings like jam, custard, or Nutella to delight your loved ones.
Extra Methods for Creativity
- Baked Doughnuts: Reduce oil by baking in a doughnut pan at 375°F (190°C) for 10–12 minutes.
- Flavor Variations: Add vanilla, nutmeg, or orange zest to the dough for extra aroma.
- Toppings: Glaze with lemon, maple, or chocolate icing; sprinkle with nuts or coconut.
Doughnuts aren’t just food—they’re joy, nostalgia, and a little indulgence rolled into one. Make a batch, share them, and watch smiles appear instantly.
If you want, I can also make a visually formatted recipe card with pictures for each step to make it look like a professional cookbook page.
Do you want me to do that?