Sure! Here’s your BIG, indulgent Butterfinger Pie recipe — with everything from history and formation to lovers of this treat, and every creamy, crunchy step in between. 🍫🥜🥧
Butterfinger Pie Recipe: A Crunchy-Creamy No-Bake Delight
🍰 Introduction
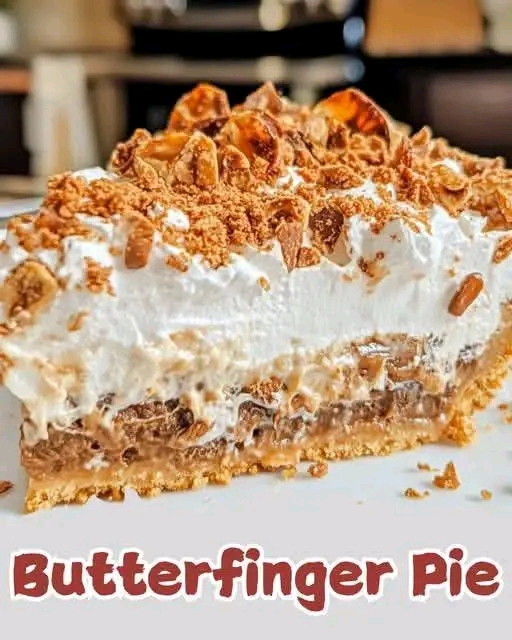
Butterfinger Pie is the ultimate dessert for lovers of creamy peanut butter, chocolate, and candy-crunch decadence. This no-bake pie is a crowd favorite at potlucks, family reunions, and cozy weekends in. It combines the rich flavors of whipped cream, sweet cream cheese, and crushed Butterfinger bars for a texture that’s smooth, fluffy, and crunchy all at once.
Perfect for peanut butter enthusiasts and nostalgic candy lovers, this pie is effortless to make and impossible to forget.
🍫 History of Butterfinger Pie
The Butterfinger candy bar was invented in 1923 by the Curtiss Candy Company in Chicago and was promoted with one of the first ever candy bar marketing stunts — dropping bars from airplanes. Since then, the crispety-crunchety peanut buttery bar has earned its spot in American candy lore.
Butterfinger Pie began appearing in home kitchens in the 1970s and ’80s, especially as no-bake desserts became popular. With the rise of whipped topping, pre-made crusts, and easy recipes, this pie became a staple of potlucks, church dinners, and dessert buffets.
🧁 Ingredients
- 1 package (8 oz) cream cheese, softened
- 1 container (8 oz) whipped topping (like Cool Whip)
- 1 cup powdered sugar
- ½ cup creamy peanut butter
- 3 Butterfinger candy bars (full-size), crushed (reserve a bit for topping)
- 1 pre-made graham cracker crust (9-inch)
- ½ tsp vanilla extract
- Optional garnish: whipped cream, chocolate drizzle, extra Butterfinger crumbles
🍴 Instructions & Method
🔹 Step 1: Make the Filling
- In a large mixing bowl, beat the softened cream cheese until smooth and creamy.
- Add in the powdered sugar, peanut butter, and vanilla extract. Beat until well blended and fluffy.
- Fold in the whipped topping gently until fully combined and light in texture.
🔹 Step 2: Add the Butterfinger Magic
- Crush the Butterfinger bars (either in a ziplock bag with a rolling pin or in a food processor).
- Gently fold the crushed Butterfingers into the creamy mixture — save some for garnish!
🔹 Step 3: Assemble the Pie
- Spoon the Butterfinger mixture into the graham cracker crust and smooth the top with a spatula.
- Sprinkle the remaining Butterfinger crumbles over the top for a crispy finish.
🔹 Step 4: Chill and Serve
- Cover and chill in the refrigerator for at least 4 hours, or overnight for best results.
- Slice and serve cold, optionally topped with more whipped cream or a drizzle of chocolate sauce.
💡 Formation Tips
- Peanut Butter: Use creamy for a silky texture or chunky for added bite.
- Candy Bars: Freeze the Butterfingers for easier crushing.
- Toppings: Add a layer of chocolate ganache or drizzle caramel for next-level indulgence.
❤️ For the Lovers of This Pie
Butterfinger Pie is beloved by:
- Peanut Butter Fanatics who crave rich, nutty sweetness.
- Candy Bar Nostalgics remembering Halloween hauls and lunchbox surprises.
- Busy Bakers who love a fast, foolproof dessert.
- Chocolate Lovers who can’t resist the mix of cocoa and crunch.
- Kids & Adults Alike — it’s a hit at any age!
📝 Conclusion
Butterfinger Pie isn’t just dessert — it’s a celebration of simplicity, nostalgia, and pure indulgence. Whether you’re making it for a gathering, a birthday, or just to satisfy your sweet tooth, this no-bake beauty never disappoints. It brings joy to candy lovers, peanut butter fans, and pie people in one creamy-crunchy bite.
Serve it cold, serve it often, and most of all — don’t forget to grab a second slice before it’s gone!
Would you like a chocolate crust version, or maybe a mini-pie batch for parties next?